
Blossom-End Rot on Greenhouse Tomatoes: Why More Fertilizer May Not Help
Greenhouse tomato troubleshooting
A dark, sunken patch on the bottom of a greenhouse tomato is easy to read as a shortage in the soil. But blossom-end rot often develops because calcium does not reach rapidly growing fruit consistently, even when the root zone contains enough. Water swings, stressed roots, high salt levels, and fast growth can all be involved. That is why adding fertilizer—or spraying calcium on every affected plant—can miss the cause. Diagnose the mark first, then check moisture and root conditions before changing the nutrient program.

Greenhouse planning note 1
Recognizing blossom-end rot
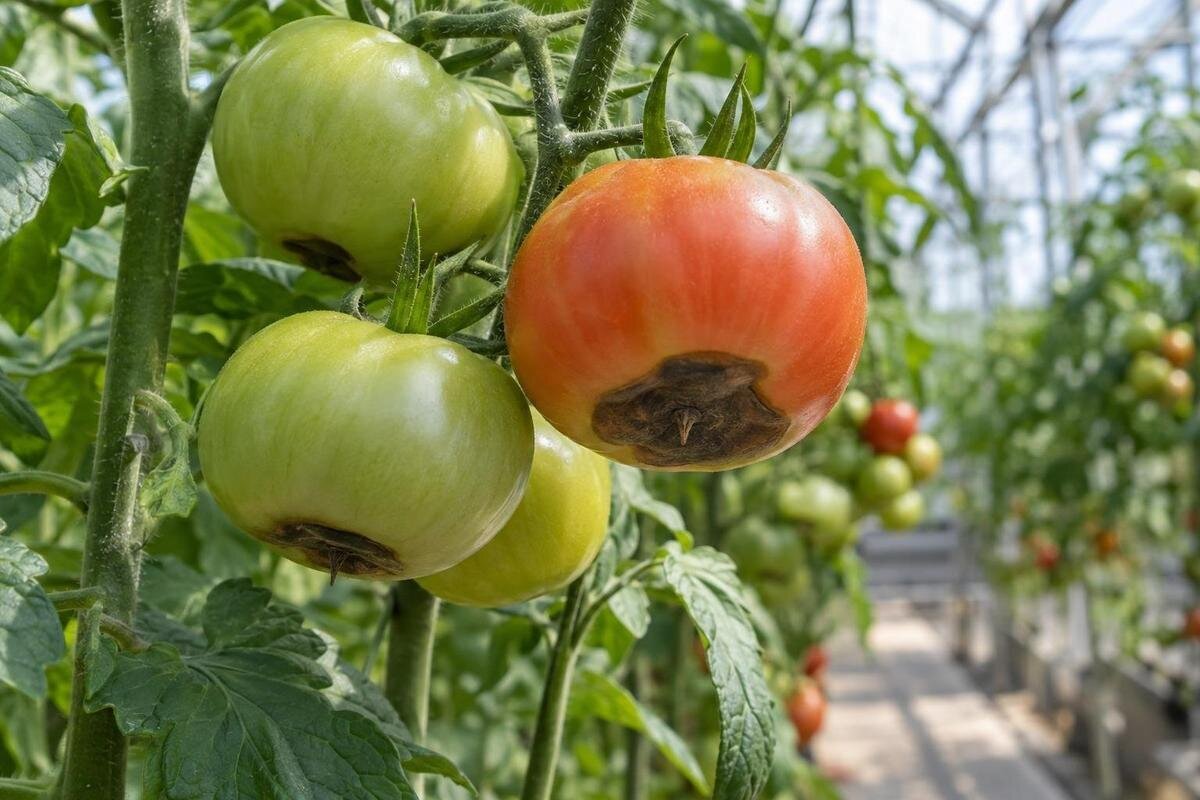
Blossom-end rot typically starts at the blossom end—the end opposite the stem scar—as a small, water-soaked mark. It may enlarge into a tan, brown, or nearly black patch that is flat to sunken and leathery. The damaged area often dries as the fruit grows, though it may crack or soften if other organisms colonize it. The spot can appear on green fruit, well before harvest color; waiting for ripening will not restore the affected tissue. In early stages, discoloration may be subtle, so inspect the fruit’s blossom end rather than judging from a distant glance.
Location helps, but it is not a laboratory diagnosis. A roughly circular lesion centered at the blossom end fits the familiar pattern better than a pale patch on an exposed shoulder, scattered dots, or a ringed wound elsewhere. One tomato can be affected while neighboring fruit remain normal because they differ in age and growth rate; several affected fruit are also possible. Blossom-end rot is a physiological disorder, not an infection that jumps between tomatoes. Secondary fungi or bacteria may grow on dead tissue, so later mold does not prove infection caused the original mark. A single close-up cannot confirm the cause.
Why calcium may not reach the fruit
Developing tomatoes need calcium for normal cell development, but calcium in the growing medium is only part of the picture. Water movement through the plant helps deliver it to growing tissues. The Royal Horticultural Society explains that fruit competes less effectively than leaves for calcium, so an adequate supply around the roots does not necessarily prevent a local shortage within the fruit. Calcium applied to leaves also moves poorly from those leaves into fruit. The lesion reflects a shortage in the affected tissue during development; it does not reveal how much calcium was present in the bed or pot.
This separates supply from transport. A calcium shortage in the growing medium is possible, but the RHS notes that it is uncommon. Irregular moisture can interrupt delivery, while concentrated fertilizer in soil water can restrict water uptake. Very high humidity can also limit uptake, so a damp greenhouse is not proof that the fruit receives enough calcium. Several pressures may overlap, and finding one plausible factor is not a complete diagnosis. A soil or growing-media test provides information about the sampled material, but it cannot reconstruct how much calcium reached a particular fruit while that fruit was developing.
Greenhouse planning note 2
Check watering patterns at the root zone
Greenhouse tomatoes depend on a reasonably steady root-zone water supply, not simply frequent watering. A plant that alternates between very dry conditions and a heavy soak does not have a consistent supply just because its daily watering total looks adequate. Check for standing water as well as dryness rather than assuming that adding more water is always the answer. Under cover, rainfall may not reach the bed, and containers can require close attention during warm weather. Surface appearance alone can mislead: a dry-looking top does not tell you how moist the medium is farther down. Check several places within the planted root zone.
Compare moisture at several plants and along the row, then note how the growing medium feels between waterings and after irrigation. If you use drip lines, confirm that each plant receives water rather than relying only on a timer. Compare outlet delivery over the same interval, and check for blocked outlets or water escaping outside the planted area. A timer records duration, not the moisture available to roots. Aim for reasonably even moisture with good drainage. When comparing a structure such as the Pyramid-type greenhouse, sketch the proposed beds and water routes before choosing a size. Include access to the farthest plants and room to inspect irrigation connections without stepping into beds. That planning makes uneven delivery easier to notice and correct; the structure itself does not establish a watering schedule.
Inspect the roots, drainage, and growing medium
Inspect the growing medium as well as the watering equipment. Look for standing water, compacted areas, damaged containers, or roots exposed by displaced soil. In containers, note the available growing space and whether drainage openings are blocked. Restricted root space makes consistent watering more difficult, and the RHS identifies plants in pots or growing bags as particularly vulnerable to irregular water supply. Repeated feeding is another detail worth recording because concentrated nutrients can restrict water uptake. None of these observations confirms the cause of a fruit lesion on its own; use them to guide a closer review of the affected bed or container.
Note whether water pools, drains slowly, or runs through one area faster than another. Record any wilting despite moist soil, and see whether affected plants share a bed, container type, or watering line. There is no need to pull up a healthy plant just to inspect its roots; use visible clues or examine a plant already being removed. For containers, check that drainage openings remain unobstructed and that runoff is not trapped beneath the pot. During layout planning, compare the greenhouse with built-in storage with your proposed growing area, allowing separate space for storage, containers, and walkways. Keep drainage points accessible rather than hiding them behind equipment. A layout that lets you observe runoff and reach individual containers makes root-zone troubleshooting more practical, regardless of which structure you choose.

Greenhouse planning note 3
Why more fertilizer can make things worse
Extra fertilizer is not a targeted treatment for a calcium-delivery problem. The RHS warns that concentrated nutrients around roots can restrict water uptake, especially when fertilizer is applied to dry soil. It also identifies ammonium salts as fertilizer ingredients that compete with calcium uptake. Foliar calcium nitrate is not a reliable rescue treatment: calcium moves poorly from leaves into fruit, and the nitrate can encourage lush growth that leaves less calcium available to fruit. These points do not establish that fertilizer caused your particular case. Review the product, application rate, and moisture conditions before adding another treatment.
If symptoms recur, test in-ground soil or container media with a method suited to that material. Ask the laboratory which measurements would help evaluate your fertilizer program, including calcium, pH, and soluble salts, and follow its sampling instructions. Keep samples from unlike growing areas separate; mixing a problem container with a healthy bed can obscure differences. Include fertilizer names, application rates, and available irrigation-water information when seeking advice. Ask for a recommendation tied to the results rather than choosing a calcium amendment from the fruit's appearance alone. If you are budgeting for a Prestige greenhouse, allow separately for testing and crop monitoring rather than treating the structure purchase as the whole growing setup. Keep previous test reports so that later results can be compared with the same growing area. A useful recommendation should explain what needs correction and how to assess the response.
Separate blossom-end rot from lookalike damage
Begin the comparison with the location and form of the damage rather than trying to name every possible disorder. A sunken brown or black patch centered at the blossom end matches the pattern described by the RHS. A pale shoulder patch, scattered spots, a wound near the stem, or an open split does not match that description as closely and deserves separate assessment. These differences do not establish an alternative diagnosis. Check several fruit, note whether the marks appeared before or during ripening, and record whether the tissue is dry, firm, soft, or leaking. Later decay can obscure the original mark, making early observations especially useful.
Photograph the whole fruit, its blossom end, its stem end, and a close view of the lesion. Include healthy and affected fruit at similar stages if possible. Compare them with diagnostic photographs from a university extension service or plant clinic, looking at lesion location and texture as well as color. A similar-looking photo is a clue, not proof: fruit age, decay, and overlapping problems can change the appearance. If several lesion types occur together, or leaves and stems are affected too, seek a diagnostic opinion. When considering a large backyard greenhouse, plan paths that let you inspect fruit throughout the crop, not just along the outer rows. Difficult access can leave damage unnoticed until decay obscures the original symptoms. Photographs taken early are more useful than images showing only the final rotted fruit.
Greenhouse planning note 4
Greenhouse heat, humidity, and airflow
Temperature and humidity both affect water demand and transpiration. On sunny days a greenhouse can warm quickly and plants may draw more water; at high relative humidity, transpiration can slow. Very dry air may increase water loss from foliage, but that does not mean more calcium reaches fruit, since leaves can compete for the water stream. A single reading—or opening a door after symptoms appear—cannot show the conditions that prevailed while the fruit was developing. No one humidity reading proves the cause of blossom-end rot.
Measure conditions near the tomato canopy at different times, and look for recurring hot, still, humid, or very dry periods in the affected area. Keep a sensor out of direct sun and follow its placement instructions so that a heated sensor does not misrepresent air temperature. Record when vents or doors are open alongside the readings. Adjust general ventilation and watering in response to observed conditions rather than assuming maximum airflow is always better; outside air and crop density matter. If comparing a classic aluminum greenhouse, verify the available ventilation options and how they would be operated during your normal routine. Also consider whether you can reach the controls as the crop grows. These are practical planning questions, not evidence that a particular ventilation arrangement will prevent blossom-end rot.
Use a crop record to look for patterns
A brief record can turn a vague problem into something testable. Note the cultivar, bed or container, watering method and dates, fertilizer inputs, fruit age, and which cluster first showed damage. Mark affected plants on a simple map, and record whether newly developing fruit are affected after conditions change. Compare plants in different rows or containers and healthy fruit on the same plant. A repeated pattern along one irrigation line may point to uneven delivery; symptoms across beds may prompt a wider review. Neither pattern, by itself, proves the cause.
Photograph a lesion before it changes, then take a wider image showing the whole plant and its growing location. A ruler beside the spot can show its size without obscuring it. Use consistent plant labels so that later images can be matched to the same plant and cluster. Record the date you first noticed damage separately from the date of a watering change; the conditions that affected the fruit may have occurred earlier. Check root-zone moisture and greenhouse readings when you log watering rather than relying on memory. For a crop in a lean-to greenhouse, mark the wall side, outer side, doorway, and irrigation route on your crop map. Those location labels help you compare observations without assuming that the structure type predicts the conditions at every plant.

Greenhouse planning note 5
What to change for fruit that is still developing
Fruit already marked will not return to normal if moisture or nutrient conditions improve; judge any correction by later fruit, not the old lesion. Do not add fertilizer solely because one tomato has a dark bottom, and avoid removing healthy foliage to expose fruit, since exposed fruit can develop other damage. If a damaged tomato is softening or molding, photograph it first if you need help identifying the problem, then remove it as routine crop cleanup. The plant may produce healthy fruit after conditions stabilize, but recovery is not guaranteed.
Where practical, change one well-supported factor at a time: make root-zone moisture more consistent, correct a drainage problem, or adjust a confirmed nutrient issue according to test guidance. Do not delay correcting an obvious irrigation failure merely to preserve a comparison. Record what changed and when, and assess fruit that developed afterward rather than expecting an existing lesion to shrink. Avoid stacking calcium, potassium, and general-purpose fertilizers together. If you are considering the limited-edition aluminum greenhouse as part of a future setup, first identify which practical limitation you need to address, such as inaccessible watering lines or insufficient room around containers. Compare the proposed layout with that need. A different structure cannot undo damaged fruit, and a new planting will still require suitable moisture, drainage, and nutrient management.
When to ask for a second diagnosis
Seek additional diagnosis if spots appear at different ends of the fruit, lesions spread across plants, leaves or stems are affected, or plants wilt despite moist soil. Also ask for help if new fruit continue to develop symptoms after you have corrected a confirmed root-zone issue. These signs do not identify a pathogen, but they make a photo-only guess less reliable. A local Cooperative Extension office, university plant clinic, or qualified horticulture professional can help compare blossom-end rot with infectious fruit rots and advise whether testing is appropriate.
Bring a clear whole-plant image, close-ups of affected fruit from more than one angle, pictures of similar healthy fruit, and notes on cultivar, watering, and recent fertilizer. If a clinic requests a sample, follow its collection instructions rather than sending an unprepared one. Ask what plant material it needs and how to package and deliver it while it remains useful for examination. Include soil or growing-media test results, noting the sampling date and the area represented. A simple crop-location sketch can also help explain whether symptoms are isolated or widespread. If you are reviewing the T-model greenhouse for a future crop, keep questions about its dimensions and layout separate from the diagnostic request. The clinic needs evidence from the affected plants and their growing conditions, not a proposed replacement model.
Frequently asked questions
Does blossom-end rot mean the soil is low in calcium?
Not necessarily. Calcium may be present in the soil or growing medium but fail to reach developing fruit consistently. Irregular moisture, concentrated fertilizer, and very high humidity can interfere with water uptake or calcium delivery. A soil or growing-media test can help evaluate nutrient supply, but the fruit lesion alone cannot establish a shortage.
Will adding calcium fertilizer stop blossom-end rot?
Adding calcium is not a reliable way to stop blossom-end rot when the problem is uneven water supply or disrupted calcium delivery. A test and its interpretation can help determine whether a nutrient correction is warranted. Do not expect fertilizer or a foliar calcium spray to repair fruit that is already damaged.
Can blossom-end rot spread from one tomato to another?
Blossom-end rot is a physiological disorder, not an infectious disease that spreads between fruit. Other organisms may grow on damaged tissue later, however, and similar-looking fruit spots can have different causes.
Why can blossom-end rot happen in a greenhouse?
A greenhouse can have dry and wet pockets, fast changes in root-zone moisture, or periods of heat and high humidity. These conditions can affect water uptake and calcium movement into fruit. The greenhouse setting alone does not identify the cause, so check the plants and growing medium.
Can a tomato with blossom-end rot recover?
The damaged tissue will not become sound again. Correcting a confirmed water or root-zone problem may help later fruit develop normally, but it cannot guarantee a healthy crop. Use newly developing fruit to judge whether conditions have improved.
The important distinction is between calcium in the growing medium and calcium reaching a developing fruit. A dark spot at the blossom end cannot tell you which factor is responsible. Confirm the lesion’s location, check moisture and root health, and use a test before supplementing. The damage already present is permanent; later fruit provide a better indication of whether changes to watering or a confirmed nutrient problem have helped.
