
Mulching Greenhouse Beds: Materials, Moisture, and Slug Risks
Greenhouse growing guide
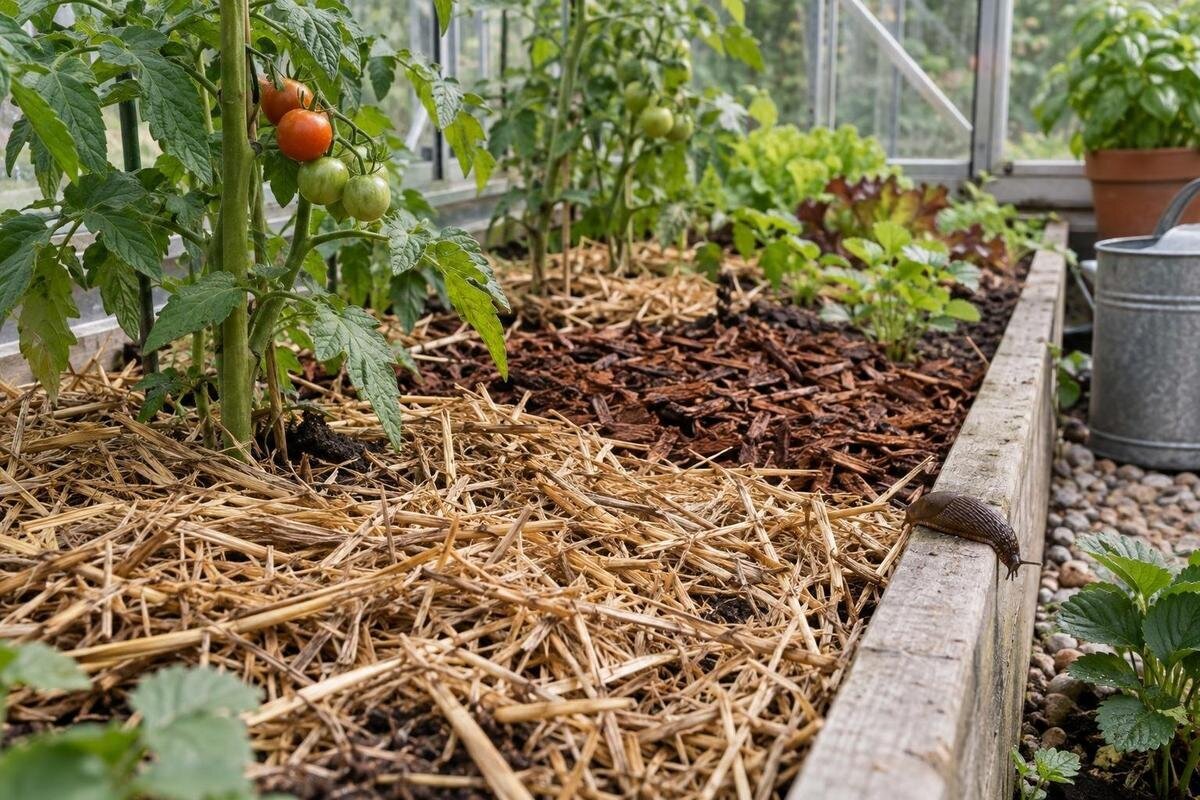
Mulch can make greenhouse watering steadier, but it also changes what the soil surface tells you. A roof blocks much of the rain, while sunlight, ventilation, crop growth, and irrigation continue to affect how quickly beds dry. A cover that slows evaporation can keep the root zone moist longer than expected, and organic material can create sheltered spots where slugs hide. Plastic and fabric raise different questions about water entry and soil temperature. Choose mulch by the crop, planting method, irrigation setup, and how easily you can inspect beneath it.

Before you choose a greenhouse 1
How mulch changes moisture in a greenhouse bed
Mulch is a surface cover; it does not create a stable moisture level by itself. Under a greenhouse roof, direct rain often misses the beds, so irrigation is usually the main water input. A layer shades the soil and slows evaporation, but sun, ventilation, crop growth, and bed texture still affect how quickly roots use water. A dry-looking mulch surface may cover damp soil, while a damp layer does not prove that the root zone is wet enough. Treat mulch as one change to the bed’s water balance, not as a reason to stop checking soil or adjusting irrigation.
Separate the greenhouse floor area from the actual bed surface when planning. Paths, the entrance, and supply storage occupy space that should not be included in a mulch estimate. The Lean-To Greenhouse is listed in sizes from 40 to 154 sq ft; use Lean-To Greenhouse size options as an initial comparison, then obtain the dimensions for the option you are considering. Sketch the bed boundaries within that footprint. Also note which beds receive the most sun and which remain shaded by plants or nearby structures. These differences can affect drying even when every bed has the same mulch. Rather than treating the entire greenhouse as one watering zone, choose a few representative places to monitor. Include an exposed bed edge and a spot beneath mature foliage so your checks reflect the range of conditions under the roof.
Match the mulch to the crop and planting method
The same layer can help at one stage and obstruct another. Seeds need contact with prepared soil and space to emerge, so keep coarse material off a row before direct sowing. Transplants allow more of the surrounding surface to be covered, provided their bases remain clear. As plants grow, their foliage shades more of the soil, and mulch that dried readily early in the season may stay damp longer beneath a full canopy. Timing also matters in a cool bed: covering the surface changes its exposure to sunlight and can affect warming. Before mulching a temperature-sensitive crop, check conditions in the soil rather than relying on warm greenhouse air. Use crop-specific guidance to decide when to apply the cover.
Draw separate planting areas for direct-sown crops and established transplants instead of assuming every bed needs continuous coverage. A bed used for successive sowings needs a practical way to clear each new row without burying nearby seedlings. Loose mulch can be moved aside, while a sheet with fixed planting holes may be less convenient when spacing changes. Consider the mature crop as well: leaves and supports should not block the strip you need to uncover for the next sowing. When comparing aluminum Limited Edition greenhouse options, use your planting plan to assess the footprint rather than judging by crop count alone. Mark where you will stand to sow, thin, and harvest each row. This helps you choose between a removable surface layer and a more fixed cover before committing to the material, while leaving room for changes between crops.
Before you choose a greenhouse 2
Organic mulches differ in breakdown and cleanliness
Straw, leaves, compost, and woody materials behave differently under a greenhouse roof. Use a known, clean source of straw; hay can contain seeds, and material from an uncertain source may bring unwanted contaminants. Dry leaves are lightweight and can be shredded for more even coverage, but a thick layer may mat when it becomes wet. Remove visibly diseased or contaminated plant debris rather than using it as mulch. Organic layers break down at different rates, so the amount of settling and the need to refresh them will vary.
Mature compost contributes nutrients as well as cover, so it is not a neutral substitute for straw or leaves. Account for compost additions when reviewing the bed’s fertility rather than treating each top-up as maintenance with no effect on nutrient inputs. Coarse wood chips break down more slowly; keep them on the surface rather than mixing fresh material into the root zone, where decomposition can temporarily tie up nitrogen. For purchased materials, ask about their ingredients and intended use, especially if the source or treatment history is unclear. Store unused organic mulch dry, off wet ground, and where spills can be cleaned up. If dedicated storage is part of your purchase, compare the greenhouse model with built-in storage and verify the storage dimensions. Plan for the actual bags or containers you use, with enough access to inspect them and rotate older material first.
Plastic and fabric covers need a watering plan
Solid plastic film and woven landscape fabric can limit evaporation and block light at the soil surface, but water does not pass through every product in the same way. Read the material directions before deciding where irrigation lines should go. With a water-resistant film, water may need to reach the soil through planting openings or from a line placed beneath the cover. Some fabrics allow water through, but that should be confirmed for the particular product rather than assumed. Keep access to the edges so you can check for water pooling or pests hiding beneath them.
A cover can also affect soil temperature, but the result depends on its color, contact with the soil, season, and growing conditions. Do not assume that one film will always warm or cool a greenhouse bed predictably. Before covering an entire bed, compare soil conditions beneath a small trial area with an uncovered area under similar exposure. Consider removal as well as installation: planting holes, crop supports, and irrigation connections can make a sheet difficult to lift at crop turnover. When reviewing Classic aluminum greenhouse options, sketch the space needed to handle and remove bed covers without dragging them through adjacent plants. For roll goods, measure both bed width and the extra material required by the manufacturer’s securing method. Greenhouse square footage cannot tell you which roll width will fit, and an awkward seam may complicate watering or later removal.

Before you choose a greenhouse 3
Check moisture below the mulch
Do not judge watering needs from the appearance of the mulch alone. Move a small patch aside and check the soil where the crop’s roots are growing, at several representative points in the bed. A probe or other consistent method can help you compare one area with another, but follow the tool’s instructions and pay attention to the soil itself. Check again after a usual watering cycle to confirm that water is reaching the root zone. If one area stays wetter than the rest, inspect that area’s irrigation and drainage rather than changing the whole bed at once.
Plan access to hoses, emitters, and planting openings before covering the bed. A hidden line can develop a problem that is difficult to locate, so mark its route on your bed sketch and leave connections accessible. Check moisture both near an outlet and between outlets; a wet spot beside an emitter does not show how evenly water spreads through the bed. After adding mulch, compare conditions over several normal watering cycles before making a large schedule change. Record whether the soil stays damp longer, whether dry pockets persist, and whether water collects at an edge. If you are also comparing Prestige Greenhouse models, include the irrigation supply route and maintenance access in your layout. This is a space-planning exercise, not evidence that a particular greenhouse comes with irrigation equipment. Confirm any equipment or installation provisions separately before including them in your purchase plan.
Why mulch can shelter greenhouse slugs
Slugs seek cool, damp shelter, and a thick or undisturbed mulch layer can provide hiding places even when the greenhouse bed looks dry on top. Damp gaps can also form around bed edges, under pots, or near irrigation leaks. Mulch does not guarantee a slug problem, and removing it is not always necessary, but it can make pests less visible. Risk depends on how wet the material stays and how easily you can inspect beneath it, not simply on whether the material is organic.
Look beneath a small section of mulch and along bed edges when seedlings show damage or the bed has stayed damp. Evening inspection with a flashlight can reveal slugs that remain hidden during the day. Ragged holes alone do not identify the pest, so look for slugs or slime trails before attributing every damaged leaf to them. Check nearby pots, loose covers, and irrigation leaks as possible sources of shelter, and remove dense, wet clumps where inspection is difficult. When reviewing T-Model Greenhouse options, map a continuous inspection route around your planned growing areas rather than relying on total floor area. Make sure you can lift a cover edge without stepping into the bed or moving a heavy container. If damage continues, identify the pest and seek appropriate local extension guidance; changing mulch alone may not address a population sheltering elsewhere.
Before you choose a greenhouse 4
Apply mulch without covering stems or seed rows
There is no universal layer depth for every crop and material. A loose layer of straw covers differently from shredded leaves, compost, or film, and a thickness that works around established plants may obstruct newly sown seeds. Follow crop-specific and material guidance, then apply an even layer to the soil you intend to cover. Keep stems, crowns, and seed rows clear rather than piling material against plant bases. If seedlings are small, leave enough open soil for them to emerge and for you to see whether they need attention.
Lay organic mulch over soil that is evenly moist, not bone dry or waterlogged, and avoid packing it tightly. After watering, check that moisture has reached the soil under the layer and that irrigation outlets remain accessible. With sheet materials, settle the placement and water route before planting so you do not have to disturb roots later. Add more only when settling or decomposition leaves bare patches; routinely stacking fresh layers can make it harder to judge moisture and inspect the bed.
Estimate mulch volume from bed measurements
Measure the length and width of each bed, then calculate its surface area. To estimate volume in cubic feet, multiply the bed area in square feet by the chosen depth in inches and divide by 12. For example, a 4-by-12-foot bed has 48 sq ft of surface. If you were calculating for a 1.5-inch layer, multiplying 48 by 1.5 and dividing by 12 gives 6 cubic feet. That is an arithmetic example, not a recommended depth; choose the depth for the crop and material first.
Add the individual bed estimates and check whether the package gives volume or coverage at a stated depth. Coverage figures are comparable only when they use the same thickness. For an irregular bed, divide the shape into measurable rectangles and add their areas; subtract substantial unmulched spaces, but do not confuse the bed’s full soil depth with the surface layer you are buying. Loose straw may be sold by bale rather than by a dependable installed volume, so ask the supplier how its coverage estimate was determined. When using Pyramid greenhouse size listings for a new layout, calculate material from the drawn bed shapes, not the greenhouse area. Keep your measurements with the purchase record. At the first application, note how much material you actually used and how much it settled; that makes later replenishment estimates more useful than repeatedly starting from package claims.
Before you choose a greenhouse 5
Plan bed access before choosing a greenhouse
Sketch the beds and paths before committing to a mulching system or a greenhouse layout. Mark the entrance, the route for carrying supplies, the places where you will water, and the space needed to reach both sides of a bed. A narrow path can make it difficult to lift a mulch edge, spot slugs, or repair an irrigation line. Include any areas you will leave unmulched for direct sowing. The goal is a plan that lets you work with the chosen material without stepping on beds or losing access to their edges.
Include the handling space needed for your chosen material, not just room to walk between crops. Bagged mulch needs a place to set the bag down without covering seedlings; a roll of fabric needs room to unroll, align, and cut it. Mark where removed material will go during crop changes so it does not block the entrance or spread across clean beds. For a larger growing area, such as the options shown in the Large Backyard Greenhouse collection, consider dividing the work into accessible bed sections rather than one continuous covered surface. Confirm the dimensions and access arrangements of the specific model before buying. Then test your sketch against routine tasks: carrying a full bag, reaching the far edge, and taking out a used sheet. These practical movements can expose layout problems that a square-footage comparison misses.
Review the layer as crops and conditions change
Check the mulch after watering and as plants grow, not just when it is first applied. Look for patches that have shifted, compacted, stayed wet, or separated from the soil. Organic layers gradually break down, so refresh only where coverage is needed and where the crop can tolerate it. If a layer remains damp and makes slug checks difficult, thin it, pull it back, or remove it from the affected area. If the surface dries quickly, check the root zone and irrigation before assuming that more mulch is the only answer.
At a crop change, remove material that is visibly diseased or heavily contaminated and handle it according to appropriate local disposal guidance. Check reusable film or fabric for damage and make sure its water route will still work for the next planting. Note which material you used, where moisture tended to persist, and whether slugs were found beneath it. Those observations help you adjust the next layer for the actual greenhouse conditions, rather than repeating a thickness or material that did not suit the bed.
Frequently asked questions
Does mulch mean I can water less often in a greenhouse?
Possibly, but not automatically. Mulch can slow surface evaporation, while sunlight, ventilation, crop growth, and bed conditions still affect water use. Check the soil beneath the layer at root depth before changing your watering routine.
Is there a mulch that slugs will not use?
No mulch is guaranteed to be slug-proof. Slugs can hide in damp, sheltered gaps beneath organic layers and around the edges of covers. Choose a layer you can inspect, avoid leaving it excessively wet, and check beneath it regularly.
Can I mulch before direct-sowing seeds?
Keep the seed row clear unless crop-specific guidance says otherwise. Seeds need contact with the soil and space to emerge, and a coarse layer can obstruct small seedlings. Once plants are established, you can extend mulch toward the row if appropriate for the crop, while keeping stems and crowns clear.
How deep should greenhouse-bed mulch be?
There is no single depth for every crop and material. Follow suitable crop and material guidance, then keep the layer even and away from stems and crowns. Calculate the amount only after choosing a depth that fits the bed.
Can I use wood chips in greenhouse beds?
They may work as a surface layer if the material is clean and appropriate for the crop. Avoid mixing fresh woody material into the root zone, where decomposition can temporarily tie up nitrogen. Also consider whether the layer will make slug checks harder.
Mulching works best as an adjustable part of greenhouse bed care. Choose a clean material for the crop and irrigation setup, apply a manageable layer, and check moisture underneath rather than relying on surface appearance. Revisit the layer if it stays wet, mats down, hides slugs, or leaves soil exposed. The right choice is one you can inspect and maintain in the beds you actually have.
