
How to Prevent Greenhouse Seedlings From Becoming Root-Bound
Greenhouse growing guide
Root-bound seedlings are usually the result of a timing and capacity mismatch: roots keep growing while a plant waits for its bed, a larger container, or suitable weather. Preventing the problem is less about choosing the biggest pot and more about working backward from the planting date, estimating how long each crop will stay in a cell, and reserving room to pot up when needed. In a greenhouse, count usable bench space—not just floor area—and check root plugs before they become a dense coil.
Space-planning checklist 1
How to recognize a root-bound seedling
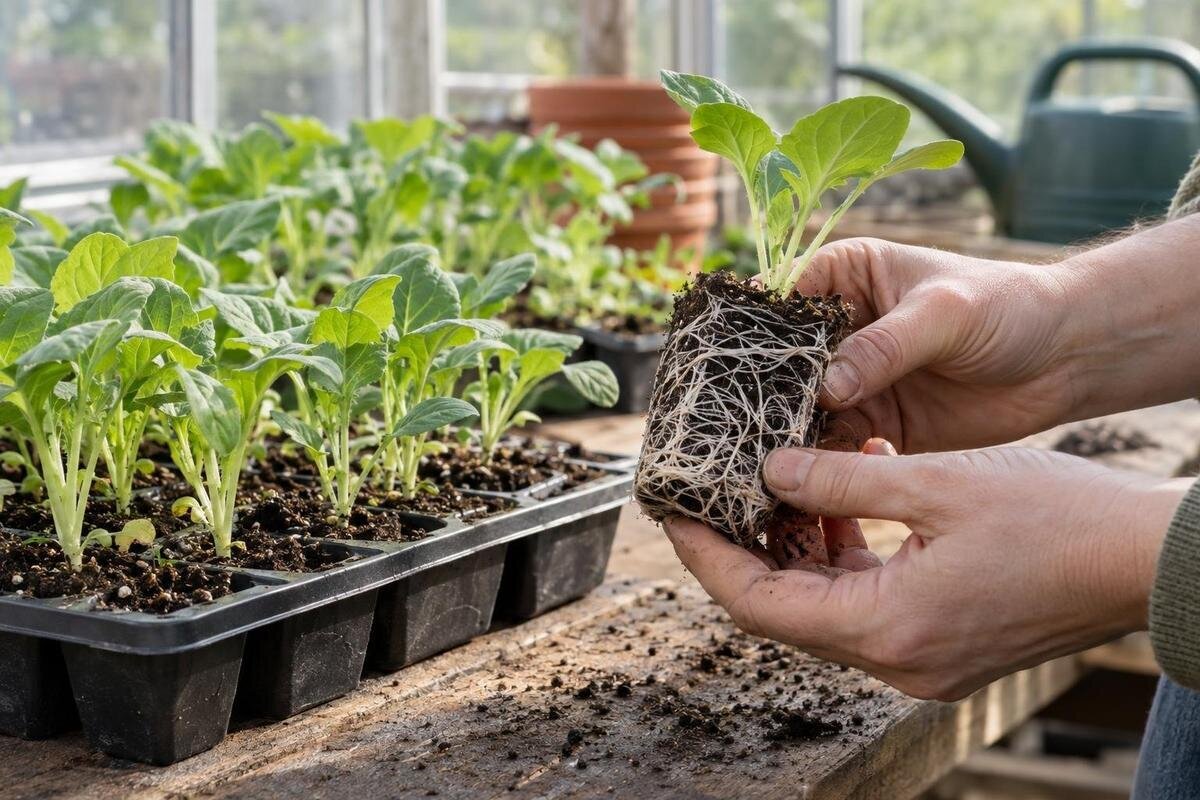
A seedling is root-bound when roots have filled the available cell and begun circling, matting together, or tracking tightly around its walls. A few pale roots at the sides or drainage holes are normal: they show that the plant is using the plug, not automatically that it has outgrown it. Slide out one representative plug and look at the whole root ball. A dense web with little mix showing, firm loops at the bottom, or roots packed against the sides are stronger signs that the seedling needs more room. Catching that stage before roots form a thick, tangled layer leaves more options for potting up.
Read the roots alongside top growth and watering rather than relying on one symptom. A seedling that stops making new leaves, wilts again soon after watering, or dries much faster than its neighbors may be short of root room, but heat, poor drainage, and dry mix can cause similar changes. Height alone is not a root-bound test: a tall, thin seedling may instead be responding to low light. Check a plant gently by supporting the plug, never by pulling the stem, and compare it with others in the same batch. A note about the root ball and time in its cell makes the next check more meaningful.
Plan backward from the planting date
Set a likely planting window before you sow. For an outdoor bed, use crop-specific guidance and local frost and soil conditions; for a final greenhouse bed, use its expected growing conditions rather than copying an outdoor calendar. Work backward through the time needed for germination, seedling growth, and any hardening off before outdoor planting. For crops that will stay under cover, do not count an outdoor hardening period they will not need; plan for the actual move to their final growing place. Check what a seed packet means by its timing: days to maturity are not always the number of days from sowing to a transplant-ready seedling. Keep the target flexible enough to accommodate slower germination or weather delays.
Then ask how much staging space the schedule requires. The T-Model Greenhouse Orangery listing gives a footprint range of 178 to 323 sq ft, but floor area is not the same as clear bench area for trays. Draw the bench and access space you can actually use, then choose a sowing window and allow for potting up crops whose planting dates may slip. Staggering sowings can be safer than starting every plant early just in case: early seedlings occupy cells longer and can become root-bound while still waiting for a bed. If timing is uncertain, sow a small follow-up batch rather than filling every available tray at once.
Space-planning checklist 2
Match cell size to time in the tray
Choose a cell by expected nursery time, crop vigor, and root behavior, not by the number of cells a tray holds. A small cell can work when seedlings will be moved promptly, but fast-growing crops or long waits need more root room from the outset or a planned pot-up. Check actual cell volume and depth: labels such as large or jumbo are not consistent across suppliers. Consider whether seedlings can be separated without tearing neighboring roots; individual cells can make that easier when plants need different pot-up dates. Do not choose the smallest option just to fit more starts if the planting date is still weeks away.
More mix is not automatically a better solution. A much larger pot uses extra bench space, and unused mix around a small root system can stay damp longer, so watering takes more care. The Pyramid-type greenhouse listing shows footprint options from 60 to 203 sq ft; those totals cannot determine the root volume a seedling needs. Pick a cell based on the crop's expected stay, then use actual tray dimensions to plan how many will fit. When the schedule is uncertain, a planned transfer to a larger pot is usually easier to manage than shifting every seedling into an oversized container at sowing.
Calculate nursery capacity before sowing
Calculate the peak number of trays before sowing, not just the initial tray count. Estimate how many seedlings you will keep after thinning, how many are likely to germinate in each batch, and which crops will overlap. Convert those numbers to tray footprints, then add room to reach the back row, water, label, and move trays. Include the temporary area needed immediately after potting up, when plants occupy more room, plus space for the next sowing. Keep a realistic surplus for germination losses, but decide in advance how many extras you will grow. If the numbers do not fit, reduce the batch, stagger sowing, or arrange another growing location before seedlings need it.
Use a map of surfaces and access paths rather than the greenhouse's total advertised area. The greenhouse with built-in storage listing shows versions from 59.4 to 302 sq ft; that is a floor-area range, not a count of tray positions. Mark usable benches, work areas, walkways, and places where trays can sit while you pot up. Leave enough room to remove one tray without lifting its neighbors; repeated shuffling can spill mix and make checks easier to miss. Map the busiest week of the propagation season, not just the tidy arrangement on sowing day. Recount if you add a crop or another batch.
Space-planning checklist 3
Check roots without disturbing every seedling
Set inspection intervals according to growth speed. A slow-growing batch may remain in its cells longer than a vigorous batch in bright, warm conditions, so a calendar reminder alone is not enough. At each check, gently remove a representative plug while supporting the mix. An edge cell may be easiest to reach, but compare it with a plant farther inside the tray if growth or drying differs across the batch. Look for roots holding the mix together and beginning to reach its edges. If they are already circling tightly or the plug is packed with roots, act promptly. Inspect again sooner as roots fill the cell rather than waiting for visible stress in every plant.
When comparing the 40.6 to 302 sq ft footprint options on the Prestige Greenhouse listing, include inspection access in your proposed bench layout. Keep tray labels facing the aisle, and leave room to lift a sample plug without reaching across other plants. A removable tray should have somewhere to rest while you examine it; balancing it on neighboring seedlings makes a simple check unnecessarily difficult. Check drainage holes too, but treat roots showing there as a cue to inspect the whole plug, not an automatic diagnosis. If seedlings in one tray differ noticeably in size, inspect both larger and smaller plants before deciding whether the entire batch needs potting up.
Pot up before roots form tight loops
Pot up when roots are filling the plug and approaching the cell's limit, or when a planting delay means the seedling needs more time before moving to its final bed. Have the next container ready, with drainage and an appropriate potting mix. If the plug is dry and crumbly, moisten it so it stays together; ease the seedling out while supporting the root ball or a sturdy leaf, not by pulling its stem. Set it at the depth recommended for that crop, fill around it without packing the mix hard, and water enough to settle the mix before allowing excess to drain. Label the crop and pot-up date so the next check follows the batch rather than your memory.
Use a manageable increase in container size instead of jumping straight to a large final pot by default. Potting up buys time, but it does not stop growth or repair roots that have already become tightly distorted. After the move, provide crop-appropriate light and moisture, then check how quickly the new mix dries. For a larger nursery, the large backyard greenhouse listing gives footprint options from 506 to 753 sq ft. Plan the potting workflow within your proposed layout: incoming trays, empty pots and mix, a working surface, and a place for finished plants. Keeping those areas organized helps prevent newly potted batches from being squeezed back into the space their smaller cells occupied.
Space-planning checklist 4
Adjust the plan for each crop
Different roots call for different starting plans. Some quick-growing seedlings fill a small cell well before the expected planting window; slower crops may take longer aboveground yet still occupy a container for an extended period. Follow crop-specific sowing and transplant guidance rather than using one universal cell size or seedling age. Taproot crops such as carrots are commonly direct-sown because moving a young plant can damage or distort the developing root. If you raise one in a container, follow instructions for an appropriately deep cell and timely planting. Crops that dislike root disturbance are easier to move when started separately, so you can lift an intact plug instead of teasing roots apart from a shared tray.
Mark expected pot-up dates separately when growing several species; do not assume every row in a tray advances at the same pace. The Classic aluminum greenhouse listing spans 40.6 to 302.3 sq ft. To compare those footprints for your crop mix, group plants by their expected container sizes and nursery departure dates, then map the week when the most groups overlap. A tray of small, newly emerged seedlings and the same number of plants in individual pots have very different space requirements. Keep a crop that is ready to plant moving toward its bed rather than leaving it in its cell while a slower crop catches up. Schedule each batch by its own development.
Keep greenhouse conditions in view
Greenhouse conditions can change how quickly cells fill, so treat the sowing calendar as a guide and watch plant development. Warm, sunny spells can increase growth and water use; cool or dim stretches may slow it. A bright greenhouse can also heat up quickly, and trays close together may be harder to monitor. Keep seedlings in crop-appropriate light, spacing, moisture, and temperature; check conditions where trays sit rather than relying on the weather outside. Water when the growing mix needs it and make sure excess can drain. Repeated wilting and saturated mix are both reasons to investigate, not automatic signals to add fertilizer or move every plant into a larger pot.
The Lean-To Greenhouse listing shows footprints from 40 to 154 sq ft. When planning tray placement within one of those layouts, account for neighboring plants, access for watering, and any shade from the surroundings. The footprint range does not establish light levels or airflow at bench height; assess those conditions at the intended location. Avoid arrangements where taller seedlings shade shorter batches or where tightly packed trays prevent you from checking the mix. If one section warms or dries faster than another, adjust watering and root-inspection intervals for the plants there. Comparing batches of the same crop in different positions can help reveal a location-related problem before you change container sizes unnecessarily.

Space-planning checklist 5
Allow room for hardening off and delays
Build a delay into the plan without deliberately holding every crop back. A bed may not be ready on the preferred date, and outdoor conditions may postpone planting even when seedlings look ready. For plants destined for outside, include a gradual hardening-off period before planting; do not treat that time as extra safe time in a cramped cell. If a delay is likely, pot up before roots become tightly coiled or stagger the next sowing. A crop moving from a greenhouse to a different protected area also needs to adjust to the new conditions. Follow crop-specific guidance for weather and transplant readiness rather than assuming every seedling can move on the same date.
Make room for the handoff as well as propagation. The Aluminum Limited Edition greenhouse listing gives a footprint range of 40.6 to 302 sq ft; that number is not a measure of outdoor hardening space or a clear route for carrying trays. Plan where plants can be staged and brought back as conditions change, without blocking the workbench or leaving containers exposed longer than intended. If you lack a separate staging surface, reduce the number of starts in a batch or time sowings so older plants leave before the next group expands. The calendar should reflect the space you can provide during hardening, not only the date you hope to plant.
Recover crowded seedlings and refine next year's plan
If a plug is only beginning to fill, move the plant to a larger cell or its final bed when conditions and crop stage are suitable. If roots have started to loop, moisten the plug and handle it gently; ease an outer root only if it separates without force. Do not pull a tangled root ball apart or assume every crop benefits from root teasing. A suitable pot-up can give a seedling more room, but it cannot guarantee that a severely bound or damaged root system will recover fully. When the final location is ready, prompt transplanting may avoid another wait. Follow the crop's planting-depth and handling guidance for the move.
Use each season to refine the schedule. Record the crop and variety, sowing and germination dates, cell and pot sizes, root-check and pot-up dates, and the day plants reached their beds. Note why any batch waited—weather, bed preparation, slow growth, or not enough bench space—and how full the nursery was at that point. Next year, adjust sowing time, batch size, or initial cell volume where the record shows roots filled containers too early. A dated photo of a representative plug can make comparisons easier. This turns root-bound seedlings from a recurring rescue problem into a scheduling signal you can act on.
Frequently asked questions
What are the earliest signs of a root-bound seedling?
Check the whole root plug. Roots beginning to reach the sides can be normal, but a dense mat, tight loops at the bottom, or little growing mix visible between roots suggest the plant is running out of room. Slower growth or unusually frequent drying can add context, but neither symptom proves the cause on its own.
How often should I check seedling roots?
There is no single interval that fits every crop or greenhouse. Check a representative plug regularly, then inspect sooner when roots are approaching the cell edges or growth is quick. Warm, bright conditions may change how quickly a batch fills its cells, so use what you observe as well as calendar reminders.
Will a larger pot prevent seedlings from becoming root-bound?
A larger container can give roots more room, but it does not fix sowing too early or a planting date that keeps slipping. Very large pots also take more bench space, and unused mix can stay damp longer. Choose a cell or pot to match the crop's expected time in the nursery, and plan to pot up if the wait extends.
Can I plant a root-bound seedling?
Often, if the seedling is at the right stage and the final bed is ready for that crop. Handle the root ball gently, and loosen an outer loop only if it separates easily; do not tear tangled roots apart to force the plant into place. A severely bound or damaged root system may not recover fully, so follow crop-specific transplant guidance.
Are roots coming out of a drainage hole a problem?
Not necessarily. A few roots may reach a drainage hole before the whole cell is full. Slide out a representative plug and look for tight circling, a dense root mat, or very little mix visible between the roots. Treat roots at the hole as a reason to inspect, not as a diagnosis by themselves.
Preventing root-bound seedlings starts with a realistic handoff date and enough room for each stage of growth. Match cell size to the expected nursery stay, check roots before they coil tightly, and pot up when a delay requires more space. Keep notes on the batches that filled their cells first; next season, adjust sowing dates or capacity instead of repeating an overcrowded schedule.
