
White Crust on Greenhouse Soil: Salts or Something Else?
Greenhouse soil guide
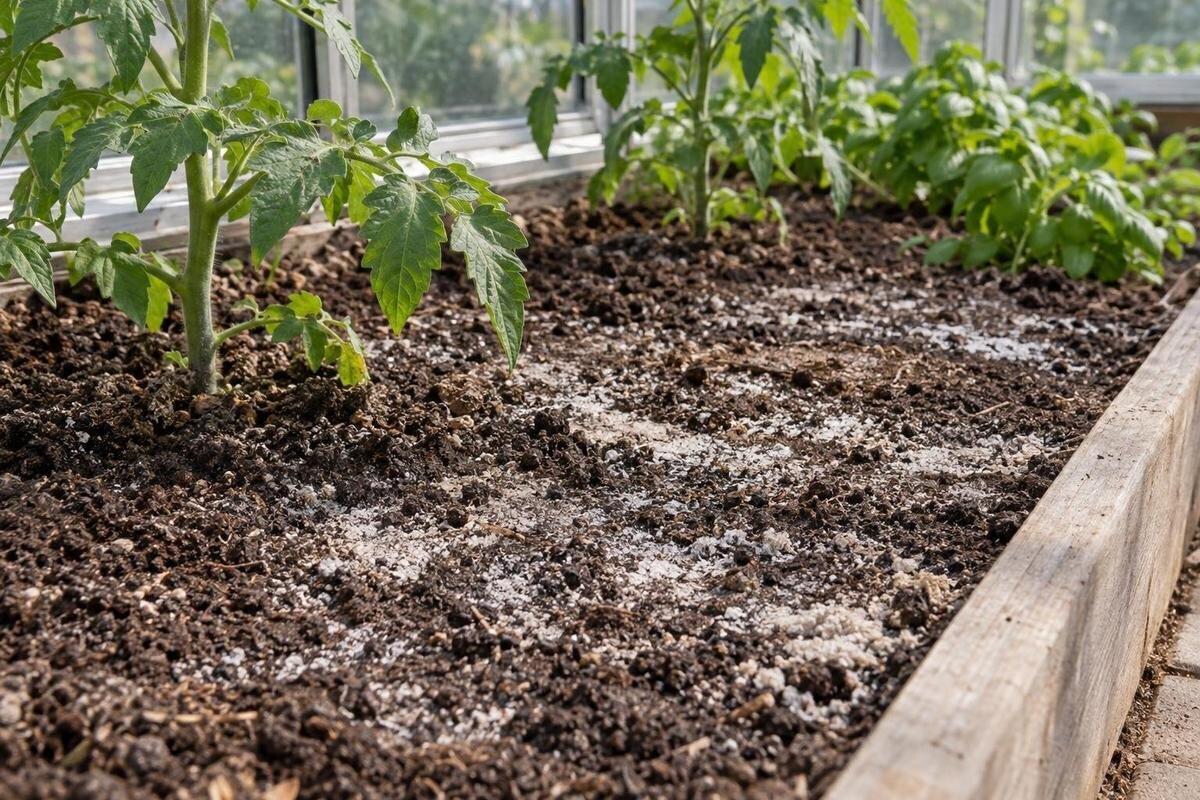
White crust on greenhouse soil may be fertilizer salts, minerals carried by irrigation water, fungal growth, or more than one cause at once. Appearance helps you decide what to investigate, but it is not a reliable test. Compare the water reaching the bed with a properly sampled growing medium before scraping, flushing, or adding amendments.

What can cause white deposits?
Treat the white material as an observation rather than a test result. Soluble salts may come from fertilizer, irrigation water, or an amendment; as water evaporates, dissolved ions can concentrate near the surface. Water can also leave pale mineral scale when some dissolved constituents precipitate. These categories overlap: mineral deposits and soluble salts are not entirely separate substances, but their solubility and significance for the root zone can differ. On damp, organic-rich media, a white threadlike layer may be fungal growth. More than one cause can occur in a single bed. Color alone cannot identify a particular ion, fertilizer, or organism, and a powdery appearance does not establish whether the deposit poses a problem for the crop.
Visible crust is not a dependable measure of what roots are experiencing. Salts can accumulate below the surface without forming a clear layer, while a thin deposit can form where evaporation is high even if the root-zone test is not elevated. Mineral scale may sit on soil that is otherwise acceptable. Plant symptoms, such as slow growth or scorched-looking leaf edges, also have multiple possible causes and cannot confirm salinity. Photograph the material before disturbing it, note whether it is wet, dry, fuzzy, or crystalline, and record the bed, crop, and date. Avoid scraping or flushing first, since that can remove useful evidence.
Map where it appears before disturbing it
Mark whether the deposit follows a bed edge, sits beneath an emitter, gathers around a plant, or appears across several beds. Note its position relative to wetting patterns, fertilizer placement, runoff paths, and the greenhouse wall. A crust near a drip line or at the edge of a damp patch can be left behind as water evaporates, but that pattern does not prove what the water contained. Differences in irrigation, surface drying, and growing medium can all affect where residue appears.
Compare the affected spot with areas that stay wetter or receive different irrigation, and note whether the material returns after routine watering. A scaled sketch is more useful than a general note such as “white soil.” Include fixed reference points so a photograph can be matched to the same spot later. When comparing footprints on the large backyard greenhouse page, distinguish the listed 506–753 sq ft of total floor area from the area actually planted. Paths, work areas, and containers should appear separately on your proposed plan. Draw affected patches within each bed rather than marking an entire greenhouse as affected. This helps you decide whether a later sample represents one localized deposit, a whole bed, or several areas that need separate investigation.
Reconstruct water and input history
Write down the water source, watering method, fertilizer products, and amendments used in the affected bed. Include recent changes, dates, and any feeding through an irrigation system. A deposit that appears after a change in water or fertilizer is a useful lead, not proof of cause. Note whether one crop or one bed is affected while nearby areas are not; separate inputs may explain the difference. If several products or sources changed at once, do not assume the most recent one is responsible without testing.
Also record how often the bed is watered and whether water drains away or remains near the surface. A covered bed receives little or no direct rainfall, so water movement depends largely on irrigation and drainage rather than rain-driven dilution. Record fertilizer concentration as well as frequency; “fed weekly” does not describe how much was applied. Include any change in the mixing procedure or injector setting, without assuming that it caused the deposit. If you are considering the Classic aluminum greenhouse, use the proposed layout to identify water outlets and where each irrigation line would run. Allow access to those points for collecting water samples and checking delivery. The useful comparison is between the inputs reaching individual beds, not simply between greenhouse models.
Test irrigation water separately
A growing-medium test cannot tell you the full chemistry of the water that reached it. Ask a testing lab which water analysis fits your concern and crops; electrical conductivity can indicate the overall presence of dissolved ions, while other tests may be needed to assess alkalinity, hardness, or particular ions. Explain whether you use municipal water, a well, collected rainwater, or a blend, and mention any treatment equipment. If fertilizer is added through irrigation, distinguish untreated source water from the solution delivered to the bed. Ask whether both should be sampled. Follow the lab’s directions for containers, collection, storage, and shipping rather than improvising with a bottle that held another substance. Label each sample with its source and collection date so the results can be interpreted correctly.
Hardness, alkalinity, pH, and salinity describe different aspects of water quality. A white deposit alone does not establish that the water is hard or salty, and a water pH reading does not replace an alkalinity test. Compare results from the water actually used on the affected bed, not from a different tap. For a proposed installation, the lean-to greenhouse options can be considered alongside a sketch of the available water sources and planned irrigation connections. Identify where source water could be sampled and where a separate sample of fertigated water would be collected. If a line serves several beds, note whether they receive the same mixture. This distinction helps prevent a clean source-water result from being mistaken for an assessment of every solution delivered to plants.

Sample each growing medium and bed correctly
Follow the testing lab’s instructions for sample depth, size, and handling; those details depend on the test and the medium. Collect a representative sample from the affected root zone, not just a pinch of the visible crust. If the deposit itself may be significant, collect some separately and ask whether the lab can assess it. A sample from an unaffected area can provide a useful comparison when it has the same crop, medium, and input history. Do not combine distinct beds or soil types just to make one larger sample.
Keep in-ground soil, raised-bed soil, potting mix, and other soilless media separate because the appropriate testing method may differ. Tell the lab what each medium contains, using the supplier’s description when available rather than guessing from its appearance. Record the container or bed depth and the sampled depth; they are not necessarily the same. Use a clean tool between areas and label samples before moving to another bed. When reviewing the limited-edition aluminum greenhouse range, sketch where permanent beds and removable containers would go, with enough access to sample both. Their boundaries matter more to the sampling plan than the building footprint. A mixed sample from a potting-mix container and an adjacent soil bed may conceal the difference you are trying to investigate.
Understanding EC, pH, and alkalinity results
Electrical conductivity, or EC, is used to assess dissolved ions in a water or growing-medium extract; it does not identify which ions are present. Results depend on the extraction method. A saturated-paste result, a diluted soil extract, and a pour-through test are not automatically comparable, so do not apply a threshold from one method to another. Ask the lab to state the method and interpret the result for the crop and medium being tested. There is no single useful cutoff for every greenhouse crop and growing system.
Soil pH is not a salinity measurement, and water alkalinity is not the same as water pH. A high EC result points to more soluble ions in the tested extract, but water and growing-medium results together help narrow their source. Keep the reported units and extraction method with each result, including when entering numbers into a spreadsheet. Check whether the lab’s interpretation applies to your crop and its growth stage rather than borrowing a threshold from another crop. For a layout based on the T-Model greenhouse orangery, assign bed numbers on the plan and use those same numbers on sample labels and reports. This creates a clear link between a result and its location, especially when several beds contain similar-looking media but have different feeding histories.
Distinguish possible fungal growth from mineral residue
Fine threads, a web-like film, or cottony patches on damp organic matter may indicate fungal growth rather than a crystalline deposit. Some surface fungi use decomposing organic material, so their presence does not by itself prove that roots are diseased. However, appearance alone cannot identify the organism or establish that it is harmless. Fungal growth and mineral deposits can occur in different parts of the same bed, or even close together, so do not assume that one observation explains every white patch.
Note whether the area stays damp, whether it is under plant debris or mulch, and whether the growth returns in the same place. Record plant condition separately: a white surface patch and declining plants may be related, but their timing alone does not establish a cause. For persistent patches or plant decline, ask a horticultural lab or local extension resource whether it needs photographs, plant material, growing medium, or a combination. A routine nutrient test will not identify a fungus. When considering the pyramid-type greenhouse models, include access to bed edges and spaces behind containers in your growing plan so those areas can be inspected. Avoid applying a fungicide or treating for salts solely because the surface is white; first establish what kind of investigation is appropriate.
Choose a correction only after confirming the cause
If a suitable test confirms elevated soluble salts, look for the source before changing inputs. Review the irrigation-water results, fertilizer history, amendment records, and drainage conditions with crop-specific guidance. Reducing an unnecessary input or changing the water source may be more relevant than removing the visible surface layer. Flushing is not a universal fix: its suitability depends on water quality, the crop, the medium, and whether excess water can drain away. Get advice before attempting it if the bed is poorly drained or the test results are unclear.
If testing points instead to mineral scale, ask how the water chemistry relates to the deposit before trying to change water or soil pH. Do not add lime, sulfur, or acid based only on the crust. If fungal growth is more likely, review persistent surface wetness and decomposing material rather than treating it as salt. If replacement media is recommended, measure the actual bed or container volume and verify that the replacement suits the crop. Replacing only the visible surface does not establish that deeper conditions have changed. Record what was removed, what was added, and when. Follow the agreed sampling interval afterward so the response can be evaluated without confusing an immediate disturbance with a lasting improvement.

Monitoring deposits and test results over time
Keep a simple record of each bed’s crop, irrigation source, fertilizer and amendment use, test method, and results. If you repeat an EC test, use the same sampling approach and method so changes can be compared meaningfully. Track whether a deposit returns and where it forms. These notes help distinguish a broad water-quality issue from a problem limited to one bed or input. They also reduce the chance of adding fertilizer to a bed that needs a water-quality investigation instead.
Keep product labels and mixing records with the bed log so you can reconstruct what was applied, including amendments sold under different names. Record quantities in consistent units and identify whether an entry describes a concentrate or the diluted solution. If you are comparing a greenhouse with built-in storage, check the selected floor plan for both growing space and the storage arrangement you need; the listing name alone does not establish usable storage dimensions. Decide where records, sampling supplies, and labeled inputs would be kept, following each product’s storage directions. Keep sampling tools and containers free from fertilizer residue. This practical organization makes later investigation easier: you can trace a change in the bed to a documented input rather than relying on memory or an unlabeled container.
What to do when clues and tests disagree
If the crust looks crystalline but the root-zone EC is not elevated, check whether the visible deposit was sampled separately and whether the lab used a method suited to the medium. A mineral film may not be represented by a root-zone sample. If the water test and soil test point in different directions, confirm that the tested water is the source used on that bed and that fertilizer was not added to only one sample. Mixed media, different depths, or samples taken after flushing can also make comparisons misleading.
Ask the lab to review sample labels, test methods, and crop information before acting on conflicting results. Retest where a specific uncertainty remains, such as whether a patch differs from the surrounding root zone, rather than applying several treatments at once. Decide what question the new sample should answer and keep other inputs documented during that comparison. If the investigation affects a future purchase, use the Prestige greenhouse listing to compare the proposed footprint with the growing system you intend to retain or replace. Map removable containers and permanent beds separately, since they differ in how easily media can be sampled or changed. Choose the layout around those practical needs; a new greenhouse structure will not, by itself, resolve the water or growing-medium problem identified by testing.
Frequently asked questions
Does a white crust always mean there are too many salts in the soil?
No. Soluble salts are one possibility, but irrigation water can leave mineral scale and damp organic matter can develop fungal growth. The pattern is a clue, not a diagnosis; test the water and the growing medium separately.
Can I tell salt from mold by looking at the deposit?
Crystals or a dry, granular layer may suggest mineral or salt deposits, while fine threads or cottony patches may suggest fungal growth. Neither appearance is conclusive, and both can occur in the same bed.
Is a high soil pH the same as high salinity?
No. pH describes acidity or alkalinity; electrical conductivity is used to assess soluble ions in an extract. A pH test cannot confirm or rule out salt buildup.
Should I flush the bed as soon as I see a crust?
Not without checking the water, growing medium, and drainage first. Flushing with unsuitable water or where drainage is poor can create other problems. Follow crop-specific advice if tests confirm elevated soluble salts.
What should I send to a soil-testing lab?
Ask the lab for its sampling instructions. You may need a root-zone sample from the affected area, a separate comparison sample, irrigation water, and the deposit collected separately. Label each sample with its bed, crop, and growing medium.
The clearest diagnosis comes from matching what the deposit looks like with the water that reached it and a representative sample from the root zone. If testing points to mineral scale or fungal growth, a salt remedy may be unnecessary; if soluble salts are elevated, the right response still depends on the crop, medium, water, and drainage. Keeping separate bed records turns a future white patch into something you can compare with a useful baseline.
