
Winterizing Greenhouse Water Pipes, Pumps, and Tanks
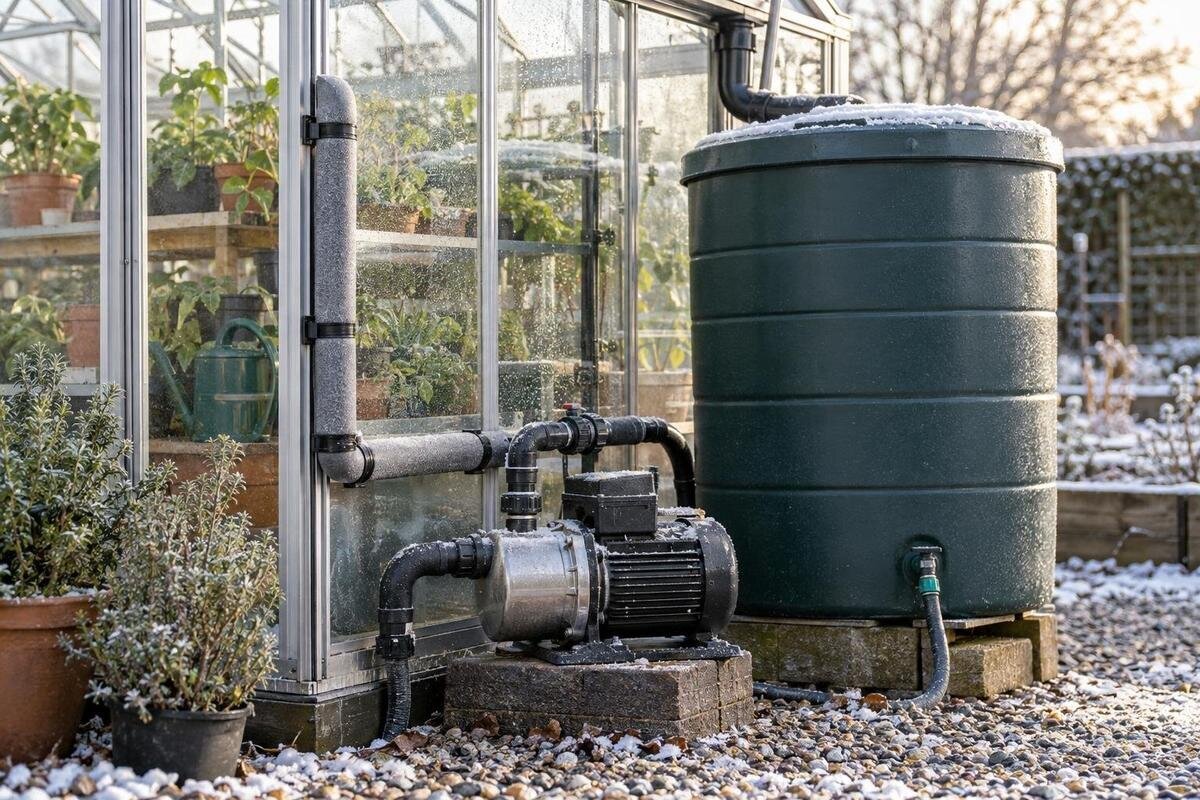
GREENHOUSE WATER SYSTEMS
Freezing weather can damage greenhouse water equipment even after the main supply valve is closed: water may remain in a low spot, pump housing, filter bowl, valve, or tank fitting. A reliable seasonal shutdown follows the water path and treats each water-holding component separately. This guide focuses on pipes, pumps, tanks, and irrigation hardware—not general greenhouse winter care—and explains when draining is not enough because part of the system must stay in service.

Map the system before the first freeze
Trace the system from its source to its last outlet: supply line, pump, pressure tank if present, filters, regulator, manifolds, zone valves, hoses, drip tubing, and tank inlet, outlet, and overflow. On a simple sketch, mark shutoffs, drain points, removable parts, and any section that sags or rises into a loop. Include bypasses, hose connections, and lines hidden behind benches; a side branch can hold water even when the main line empties. Note which pieces are indoors, outdoors, against glazing, or in an unheated space, since exposure may differ within one greenhouse. Mark whether each drain is reachable without moving a full tank or crossing a wet growing area. Label line ends and intended year-round branches so another person can tell what was drained and what remains live.
Schedule shutdown before freezing conditions are forecast for the most exposed components, rather than relying on a calendar date. Air inside a greenhouse can cool, and a line beside glazing, an exterior wall, a door, or an outside faucet may be colder than the growing area. Decide whether you are closing the system for the season or keeping some zones in service; those require different plans. Photograph control labels and leave the sketch by the shutoff. If you are also comparing structures, use the Lean-To Greenhouse as one option to review alongside your proposed water-system map. Check where the supply would enter and whether benches or stored equipment would block access to shutoffs and drains; do not assume the structure comes with plumbing.
Shut off the source and release pressure
Close the supply valve upstream of the greenhouse system and stop any automatic timer or controller from starting a cycle. If a tank fills from rainwater or another source, shut off or divert that inflow using its intended control; otherwise an emptied tank can refill. Identify separate feeds, including a hose connection or secondary fill line; one closed valve may not isolate everything. Follow the pump and controller manuals before disconnecting power, and never handle wet electrical connections. After isolating the source, release trapped pressure through an appropriate outlet before loosening a fitting. Do not use a threaded connection as a pressure-release point, and direct drained water away from walkways and electrical equipment. If irrigation shares a source with other plumbing, isolate its branch deliberately rather than changing unrelated connections.
Keep potable-water connections, backflow devices, and removable irrigation tubing distinct. Some assemblies protect a water supply and may hold water even when downstream lines are empty. Do not dismantle or alter them based on a generic diagram; follow manufacturer instructions and water-provider requirements, or have a qualified plumbing professional prepare them. If you are considering a Limited Edition greenhouse, include the proposed supply entry and isolation valve in your layout review. A shutoff that is easy to reach during summer may become awkward once hoses, pots, or other seasonal equipment are stored nearby. Tag the closed source valve so no one restores the supply by mistake during shutdown.
Drain pipes, hoses, and drip lines
With the supply isolated and pressure relieved, drain main lines, branches, hose bibs, quick-connects, and flexible tubing through the manufacturer's designated outlets. Open zone valves or end caps only as directed, then check for low spots and loops that retain a pool. A line that slopes on paper may sag when supports are far apart, so inspect its actual installed shape. Water can remain behind a check valve, at a closed tee, or inside a short rise even when a downstream hose looks empty. Work through branches separately and record which outlet drained; flow at one endpoint does not prove a side branch is empty. Recheck installed low points rather than relying on a dry-looking outlet alone.
Remove detachable hoses and drip lines if their instructions call for indoor storage; drain them as directed, keep fittings clean, and store them without tight kinks. Do not assume an emitter line empties just because its supply end is open: emitters, elbows, and uneven ground can retain pockets. Compressed-air blowout is not a universal shortcut. Use it only if the irrigation manufacturer specifies the method and sequence for that equipment; improvised air pressure can damage parts or eject debris. If a fixed line has no reachable low-point drain, ask about an approved method rather than relying on insulation alone. When planning irrigation for a T-Model Greenhouse Orangery, leave room to reach line ends and collect drained water without having to move a bench.
Empty filters, valves, and regulators
Filters, regulators, check valves, solenoid valves, and pressure-control parts can have internal chambers that do not empty with the main line. Shut off water and power as the manuals direct, then remove and drain bowls, screens, cartridges, or plugs only when instructions permit. Never force open a pressurized housing. Clean reusable filter elements by the specified method and inspect seals without stretching them. Keep small parts and their orientation together in a labeled bag; a reversed or missing seal can cause leaks or poor operation when the system restarts. Do not wash electrical parts unless their instructions explicitly allow it.
An empty upstream pipe does not mean a valve assembly is ready for winter. A solenoid body, backflow device, regulator, or filter bowl may hold a separate volume, and some components are not intended for user disassembly. Store removable parts in the conditions specified by their manufacturers, and record where each belongs. Photograph assemblies before taking them apart, and keep seals with their housings. Note the direction of flow where marked so parts can be reinstalled correctly. If you are considering a Pyramid-type greenhouse, include filter servicing in the proposed layout: allow access below a removable bowl and enough clearance to turn it without striking nearby shelves. Do not substitute an improvised seal or plug for a specified part.

Drain and store the pump as directed
Treat the pump as its own water-holding component, not just another piece of pipe. Surface pumps can retain water in the casing, strainer, priming chamber, or connected fittings; a submersible model has different removal, draining, and storage rules. Stop it using its controls, isolate its water source, and follow its exact manual for draining or removal. Never run a pump dry to clear the system unless its instructions specifically allow that procedure. For a fixed or hardwired unit, or one connected to a pressurized domestic system, ask qualified service personnel rather than opening an electrical enclosure or guessing at connections. Draining a pump casing does not empty a connected pressure tank, filter, or hose, so list those parts separately.
If the manual permits removal, drain or otherwise prepare the pump exactly as instructed, protect its openings from dirt, and store it in the specified environment; do not lift it by its power cable. Removal does not automatically mean the pump should be stored completely dry, so check the instructions for the exact model. If it must remain installed, use the manufacturer's documented freeze-protection method. A cover or insulation wrap cannot ensure trapped water stays liquid. For an aluminum greenhouse with built-in storage, check the proposed storage location against the pump manual's requirements for frost, moisture, and ventilation. The presence of a storage area does not establish those conditions. Also allow enough space to remove the pump and its attached fittings without straining hoses or cables.
Drain and protect water tanks
First identify the tank type, material, fittings, and manufacturer's winter instructions. Some tanks are meant to be drained for freezing weather; others may have specific directions for remaining installed or holding water. Do not assume an apparently empty vessel has no trapped water: outlet valves, bottom sumps, float valves, fill hoses, filters, and pump pickups can retain it. Stop the inlet before draining, use the designed drain outlet, and ensure no automatic or rainwater feed can refill it. A float valve may control the level without isolating the incoming line. An empty reading on a level indicator does not confirm that the bottom outlet or pickup tube is dry. Keep overflow and vent openings arranged as specified rather than sealing them to keep out cold.
After draining, check the drain plug, outlet, bulkhead fitting, and connected hose separately; these may retain water even when the tank looks empty. If the tank is removable, clean, prepare, and store it as its manufacturer directs. Leave a fixed tank on its designed support, and do not climb into it, tip it, or move it while full. Insulation can delay cooling but is not a substitute for an approved plan if water may freeze. If it cannot be fully drained, ask the maker or a qualified professional about the remaining water. When planning a tank location for a Prestige Greenhouse, review access to the lowest outlet as well as the space occupied by the vessel. Make sure the proposed drain route will not discharge across the entrance or an electrical connection.
Winterize rainwater inlets and outdoor connections
Rainwater systems need a refill check as well as a drain. If an empty storage tank is connected to a gutter or downspout, use the intended diverter or inlet shutoff so rain cannot refill it after winterization. Do not plug an overflow or vent to keep out debris; follow the tank instructions for those openings. Drain collection pipework, screens, first-flush devices if present, and hose connections only as the maker allows, because water can remain in a low bend or small chamber. Use an approved cap where needed to keep debris out, without closing a vent or overflow that must remain open. After a rain, check that the intended diversion is still keeping runoff out of the emptied tank.
Outdoor faucets, hose reels, quick-connects, and exposed manifolds also need attention. Disconnect hoses, drain them, and store them according to their care instructions; a hose left attached can hold water at the faucet or coupling. Protect exposed valves and backflow devices by the specified method rather than assuming any covering will keep them safe. A long fixed line may remain full even after its detachable hose is removed, so check where that line drains. Mark which valve controls the tank and which supplies irrigation so the wrong route is not reopened later. If comparing a large backyard greenhouse for a rainwater-fed setup, verify gutter, diverter, and tank compatibility separately. The supplied product information does not establish that water-capture accessories are included or available.
Treat winter irrigation as an active system
If you need irrigation through winter, do not combine a seasonal drain-down with an assumption that the system can keep running. Identify every water-filled section, including the source connection, pump, filters, valves, tank fittings, and lines outside the protected area. Each needs a documented protection plan suited to its installation and expected exposure. Insulated pipe loses heat more slowly, but insulation supplies no heat and cannot guarantee water will not freeze during a long cold spell or power outage. Daytime warmth inside a greenhouse is no proof that a pipe in a corner or near an opening will stay protected overnight. If the system depends on electricity, plan for periods when nobody is there to monitor it.
A system kept in service may depend on protection equipment, power, controls, and monitoring. Have a qualified irrigation or plumbing professional assess components that must stay connected, especially fixed domestic-water connections. Ask how a power failure changes the plan, whether the supply can be safely isolated, and which components need inspection afterward. Avoid improvised heaters, open flames, or chemical additives; use only products and methods approved for the equipment and intended water use. When evaluating a Classic aluminum greenhouse, assess the proposed water-system locations separately from the structure itself. The product listing does not establish an interior temperature or a freeze-safe utility space. Identify who will respond to a failure when the greenhouse is unattended rather than relying on daytime warmth.
Get help where water cannot be drained safely
Sometimes full draining is not practical: a line disappears under a bench, a pump is hardwired, or a fixed fitting is inaccessible. Do not guess at a hidden low point or repeatedly cycle a valve in the hope of pushing water through it. Leave the supply isolated, label the uncertain branch, and ask an irrigation technician or plumber to identify trapped volumes and an approved winter method. This matters especially where irrigation ties into household plumbing or a backflow assembly; seals and supply connections can require specific handling. Tell the professional which parts are intended to remain in service, rather than asking for a blanket insulation fix. A sketch and photos can help show hidden branches as well as visible equipment.
If freezing weather arrives before the plan is complete, prioritize stopping automatic refill and safely isolating the source, then drain accessible components through their normal outlets if conditions allow. Do not use a torch or boiling water to thaw a line. If equipment is already frozen, do not force a valve or restart a pump; follow the maker's guidance and inspect for cracks and leaks after thawing before returning it to service. If you find damage, keep the system isolated until repaired. A brief record of what remains wet makes next season's shutdown more reliable.
Inspect before restarting in spring
Before opening the supply, examine exposed pipe, tubing, tanks, filter housings, pump casings, fittings, and valve bodies for splits, bulges, loosened joints, or cracked seals. Inspect seams and outlets, not only the broad tank wall. Reinstall only parts removed for storage, and replace damaged components with items the equipment maker approves. Clean or replace filters as instructed, confirm seals and parts are correctly positioned, and restore power and controls according to their manuals. Do not energize a pump dry or assume a component is sound because its outside looks intact.
Restore water in the sequence recommended for your system, watching accessible joints and devices for seepage before leaving automation enabled. Flush irrigation lines if their instructions call for it, then verify that valves open and close and that emitters or outlets deliver water normally. A second visual check after lines are full can reveal a leak that was invisible while drained. Record any slow drain, leak, or component that retained water; those observations show which low points or parts need a different storage plan next fall. Keep the updated map with the manuals and note which components needed extra draining, so next season's shutdown reflects what actually happened.
Frequently asked questions
Does shutting off the main valve winterize the whole system?
No. It stops new supply but does not empty downstream pipes, pump casings, filters, valves, hoses, or tank fittings. Stop automatic inlets too, release pressure, and drain or remove each component according to its instructions.
Is pipe insulation enough to prevent freezing?
Not by itself. Insulation slows heat loss, but it cannot guarantee that water will stay unfrozen through every cold spell or power outage. Drain seasonal lines, or get a qualified assessment for equipment that must remain in service.
Can I blow out drip lines with an air compressor?
Only if the irrigation manufacturer approves the procedure for that equipment and explains how to do it. Improvised compressed air can damage components or eject debris. If the manual gives no approved method, use another documented approach or ask an irrigation technician.
Should I leave my water tank empty all winter?
Not universally. Tank materials, fittings, and installation vary, so follow the manufacturer's instructions. Prevent an emptied tank from refilling, and check its outlets, overflow, and vent as well as the vessel itself.
What if I need irrigation all winter?
Treat it as an active system, not a partially winterized one. Every water-filled component needs protection suited to its location. Have a qualified professional assess fixed connections, and do not rely on greenhouse air or insulation alone.
Closing the supply stops new water, but winterization also requires checking every place water can remain. A component map and manufacturer-specific instructions help keep a forgotten filter bowl, pump chamber, or tank fitting from undermining the rest of the work. Record which parts were drained, removed, or left in service, and keep that record with the system for spring startup and the next seasonal shutdown.
