
Blossom End Rot in Greenhouse Tomatoes: Check Water Before Fertiliser
Greenhouse tomato care
A dark, leathery patch at the blossom end of a greenhouse tomato often points to blossom-end rot, a fruit disorder linked to inadequate calcium reaching developing tissue. Calcium in the soil can be sufficient; uneven moisture, damaged roots, salinity or nutrient imbalance can interfere with uptake. Confirm the lesion pattern and check watering and drainage before deciding whether fertiliser is warranted.

Before adding fertiliser 1
Recognising blossom-end rot on a tomato
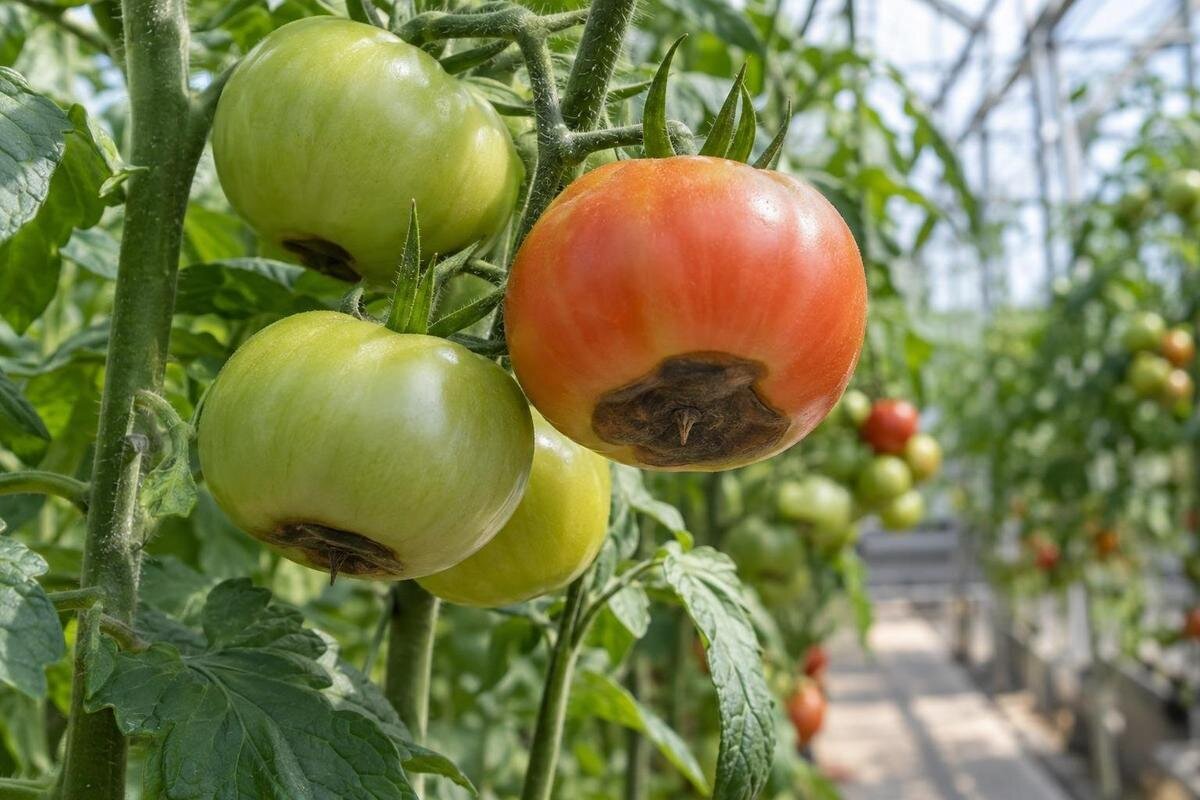
Blossom-end rot (BER) is a physiological disorder of tomato fruit, not a contagious fungus. It usually begins at the blossom end—the end opposite the stem—as a small, water-soaked, pale-brown or tan patch. The area may darken, sink and become dry, firm and leathery as the fruit grows; severe damage can cover much of the end. Early lesions can be easy to miss on green tomatoes. The position matters more than the colour: a dark mark elsewhere on a fruit needs a broader diagnosis. One affected tomato is a clue, not proof that the whole greenhouse bed lacks calcium.
The damage forms while the fruit is developing, but may only become obvious as the fruit enlarges. Once tissue is damaged, it will not repair itself if watering or nutrition improves. An affected tomato may continue to mature, but the patch can remain or decay further. Secondary mould can obscure the original appearance, so its presence does not automatically mean an infection started the problem. Note the cultivar, fruit cluster and approximate fruit size, and photograph both the whole fruit and the blossom end. Judge improvement on fruit that develops later rather than expecting old lesions to disappear.
Compare affected fruit and neighbouring plants
Inspect several fruits at different stages, not just the worst one. Check the blossom end and stem end, both exposed and shaded sides, and whether the mark is dry, sunken, wet or split. Blossom-end rot usually starts opposite the stem. Record whether symptoms are confined to one plant, cultivar, bed, container or greenhouse section, or appear throughout the crop. A cluster in one area can direct attention to local irrigation coverage, root conditions or shade; fruit affected across several areas may point to a shared factor. Either pattern helps prioritise checks, but neither establishes the cause by itself.
Compare affected plants with healthy neighbours. Look for differences in watering, growing medium, drainage, recent root disturbance and feeding history. Ask whether the first lesions followed a hot spell, missed watering or prolonged saturation, but do not treat timing as proof: visible fruit injury can lag behind the stress that contributed to it. Record whether leaves are otherwise vigorous or wilting, and mark affected rows on a simple plan. Photos that show a whole fruit, the exact lesion and the plant position are more useful than a close-up without context. Keep notes before changing several conditions at once.
Before adding fertiliser 2
Distinguishing blossom-end rot from other fruit damage
Sunscald is usually on the side of a fruit exposed to strong direct sun, rather than centred on the blossom end. It may look bleached, pale tan or whitish, then become dry and papery. Cracking splits the skin—often near the stem or around the shoulder—and differs from a single sunken blossom-end lesion. Contact damage or rubbing usually appears at a point that touched a tie, support or neighbouring object. Note where a mark starts and whether it has a defined, dry centre or follows a split. Position and texture can be more informative than a dark colour alone.
Some fungal or bacterial rots create soft, expanding or wet-looking areas; rings, visible spores, leakage or an unpleasant smell raise concern for decay, but are not enough to identify a pathogen from a quick look. Blossom-end rot can itself be invaded by organisms after the tissue is damaged, so mould on an old lesion does not settle the original diagnosis. If lesions appear on fruit sides or stems, spread rapidly, or accompany leaf spots or plant collapse, seek an assessment rather than treating the crop as a calcium problem. For a future growing space, include room to inspect fruit from both sides of the plants when reviewing the Limited Edition Aluminium Greenhouses and your proposed bed layout.
Why calcium in the soil may not reach the fruit
Calcium is needed as fruit tissue develops. Plants take it up through their roots in water, and most calcium movement within the plant occurs in the xylem, the water-conducting tissue. Calcium is not readily redistributed from older leaves to fruit, and fruit generally loses less water through transpiration than foliage. A shortfall in delivery during a sensitive stage can therefore affect a developing fruit even when leaves look healthy and the growing medium contains calcium. Blossom-end rot describes a local calcium-related disorder in the fruit; it does not reveal by itself whether there is too little available calcium or a problem with uptake and transport.
Root activity, available water, dissolved salts and the balance of other nutrients all influence the route from growing medium to fruit. Rapid fruit growth can also outpace the supply reaching the tissue. Greenhouse conditions can shift transpiration: high heat can raise water demand, while very humid air can reduce water loss; strong water loss from leaves may also affect delivery to fruit. The effects depend on the whole plant and conditions over time, not one reading. When planning beds for a T-Model Orangery Greenhouse, consider how you will compare root-zone moisture and plant conditions in different parts of the proposed layout. Those observations will be more useful for investigating uptake than the greenhouse format alone.

Before adding fertiliser 3
Check irrigation before adding fertiliser
Start by checking moisture where tomato roots are active, not just at the dry-looking surface. In a greenhouse, rainfall may not reach beds or containers, so the crop can depend entirely on its irrigation setup. Compare moisture through the root zone before and after watering, and check each part of the bed for uneven delivery. A blocked emitter, leaking line, missed watering or irrigation duration that no longer suits a hotter period can create dry sections. Let the crop and growing medium guide watering; a fixed calendar or one schedule for every pot and bed can miss local needs.
Look for a cycle of very dry growing medium followed by a large watering, but also watch for persistent saturation. Both extremes can impair root function, and simply adding more water is not the answer if drainage is poor. Aim for reasonably even moisture without leaving roots waterlogged, and adjust one part of the system at a time so you can see whether distribution improves. If you are considering a Pyramid Greenhouse, mark proposed beds, containers, water access and irrigation lines on the selected layout. Check how you would reach each emitter for inspection or maintenance, including those behind mature plants, rather than planning only where the main watering line will run.
Inspect roots, drainage and growing medium
Root uptake can be limited if roots are damaged or short of oxygen. Check for standing water, slow drainage, compacted soil, a root-restricted container or recent disturbance such as cultivating close to stems. A plant that wilts while its growing medium is wet deserves a closer root-zone check; adding fertiliser will not correct damaged or poorly functioning roots. Avoid pulling up a healthy established plant just to inspect it. Instead, note how water drains and, if a plant must be removed or repotted for another reason, examine the roots then. Root colour varies with the medium, so consider firmness and smell as well as colour.
Growing in pots, bags, raised beds or ground soil changes how quickly the root zone dries and how salts can accumulate. Check the actual mix or soil, drainage holes where relevant, and whether the root area has been repeatedly fed. Excess soluble salts can make it harder for roots to take up water even when the medium appears damp. If you are considering the Limited Edition Aluminium Greenhouses with Storage, mark the growing area and storage area separately on your proposed plan. Then check the space available for beds or containers and for inspecting drainage. The important distinction for this problem is between the overall greenhouse footprint and the root space you actually provide.
Before adding fertiliser 4
Test the nutrient balance before changing the feed
More fertiliser does not automatically mean more calcium reaches tomatoes. If the growing medium already contains enough available calcium, adding a calcium product may leave the transport problem untouched. Heavy feeding can increase soluble salts; high concentrations of potassium, magnesium or ammonium can interfere with calcium uptake, while excessive nitrogen may encourage vigorous leafy growth. These are possible contributors, not a diagnosis from appearance alone. Avoid applying lime, gypsum or a calcium-rich fertiliser by habit: products differ, and liming can alter pH. The damaged tissue will not recover after an amendment, so judge any change by later fruit.
Before changing the feed, test the growing medium for pH and relevant nutrients; a soil or media laboratory can advise on sampling and interpretation. For container crops, test the actual potting mix rather than nearby garden soil. If water quality or salt build-up is a concern, ask whether testing the irrigation water or electrical conductivity is appropriate. Use a fertiliser only where test results and crop requirements support it, and follow its label. If a new Prestige Greenhouse is part of your plans, record whether its proposed beds will use existing soil or a different growing medium. Keep the feeding and testing history with that medium, rather than assuming results from another bed apply.
Account for greenhouse heat, humidity and layout
Greenhouse air can become hot quickly, and warmer conditions raise water demand. This makes irrigation timing and coverage more important, but ventilation or shade alone cannot restore calcium to fruit that is already affected. Humidity and air movement also influence transpiration, so do not assume one adjustment will suit every plant or weather pattern. Track conditions at plant height, check whether they differ by side or under a roof edge, and note hot days alongside root-zone moisture. If you change ventilation or shading, observe the results over time rather than attributing improvement to a single change after one day.
Position can offer useful diagnostic clues: a bed close to a wall, doorway or sunny edge may have a different light and heat pattern from a central bed. The Spacious Greenhouse listing gives an area range of 47 to 70 m². When planning a growing area of that size, mark the proposed beds, openings and access routes so you can identify where to compare conditions. Keep location names consistent in your notes: for example, distinguish a wall-side bed from a central bed rather than recording only ‘greenhouse tomatoes’. Footprint information helps with the plan, while observations at plant height show what the crop experiences in each position.

Before adding fertiliser 5
Track changes and judge new fruit separately
Keep a short log rather than relying on memory: date, cultivar, fruit stage, bed or pot, visible pattern, irrigation changes, temperature swings and fertiliser additions. Take repeat photographs from the same angle, including a whole-fruit image to show where the lesion lies. Give beds or containers simple identifiers so photographs, watering notes and feed records refer to the same plants. Keep observations separate from actions: record what you found, what you changed and when, rather than simply noting ‘treated blossom-end rot’. If you later move the crop into an Aluminium Classic Greenhouse, start a separate record for that growing space. Retain the earlier notes for comparison without confusing different beds, growing media or irrigation arrangements.
Where practicable, change one factor at a time—for example, correct a blocked line or stop an excessive feed—while keeping other conditions steady. Observe newly developing fruit; a later symptom-free cluster is encouraging, but it does not prove which factor mattered if weather or fruit load also changed. If lesions continue, widen or appear with other plant symptoms, take your notes and photos to a horticultural adviser or plant diagnostic service. A test or sample may be needed for a confident diagnosis, especially before adding nutrients.
Preparing for a plant-health assessment
Seek further help when your observations do not explain the pattern, symptoms persist despite correcting an identified problem, or you are unsure what to change. Be clear about the question you need answered: whether the lesion is blossom-end rot, whether root conditions are limiting uptake, or whether a nutrient amendment is justified. These questions may call for different assessments rather than the same test. Give the adviser any existing results alongside your watering and feeding records, and explain which bed or growing medium each result represents. Distinguish what you observed from what you suspect; ‘the medium stayed wet while the plant wilted’ is more useful than an unsupported diagnosis of calcium deficiency.
Organise your photos so an adviser can connect each close-up with the whole fruit and its plant. Include healthy neighbouring plants for comparison, and identify whether the affected fruit came from one cluster or several. Describe the plants' position relative to walls and openings, particularly if damage is concentrated in one area. Keep plans for a future Wall Greenhouse separate from observations of the current crop: the proposed site does not explain existing symptoms elsewhere. On that future plan, record the intended beds, wall-side positions and drainage arrangements. This keeps the information about the present problem clear while giving future crop records their own location and context.
Frequently asked questions
Can an affected tomato recover?
The damaged patch cannot heal, even if you correct the conditions that contributed to it. The fruit may continue to grow or colour, but check later fruit to judge whether your changes have helped. Remove fruit if it is badly decayed or getting in the way of crop care.
Should I add calcium as soon as I see a dark patch?
Not without checking the symptom and growing conditions first. Blossom-end rot can occur when calcium is present but not reaching the developing fruit. Check irrigation, drainage and root health, then test the actual soil or potting mix before applying a calcium product.
Will a calcium spray fix blossom-end rot?
A foliar spray is not a dependable fix. Calcium moves poorly from treated leaves into fruit, and a spray cannot repair tissue that is already damaged. If you are considering any product, check that it is suitable for the crop and follow its label; investigate root-zone conditions as well.
Why are only some tomatoes affected?
Fruit can differ in how quickly it develops and how much calcium reaches it. Watering coverage, root condition and local greenhouse conditions may also vary between plants or beds. Map which fruit are affected, then compare those plants with healthy neighbours rather than treating the whole crop as deficient.
When should I get a soil test or expert diagnosis?
Consider testing if the problem persists, affects many plants or you are unsure whether the lesion is blossom-end rot. A soil or growing-media test can help guide nutrient changes. If fruit damage is unusual, spreading or accompanied by other plant symptoms, seek advice from a horticultural adviser or plant diagnostic service.
Blossom-end rot is a reason to investigate calcium delivery, not an automatic instruction to add calcium. Confirm that the lesion begins at the blossom end, compare affected and healthy plants, then review root-zone moisture, drainage and feeding history. If the cause remains uncertain, test the actual growing medium before changing nutrients. Existing damage will not disappear, so use later fruit to assess whether a measured correction has helped.
