
Do Soil-Moisture Sensors Improve Greenhouse Watering?
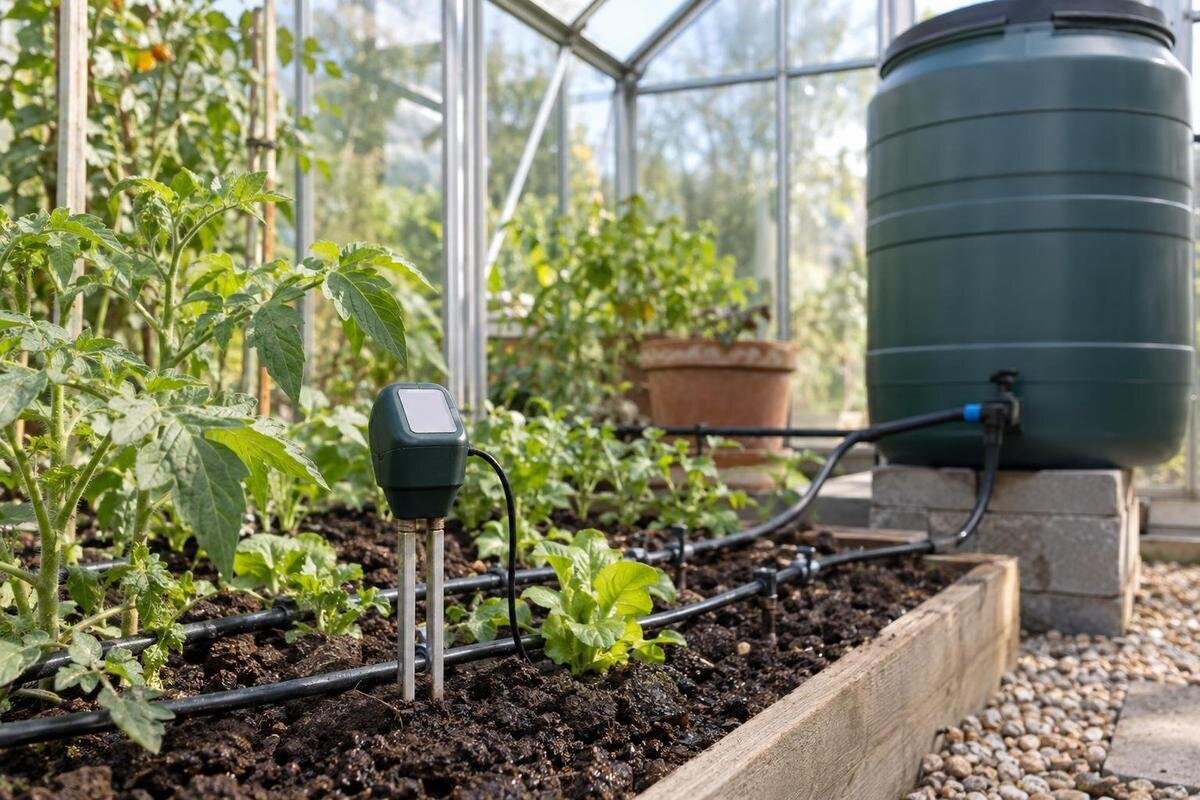
Greenhouse watering guide
Greenhouse watering is easier to judge when you can compare the root zone over time, but a soil-moisture sensor is not a direct measure of what every plant needs. Its reading depends on the probe, growing mix and exact position. Calibration, placement and hand checks determine whether the number is useful. Treat it first as an observation tool; only consider letting an automatic controller act after repeated readings agree with conditions in the bed or pot.

01
What a sensor can improve
A probe gives you a repeatable reading from the same point, so you can compare the growing medium before watering with what happens after a routine cycle. Over time, this may reveal a bed that dries sooner than expected or a location that stays wet while the surface elsewhere looks dry. That is useful when greenhouse conditions vary across the growing area or several containers need different attention. The benefit is better-informed, more consistent decisions; a sensor alone cannot promise lower water use, healthier plants or a better harvest.
Treat the reading as one observation alongside the plants, the medium and the watering history. A low value does not explain why a spot is dry, and it does not prove that every plant needs water. Before buying a sensor, identify the decision you want it to help with: whether a particular bed needs watering, whether pots dry at different rates, or whether your usual watering cycle reaches the monitored roots. This gives you something specific to assess during a trial. If you are also choosing a structure, the Classic Aluminium Greenhouses listing spans 3.77 m² to 28.08 m². Sketch the proposed planting areas within your preferred size and identify where moisture is difficult to judge. That is a more useful starting point for monitoring than assigning a sensor to every fixed amount of floor space.
A reading represents a small sample
A probe samples the material around its sensing section, not the whole bed or container. Many common sensors infer moisture from an electrical property of the medium and convert it into a number, scale or threshold. The output might represent an estimate of water content, or it might be a relative value that is meaningful mainly for that device. Read the manual to learn what the display measures, which direction means wetter, and whether its scale is calibrated for a particular medium.
Moisture is rarely distributed evenly. A reading beside an emitter can differ from one nearer the edge of a bed, and the surface can dry while deeper soil remains damp. A wet pocket at the probe does not prove that all roots have water, just as a dry reading outside the wetted area does not prove the entire bed is dry. Nor does a moisture value directly measure plant health or how readily roots can access water in a particular mix.
02
Match the probe to the growing medium
Soil, compost-rich beds and potting mixes can respond differently to the same sensor because their texture, structure and packing differ. A probe calibrated in one medium may give a misleading value in another. This matters when comparing a garden bed with pots, or when mixes contain different proportions of materials such as coir, bark or compost. Even containers filled from the same bag can behave differently if one is packed more firmly or has a different drainage pattern.
Sensor designs also vary. Some measure electrical resistance; others use a dielectric response, and their readings can be affected in different ways by the medium, contact or dissolved salts. Do not assume that every sensor marked for soil suits every potting mix. When comparing devices, note which medium each one supports and whether its instructions explain how to interpret or adjust the reading. Keep that information with your records so a later change of mix does not leave you relying on an old setting without checking it. The Wall Greenhouse listing covers 3.69 m² to 14.34 m². Whether you plan beds or containers inside it, choose the probe for the material surrounding its sensing section. The enclosure itself does not determine sensor suitability; the manufacturer's guidance on media, insertion, calibration and controller requirements is the relevant buying information.
Place the probe among active roots
Choose a position and depth that reflect the roots you want to monitor. Rooting depth varies with crop, plant age, bed or container, so a single depth recommendation will not suit every greenhouse. Check crop-growing guidance and the sensor instructions, including which part of the probe is active. Install it as directed so the sensing area has good contact with the medium; an air gap or a loose fit can make a reading less representative.
Do not place a probe automatically right under a dripper or at the edge of a bed. The first position may sit in a concentrated wet pocket, while the second may miss the wetted area. Compare a proposed position with nearby root-zone checks before settling on it. Note its depth and distance from the watering point so you can interpret later readings in context, rather than remembering only which bed it is in. If you move the probe during this trial, record the move: readings from two positions are not a continuous record of conditions at one point. For a new layout, the Limited Edition Aluminium Greenhouses listing spans 3.77 m² to 28.08 m². Mark the beds, crops and watering points within your selected footprint, then choose probe positions from that planting plan rather than from the model name or overall area.

03
Treat different beds as separate zones
One probe is useful only for decisions about an area it represents. A bed of mature plants, a group of small pots and a container with a different mix may dry at different rates, even if they receive water from the same source. Differences in crop, medium, pot size, light and irrigation pattern are reasons to check locations separately. You may find that several areas behave alike, but verify that rather than assuming a single sensor describes the whole greenhouse.
Map planted areas and watering circuits before deciding how many monitoring points make sense. Give each proposed zone a simple name and record which plants, medium and watering points it contains. Then compare candidate locations at similar stages of the watering cycle, rather than comparing one freshly watered pot with a bed that has been drying all day. Options in the T-Model Orangery Greenhouse listing span 16.52 m² to 30 m², leaving the planting arrangement for you to plan. Your layout may contain one consistent bed or several distinct growing areas. Where readings repeatedly diverge and the areas need different watering decisions, consider separate monitoring, provided the controller supports it. Also distinguish monitoring zones from watering circuits: knowing that two areas need different treatment is not the same as having a system that can water them separately.
Establish reference readings in your growing medium
Start by reading the instructions for the sensor's calibration or adjustment procedure. If it can be calibrated, use the growing medium and installation position where it will actually work. Record a reading at a suitable, evenly moist condition and at a drier point that is still appropriate for the crop, without deliberately stressing plants or saturating a pot. Repeat observations at the same location and at consistent points in the watering cycle so you can see whether the readings are stable. Keep the device's calibration procedure separate from your own observations: noting that a particular value accompanies damp medium does not necessarily adjust the sensor or establish its measurement accuracy. Record what you did, which settings you changed and what the medium felt like. This makes the reference useful when you revisit it, rather than leaving you with two unexplained numbers.
A number copied from another greenhouse is not a local calibration. For example, the Pyramid Greenhouse listing offers areas from 5.53 m² to 18.9 m², but choosing a size does not provide a moisture threshold for the beds or pots you put inside. Establish what the sensor reads in your own medium. If the device cannot be calibrated for that setup, use it to follow relative changes rather than treating its display as a precise percentage. Label your notes accordingly: a relative reference is still useful, but it should not be confused with a measured water-content value. Retain the wet-to-drier observations together so you can review the pattern, not just the number you eventually choose as a watering trigger.
04
Check readings by hand before trusting trends
Use a hand check as a reality check, not as a laboratory measurement. Examine a small amount of medium near the probe at a similar depth, taking care not to disturb roots or the sensor. Compare how it feels with the reading and note whether the surface condition differs from the root zone. Checking only the top layer can be deceptive: it may look dry while deeper medium remains moist, or appear damp after water has passed through without evenly wetting the roots.
Repeat the comparison before watering and after enough time for water to reach the sensor's position. Keep notes on the reading, the medium's condition, the watering event and any obvious change in the plants. Use consistent descriptions for your hand checks so entries remain comparable; a short description of the medium is more informative than simply writing 'good'. When a reading and a hand check disagree, record both rather than adjusting the setting immediately to make them match. Check the location and depth of the comparison first. Access matters here: the Limited Edition Aluminium Greenhouses with Storage listing spans 5.52 m² to 28.08 m², and your chosen layout should leave each monitoring point within practical reach. Plan how you will inspect the medium without repeatedly moving pots or disturbing the probe, especially once the planting area is occupied.
Set thresholds for each watering zone
A threshold should reflect a locally checked condition and the needs of the crop, not a universal number found on a chart. A display percentage may not mean the same thing across sensor models or growing media. Use the readings and hand checks you have recorded to decide what value signals that a particular zone is approaching the point when it normally needs water. Consider the crop's growing stage and recent watering as well as the sensor value.
Watering may take time to reach the probe, so an immediate reading after a cycle can be hard to interpret. Check again at a consistent interval and confirm that the medium changed as expected. Distinguish the decision to begin watering from the decision that enough water has been applied; one dry reading cannot answer both questions. If the reading remains low, compare it with the medium before assuming another cycle is needed. For layout planning, the Bloomcabin Prestige Greenhouse listing covers 3.77 m² to 28.08 m². Define the actual watering circuits within your chosen layout before assigning settings to them. Use a delay or separation between start and stop settings only if your controller supports it and its instructions explain how. Record the settings alongside the observations that led to them, so later adjustments have a clear basis rather than becoming a series of unexplained changes.

05
Run automation in a supervised trial
Before linking a sensor to a watering controller, confirm in both products' documentation that the sensor type, output and settings are compatible. Check whether the controller can handle the number of monitored zones you have planned and whether its displayed scale can be adjusted for your medium. Do not assume that a probe is plug-and-play just because both products are described as automatic. Where an installation requires specialist work, ask a qualified professional to handle it.
Begin by logging readings or using an alert-only mode if one is available. Compare the signal with hand checks over several ordinary watering cycles before allowing it to trigger irrigation. During this trial, record whether you would have watered when the alert appeared and why. A repeated disagreement is a reason to revisit placement or settings, not simply to dismiss the hand check. Once automatic watering begins, observe the complete cycle and check the intended area afterwards; a sensor reading cannot confirm that water reached every part of a bed. This is especially relevant when planning several growing areas within the Spacious Greenhouse range, listed from 47 m² to 70 m². Map the planting and watering plan before choosing controller inputs. Keep the trial focused on each monitored zone, rather than treating a successful response at one probe as approval of the whole greenhouse.
Recheck the setup as crops and media change
A once-reliable position or threshold can become less representative after you move a pot, repot a plant, change the growing mix, alter watering points or replace a crop. Recheck the probe whenever its surroundings change, and repeat your hand comparisons if readings no longer match what you observe. Date these changes in your notes so you can distinguish a new growing arrangement from the conditions used to establish the old reference. Inspect and clean the sensor only as its instructions allow. If a value stays fixed, jumps unexpectedly or conflicts with nearby checks, pause automatic decisions until you have identified the cause. Continue assessing watering manually during that pause rather than leaving the crop's needs to an unexplained reading. After correcting the problem, compare readings and conditions again before returning the zone to automatic control.
A sensor is most worthwhile when repeated observations help you manage areas that are difficult to judge consistently by eye or by hand. For a small, uniform growing area that is easy to check, manual observation may be enough. Before buying, confirm that the sensor suits the medium, that its reading can be interpreted or calibrated, and that any controller accepts its output. Choose a device to answer a real watering question, then keep the local notes that make its readings useful.
Frequently asked questions
How many soil-moisture sensors does a greenhouse need?
There is no reliable count based on floor area alone. Consider whether beds differ in crop, growing medium, container size, exposure or watering circuit. Begin with a representative location, compare it with other areas by hand, then add separate monitoring where readings show meaningfully different conditions.
Should a sensor sit directly under a dripper?
Not automatically. A probe directly beneath an emitter may register a very wet pocket, while one outside the wetted area may stay dry. Use the probe instructions and check nearby medium at root depth to find a position that reflects the area you want to monitor.
Why does my sensor disagree with how the mix feels?
The probe may be in a different moisture pocket, have poor contact with the medium, or need adjustment for that mix. Sensor type, dissolved salts and temperature can also affect some readings. Compare at a similar depth and location, then check the manufacturer's guidance.
Can I use a soil-moisture sensor with any potting mix?
Do not assume so. Read the sensor maker's guidance for the intended medium and calibration method. A reading or threshold that works in one soil or potting mix may not transfer to another, even when the display uses a percentage.
Can I connect a sensor straight to an automatic watering controller?
Only if the sensor and controller are compatible, as confirmed in their product documentation. First record readings or use an alert-only mode if available. Compare them with hand checks through several cycles before allowing a controller to trigger watering.
A soil-moisture sensor improves greenhouse watering when its reading reflects the roots you are monitoring and helps you make a more consistent decision. Match the probe to the medium, check its position, establish local reference readings and compare them with hand observations. Once those checks agree over repeated cycles, automation can support your routine without asking one number to speak for the whole greenhouse.
