
Mulching Greenhouse Beds: Materials, Moisture and Slugs
Greenhouse growing guide
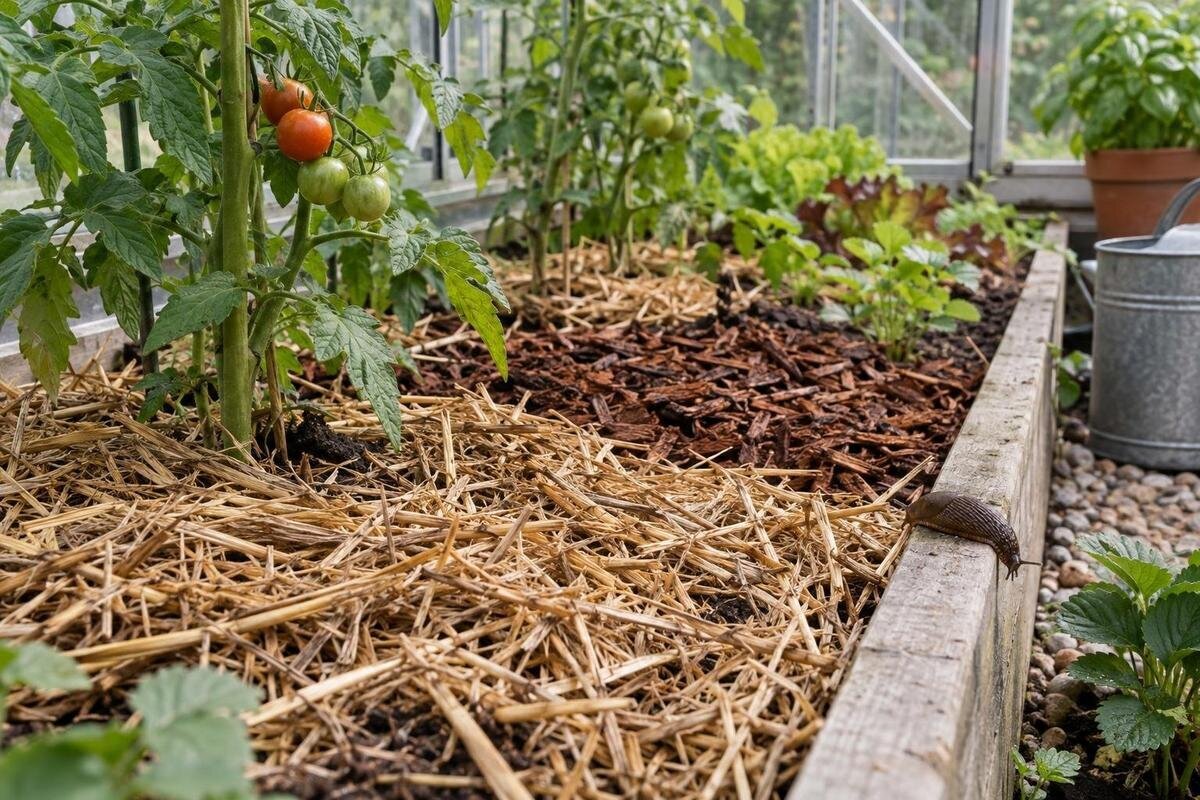
Mulch can slow surface drying and reduce soil splash in a greenhouse bed, but it also changes how easily you can judge moisture and may create sheltered places for slugs. A roof usually keeps direct rain off, so a cover never replaces irrigation. The right choice depends on the crop, how water reaches its roots, how quickly the bed dries and whether you can inspect beneath the mulch regularly.

Before you mulch 1
Mulch changes how greenhouse soil dries
A greenhouse bed receives little or no direct rainfall, so irrigation is usually its main water input. How quickly the soil dries also depends on the crop, growing medium, light, ventilation and conditions outside. Mulch can slow evaporation at the soil surface and reduce splash, but it does not make water demand constant. The top may feel dry while soil below remains moist, and moisture can differ between the centre of a bed and its edges. Treat the cover as one influence on dry-down, not as a reason to follow a new fixed watering schedule. After laying it, check the same points over several watering cycles and at a similar depth. Note whether each check is before or after watering so the comparisons are meaningful.
Mulch and greenhouse air are related but not interchangeable. A cover may keep the soil surface damp; it does not correct stale, humid air around leaves, and dry air does not guarantee dry soil below a dense layer. Compare planned bed area with usable space before estimating material. The wall greenhouse range is listed from 3.69 m² to 14.34 m², but that figure is greenhouse area, not the surface to be mulched. Use the selected model's dimensions and a bed-and-path sketch; paths and working space reduce the area available for planting. Raised beds, permanent fixtures and other growing areas also change the total, so measure the surfaces you will actually cover.
Choose mulch for the crop and irrigation method
Choose a cover according to the crop, its growth stage and how long the bed will remain planted. Direct-sown seed needs an open surface for emergence; a transplant needs a clear stem base, while an established crop may tolerate cover around its root zone. A long-season crop can justify material that stays in place, whereas a succession bed replanted often is easier to manage with a cover that can be moved. Consider whether the crop also needs frequent staking, hoeing or access for harvest: a cover that must be pulled aside can disturb plants and become a chore. Check crop-specific guidance rather than assuming one material or layer depth suits every vegetable. If crops with different needs share a bed, mark where the cover stops.
Match the material to the watering route as well. Water from a can or hose lands on top; a dripline may sit below the layer. With either method, check that moisture reaches the full root area rather than just wetting the mulch. If one zone dries faster than another, water it separately rather than making the whole bed wetter to compensate. When comparing options in the limited-edition aluminium greenhouse range, sketch crop zones and water lines alongside paths. Allow access to both ends of each bed so you can check whether water reaches the far end as well as the area closest to the hose or irrigation inlet.
Before you mulch 2
Straw, leaves and compost behave differently
Straw is light and easy to move when planting changes, but loose pieces can shift and the source may contain seed heads or debris. Check the material before use and choose a known, clean supply for food beds. Do not assume hay behaves like straw: composition and seed content can vary by source. Keep the layer open rather than compressing it into a dense mat, so water can reach the soil and the cover can be lifted for checks. Fallen leaves vary too: whole leaves can knit together when damp and shed water to the sides. Break them up or use a thinner, open layer, then look underneath after watering. Light materials may also need replenishing if they move during routine work.
Well-finished compost behaves differently because it can contribute nutrients as it breaks down; count it as an amendment as well as a surface cover. Avoid adding more simply to slow evaporation if the crop's feeding plan is already adequate. Fresh grass clippings can compact into a wet mat, and thick piles may heat as they decompose; use only a small, loose amount from a known source or leave them out. When planning beds for a T-model orangery greenhouse, estimate quantities for each mulch material separately using the bed measurements and intended depth. Try a small patch first to see whether the material mats or sheds water before ordering enough for every bed.
Woody and manufactured covers need extra checks
Bark and wood chips tend to remain recognisable longer than soft plant residues, which can suit a bed that will not be disturbed soon. Their coarse gaps can also shelter slugs and hold damp material, so a long-lasting cover is not automatically low-maintenance. Check the supplier's description and the material's source, particularly around edible crops; do not use material of unknown treatment. Keep woody cover on the surface rather than mixing it into the root zone: fresh wood worked into soil can temporarily affect available nitrogen as it decomposes. Large chunks can be awkward around close-spaced seedlings, while finer grades are easier to place but may compact. If the bed needs frequent sowing or replanting, a removable, finer cover may be easier to manage.
Manufactured covers need a different check. Some horticultural fabrics pass water, while an impermeable sheet can direct it towards planting holes or bed edges; the material name alone does not show how irrigation will behave. Confirm water permeability, reuse guidance and crop suitability with the supplier, then test a small area before covering a whole bed. If considering the pyramid greenhouse range, draw the proposed bed shapes and paths before buying or cutting sheets. Measure each bed and mark planting holes and other cut-outs on the plan. Also consider how you will remove the cover at crop change, when you may need access to the soil.

Before you mulch 3
Keep mulch clear of stems and seed rows
Apply mulch when the bed is moist but not waterlogged, rather than using a cover to conceal very dry or saturated soil. A dry surface covered over may stay dry, while a saturated bed can remain wet for longer. Spread material evenly and leave a clear collar around stems, crowns and transplant bases; contact can keep those areas damp and make early damage harder to see. Keep direct-sown rows open until seedlings have emerged and can cope with the chosen cover. A narrow uncovered strip also lets you check soil and locate irrigation points without lifting the whole layer. Keep irrigation outlets accessible too, so you can inspect them if the bed wets unevenly.
Use a consistent layer rather than piling material around individual plants or adding more whenever the surface looks bare. Suitable depth depends on crop and material, so follow crop-specific advice and product directions; too deep a layer can hide wet soil, impede emergence and complicate slug checks. Keep bed edges and paths clear so sections can be lifted, and prevent loose material spilling from raised beds. If you are considering limited-edition aluminium greenhouses with storage, check the storage dimensions and conditions before planning where to keep spare mulch. Built-in storage alone does not establish whether a particular bag will fit or remain dry.
Check moisture beneath the mulch
Once mulch is down, judge watering by the soil underneath, not by the colour or dryness of the cover. Lift a small patch near active roots and check more than one point along the bed; areas beside a dripline, at the edges and in the middle may differ. A finger test can help with surface moisture, while a narrow trowel or suitable moisture meter can help assess deeper soil. Interpret readings according to the crop and growing medium, and use the same locations when comparing checks. Recheck after hot, bright or windy weather and as the canopy grows, because shade and water use change. Do not rely on the mulch surface or a single reading to represent the whole bed.
Before covering an irrigation line, confirm its position and whether each outlet wets the intended root area. Run the system, lift the mulch in several places and look for dry strips, pooling or water escaping to an edge; adjust the route before adding more cover. With surface watering, apply slowly enough to see whether the material absorbs water or sheds it. For a new layout in a Bloomcabin Prestige Greenhouse, mark irrigation routes on the bed plan before laying mulch. Leave outlets accessible so you can check sideways water movement beneath the cover and recheck the wetting pattern after moving a line.
Before you mulch 4
Reduce slug shelter and keep inspection access
Mulch is a possible slug refuge, particularly when it stays cool, damp and undisturbed. Straw, leaves, compost and coarse woody cover can all conceal pests, so changing material alone does not guarantee control. When feeding damage appears, look under the cover, along bed edges and beneath pots or other objects beside the crop. Inspect at a time when slugs are active and lift a few separate spots, not only the wettest-looking patch; a check after dark can be useful when activity is suspected. If slugs are present or a section stays saturated, remove or thin that area and reassess watering before replacing it. Clear fallen leaves, spilled compost and plant scraps as well; they add shelter beside the crop.
Make inspection part of routine watering and harvesting rather than waiting for widespread damage. Lift sections, check stem collars and bed edges, and note whether the underside remains wet between irrigations. Keep an accessible strip beside beds where the layout permits, and avoid burying every inspection point beneath material that is difficult to move. When planning beds in the spacious greenhouse range, include paths that let you reach their edges without trampling soil or disturbing roots. A larger greenhouse does not automatically make every bed accessible. Revisit likely hiding places after adding fresh organic material or changing irrigation, as conditions may have shifted.
Soil moisture and greenhouse humidity are different
Mulch manages water loss at the soil surface; it is not a ventilation control. Plant transpiration and watering also add moisture to greenhouse air, while ventilation and outside conditions influence how quickly it leaves. Assess soil and foliage separately: damp soil under a cover does not prove leaves are wet, and a humid canopy does not show whether roots need water. If leaves stay damp or condensation is frequent, review irrigation, canopy density and ventilation rather than treating mulch as the only cause. Avoid letting mulch press against low leaves that rest on the bed, where contact can keep them wet. Do not respond to humid air by adding more water; check root-zone moisture first.
Where practical, watering the soil rather than the foliage makes it easier to see what happens under the cover. Look for even wetting, water that runs away, and mulch that remains soaked long after irrigation. When comparing models in the classic aluminium greenhouse range, allow for mature crop width as well as bed width: you will need room to reach both foliage and soil. Check the selected model's dimensions and access points rather than relying on the range name to establish clearances or ventilation performance. Reconsider the layout if crowded crops or bed covers would obstruct routine care.

Before you mulch 5
Refresh mulch only after checking the old layer
Inspect the layer after watering and as crops mature. Organic material breaks down, shifts, tangles with stems or becomes patchy; a sheet or fabric can lift or channel water towards an edge. Lift more than one section and check whether soil is too wet, too dry or uneven beneath it. Replace only the parts that have thinned if the rest is clean and functioning, rather than adding a fresh layer across everything by habit. If a patch stays slimy, smells sour or has become a pest refuge, remove it and address the water source before laying anything new. If only one section stays wet, check where water enters and whether the cover is shedding it.
At crop change, remove spent plant debris and decide whether the remaining mulch is suitable for the next planting. Do not move material from a bed with suspected disease or serious pest damage straight into another bed unless you know an appropriate treatment or disposal route. Keep clean, reusable material separate from anything decomposed or contaminated. Leave woody mulch on the surface where suitable rather than working it into soil. Do not assume old material is ready to reuse just because its top looks dry; lift and inspect it. A short record of material, irrigation changes and slug activity can reveal patterns across seasons and help you avoid repeating a cover that stayed wet or obstructed planting.
Calculate mulch from bed measurements
Measure each bed separately. For a rectangular bed, multiply length by width to get surface area; multiply that by the chosen layer depth, expressed in metres, to estimate cubic metres of material. Exclude paths and add separate totals for beds using different covers. As an arithmetic example only, a 1 m by 4 m bed with a 40 mm layer would need 0.16 m³, or 160 L, before allowing for unevenness or settling. Forty millimetres is not a universal recommendation; choose the depth from crop-specific and material guidance first. For the calculation, convert millimetres to metres before multiplying. If bed edges are irregular, measure sections separately and add their areas.
A clear plan is useful beyond ordering. Mark crop rows, stem-clear areas, irrigation lines, paths and points where you need to lift the cover for inspection. Check that you can reach each bed with a hose or watering can and move removable covers without damaging stems. Some soil may remain uncovered for sowing, access or a trial strip; that can be more useful than covering every surface with one material and discovering it impedes watering, emergence or routine checks. Record the planned material and layer depth for each bed so later top-ups do not gradually become deeper than intended.
Frequently asked questions
Can mulch replace watering in a greenhouse?
No. A covered bed usually receives little or no direct rainfall, and mulch only changes evaporation at the soil surface. Lift it in several places and check moisture near active roots before watering. If one patch differs from another, check the irrigation route or soil rather than wetting the whole bed by schedule.
Which mulch keeps slugs away?
No mulch is reliably slug-proof. Slugs can use cool, damp material as shelter, including loose organic mulches. Keep the layer easy to lift, remove wet plant debris, and inspect underneath and along bed edges when damage appears. If a patch stays wet, adjust watering or remove the cover there.
Can I mulch a direct-sown bed?
Keep the sowing line clear until seeds have emerged and the seedlings are established enough for the chosen material. A loose cover can obstruct emergence or make it difficult to see the row. Follow the crop's sowing guidance, then add mulch between plants without burying young stems.
Should a dripline sit above or below mulch?
Either position can work if water reaches the intended root zone and the emitters remain accessible. Test the line before covering, then lift the mulch at several points after watering to find dry strips or pooling. Follow the irrigation product's instructions and adjust placement if the bed wets unevenly.
Are grass clippings suitable as greenhouse mulch?
They can be used cautiously if the source is known and suitable for the crop, but thick, fresh clippings may heat, compact and stay wet. Use a small, loose amount and inspect it after watering. Mature compost is different: it can contribute nutrients as well as cover the soil.
Greenhouse mulch is most useful when it suits the crop and lets water reach roots without hiding the bed's condition. Measure the growing surface, apply a manageable layer and compare moisture and slug activity beneath it over several watering cycles. If the cover stays wet or makes inspections difficult, adjust the material or reduce the covered area rather than simply adding more.
