
Can a Greenhouse Fit Between a House and Fence?
Greenhouse siting guide
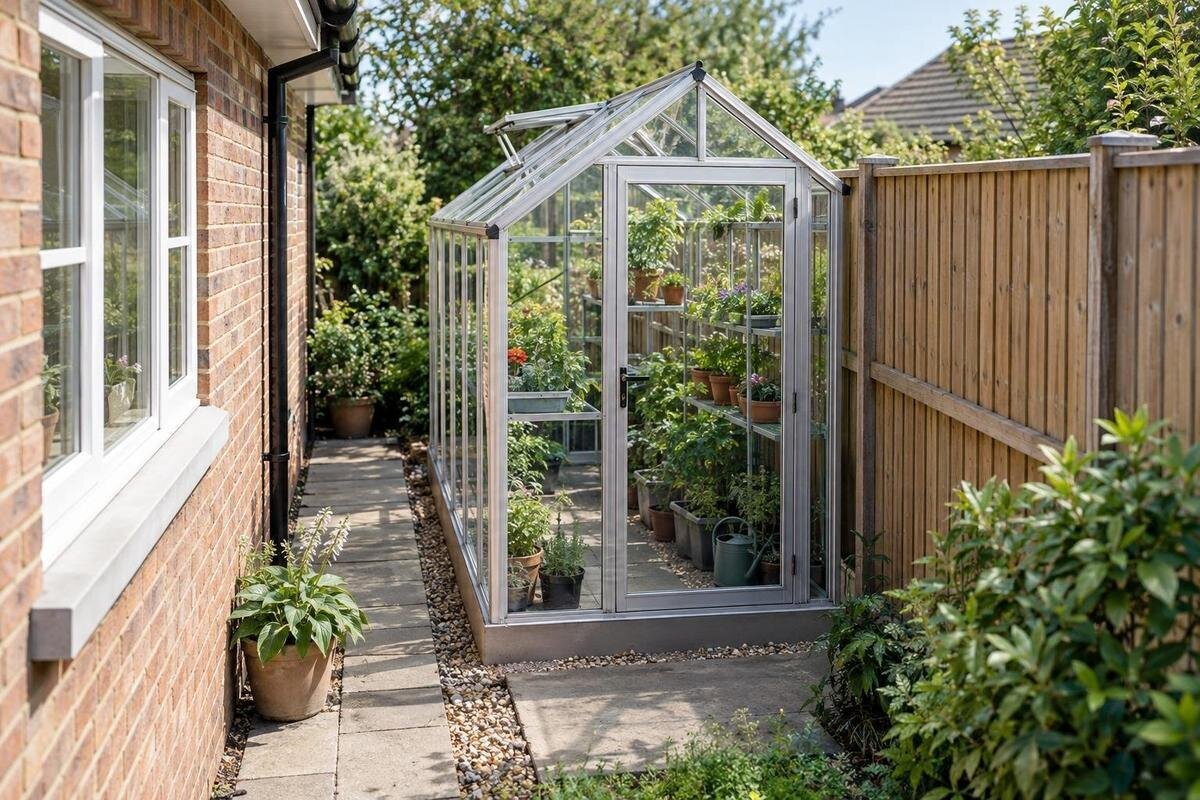
A greenhouse can fit between a house and fence if the measured space works for more than the frame alone. You need room to assemble and reach it, operate its doors and vents, manage water from both roofs, and retain enough internal width for growing. In a narrow passage, one downpipe or opening door can change the answer. Measure the site and compare it with the exact greenhouse variant before treating the nominal gap as usable space.

Measure the narrowest clear width
Measure from the house's outermost fixed projection to the fence's inner face, rather than between the wall and the fence line. Take readings at both ends, the middle and every visible pinch point: a downpipe, meter box, gate hinge, wall tap, air-conditioning unit, fence post or rail can reduce clearance. Include eaves or another overhang if it enters the greenhouse's roof or access zone. Note which items could move and which must remain reachable; a removable hose still needs space to use, and a service cover cannot be hidden behind a structure. Record each obstruction's position and height as well as its width, so the sketch shows exactly where the passage narrows.
Repeat the survey at ground level and at the heights where the frame, roof edge and gutter would pass. A leaning fence or walls that are not parallel can make one floor-level reading misleading. Mark clear widths at several intervals on a simple scale drawing, with the house, fence, doors, gate and fixed services labelled. Photograph the passage from both ends and note where each measurement was taken, so the images can be matched to the plan later. Use the smallest relevant clearance, not an average. A long greenhouse may fit at one end yet conflict with a pinch point halfway along, so survey its full proposed length.
Compare the full external footprint
Find the dimensions for the exact greenhouse model and variant, not just a headline floor area. Compare external width and length, overall height, base outline, and any roof, eaves or gutter projection with your site sketch. Area alone cannot tell you which side is wider or what protrudes into the passage. When comparing options in the aluminium greenhouse range, use the measurements for your selected variant to check it against the available space. If a projection or base size is not stated, ask for it rather than estimating from a photograph, where perspective can distort proportions.
Draw the complete external envelope to the same scale as the passage, including the frame, base, roof edge and any gutter or downpipe. Place it along the narrowest part of the sketch and check the clearance on both sides, not just at the open end. The permanent outline is only one layer: installation instructions may specify assembly access or a particular side for servicing, while a future panel repair may also require outside reach. Check the route for bringing components through the gate and into position. A line that fits on paper is not a workable choice if the structure cannot be delivered or assembled in the available space.
Leave access for maintenance
Even a greenhouse that fits on paper can leave too little room for routine care. Find out which outside faces and fittings must be reached to clean glazing, clear leaves, inspect seals or frame joints, and replace a damaged panel; those tasks depend on the chosen design. For a model in the Limited Edition aluminium greenhouse range, check the instructions to see which tasks can be done from inside and which need external access. If the unit sits close to a wall or fence, check how you would reach the blocked side without scraping surfaces, leaning over the roof or relying on an access route that disappears once the greenhouse is in use.
The house and fence need attention too. Keep practical access to windows, cladding, taps, service covers, fence gates, gutters and downpipes that require maintenance. A gap wide enough for a person to squeeze through may still be too tight to open a cover, carry a tool or clean a surface. List the jobs you expect to do and any equipment they require, then compare them with the clear route on site. For work that normally needs a ladder or a tradesperson, ask how it will be carried out before installing the greenhouse. Think about access after plants and containers fill the interior, not just on installation day; one accessible end does not make the whole arrangement maintainable.
Work out the usable growing width
External size is not growing space. The frame and base, beds, pots, benches and shelves all use part of the width, while an aisle takes up more. Sketch a cross-section and mark how much internal width remains after allowing for the frame and any projecting fittings. Add the width of each bed, containers, shelving and the walking route you actually want; do not count every floor square metre as productive area. If built-in storage is part of your plan, include its footprint and access: the Limited Edition Aluminium Greenhouses with Storage listing needs the same variant-level check as any other option. Total area does not reveal how much clear width remains for beds and an aisle.
Make the drawing match the way you garden. A single bed with access from one side uses space differently from beds or benches along both walls; pots that need moving require a clear route to the doorway. Check the door opening against the widest tray, container or tool you expect to bring inside, then decide where seedlings and supplies will sit. Consider how you will reach the back of each bed without stepping on soil or stretching over other plants. A layout that only works when shelves are removed or the aisle is blocked is not a practical growing space. Leave access for when foliage fills the beds, rather than judging an empty greenhouse.

Check doors, vents and gates in use
The greenhouse door can turn an apparently suitable gap into a blocked passage. Check the clear opening, its position, hinge side and full swing, or the travel space if it slides; do not assume its direction can be changed. Draw the open door on your site plan. When comparing a Pyramid Greenhouse, mark the entrance position and the space needed to use it rather than judging the fit by its footprint alone. Also mark the house door and fence gate, so you can see whether two openings compete for the same strip or prevent access. Door position affects whether bulky growing supplies can get inside without awkward manoeuvring.
Repeat the check for roof or side vents, windows and access panels, as well as nearby house windows and gates. Confirm their full operating position and whether an open part would meet the wall, fence, eaves, gutter or another opening. Include enough room for a hand or tool to reach latches and fittings. Some conflicts are above head height, so check a side elevation as well as a ground plan. Trace the usual route through the passage with doors open, and test where you would carry a watering can or pot. If opening a required component blocks the only route in or forces it against another surface, a different position or model may be needed. Verify details for the exact version.
Plan for runoff from both roofs
Rainwater deserves its own sketch because the house and greenhouse may both shed water into the same narrow strip. Identify the house gutters and downpipes, existing outlets, low spots and any places where water already ponds after rain. Mark where the greenhouse roof edge or gutter would discharge, including the likely overflow route, and note whether water could cross the walking path or collect beside the house or fence. A photograph taken after rain can show a route that is invisible on a dry day. Do not assume the ground will absorb extra runoff or that a nearby drain can accept another outlet. Record which gutters need regular cleaning and whether they can be reached.
Check the chosen model's documented gutter and outlet arrangement, then work out how both roofs can be managed without sending water against a wall, over a boundary or across a path. If you intend to collect greenhouse runoff, plan where a container would sit and where overflow would go; a tank and hose can also occupy valuable access space. Keep gutters and outlets reachable for cleaning. Where the discharge route, soil behaviour or existing drainage capacity is uncertain, ask a qualified drainage professional and check requirements with the relevant local council. Avoid improvising a connection to existing drains or changing a discharge route without advice; revisit the site plan if an outlet needs to stay accessible.
Map shade through the year
Light in a side passage changes with the sun's path, and the house and fence cast different shadows at different times of day and year. Photograph the space from fixed points in the morning, around midday and in the afternoon, recording the date and position; repeat in another season if possible. A scaled seasonal shadow diagram can show the house, fence, proposed greenhouse and areas likely to be shaded. One bright visit, or a summer photograph alone, cannot tell you what the growing beds will receive through the year. Include nearby structures that add shade, and note which parts of the passage lose light first; the pattern can vary along its length.
Overlay the intended growing area, not just the roof outline, on your shade notes. Beds may sit nearer the house or fence than the greenhouse centre, and the structure itself can shade parts of the interior. If you are considering a T-Model Orangery Greenhouse, plot the exact variant's dimensions against your site observations to see where the proposed growing areas fall within the shadows. Then check the light needs of the plants you intend to grow using reliable crop-specific guidance. A bright patch at one end may still leave most of the growing area in shade, so evaluate the whole proposed layout rather than one attractive spot.
Consider airflow in the enclosed passage
A passage enclosed by a house and fence may be more sheltered than an open garden, but the effect depends on its orientation, surrounding openings and local wind. A wall or fence can also sit close to an opening and interfere with how a greenhouse ventilates; gap width alone does not establish airflow. Check the chosen model's instructions for ventilation openings and any clearances around them. For the Bloomcabin Prestige Greenhouse, compare the ventilation layout of the exact version with your passage measurements. Check both the position of each opening and the space around it to establish whether it can be used in this location.
Walk the passage at different times and note whether the house's own doors or windows open towards the greenhouse, whether vents can be reached, and whether a roof projection blocks their movement. Do not count the space as ventilated merely because it is open at one end. Nearby paving, masonry or other hard surfaces may alter local conditions, so observe the space rather than assuming it behaves like an exposed garden bed. If required openings cannot operate, or product instructions call for clearances the site cannot provide, discuss another arrangement with the supplier or a qualified greenhouse installer before purchase.

Compare wall and freestanding greenhouses
A wall-side passage can make a lean-to or wall greenhouse seem an obvious choice, but proximity alone is not enough. Confirm that the Wall Greenhouse you are considering is designed for the intended wall relationship, and check its instructions for support, attachment, clearance, drainage and access. The catalogue name identifies a wall-greenhouse option; it does not establish that your house wall is suitable or that a fence can act as a second support. Do not assume either surface can carry or restrain a greenhouse unless the product requirements and a qualified professional confirm the arrangement. Keep house openings and services in the comparison too.
A freestanding greenhouse still occupies its complete base and needs space for assembly, care and any specified site preparation. Compare a freestanding and wall-adjacent option on the same scale drawing rather than assuming the latter saves useful width. If installation involves attachment to the house, building work, drainage changes or a boundary concern, seek site-specific advice from an appropriate qualified professional and check with the relevant local council for applicable requirements. There is no universal clearance number that resolves every model and property, so use the instructions for the option you are actually considering.
Test the complete layout on site
Bring the decisions together on one scaled drawing: narrowest widths, greenhouse envelope, door and vent movement, inside bed plan, access route, shade and runoff arrows. Check the final model and variant, not a generic category picture. The Spacious Greenhouse listing gives an area range from 47 to 70 m², but floor area alone cannot establish external width, projections, access or whether it suits a side passage; those details require the selected variant's specifications. If practical, mark the proposed outline on the ground with removable markers and walk the route carrying a pot or tool. Keep existing gates, service access and house maintenance clear during the test.
Call the passage workable only if the greenhouse fits along its full length, can be installed and serviced, opens as required, has a manageable runoff route and leaves an internal layout with light suitable for your intended plants. If one condition fails, compare a smaller or differently shaped model using its own measurements, consider another location, or keep the passage for access. A forced fit can lead to blocked gutters, awkward repairs or beds that cannot be reached. Keep the sketch, photographs and product specifications together so a supplier or installer can review the same constraints, and revise the plan if a measurement or instruction changes.
Frequently asked questions
How narrow can the gap be for a greenhouse?
There is no single minimum gap that suits every greenhouse. Start with the selected variant's external width and projections, then account for installation, doors, vents, maintenance and the internal layout. A frame that physically fits may still leave too little access or usable growing width.
Is a lean-to greenhouse automatically the best fit beside a house?
No. A wall greenhouse may be worth comparing, but confirm that it is designed for your wall and that access and runoff remain workable. The house may have windows, gutters or services to maintain, and a fence cannot automatically provide support.
Can a greenhouse sit directly beside the fence?
Only if the selected design's instructions allow the available clearances and you can still do the required cleaning, inspection and repair. There is no universal fence gap; list the maintenance tasks and check with the supplier or a qualified installer if access is uncertain.
How do I check whether runoff will be a problem?
Check both roofs' gutters, outlets and overflow routes, and observe where water lies after rain. Show those paths on your site sketch. If the passage has no clear discharge route, or you are unsure about existing drainage, seek advice from a qualified drainage professional.
How can I judge shade in a narrow passage?
Record shadows at several times of day and across seasons, using photographs from fixed points or a scaled diagram. Assess the growing beds, not just the roof or the brightest part of the passage, then compare the observed light with the needs of the plants you want to grow.
Treat the wall-to-fence width as the first measurement, not the verdict. A side passage is suitable for a greenhouse only when there is room for its full external outline, maintenance access, doors and vents to open, managed runoff and a useful interior layout. If the plan leaves a fitting blocked, water unmanaged or beds out of reach, another position or a smaller design may be more useful. A scaled sketch should make that clear before you settle on a model.
