
How to Recognise Damping Off in Collapsing Greenhouse Seedlings
Seedling health
Seedlings that topple at the surface of the seed-raising mix may be showing damping off, a disease problem that can move quickly through crowded, persistently damp trays. The main clue is often a weakened stem where it meets the mix, but collapse alone is not proof: watering stress, heat, root damage and other problems can look similar. Inspect the stem, compare plants across the tray and review recent conditions before deciding what to remove or change.

Greenhouse setup checks 1
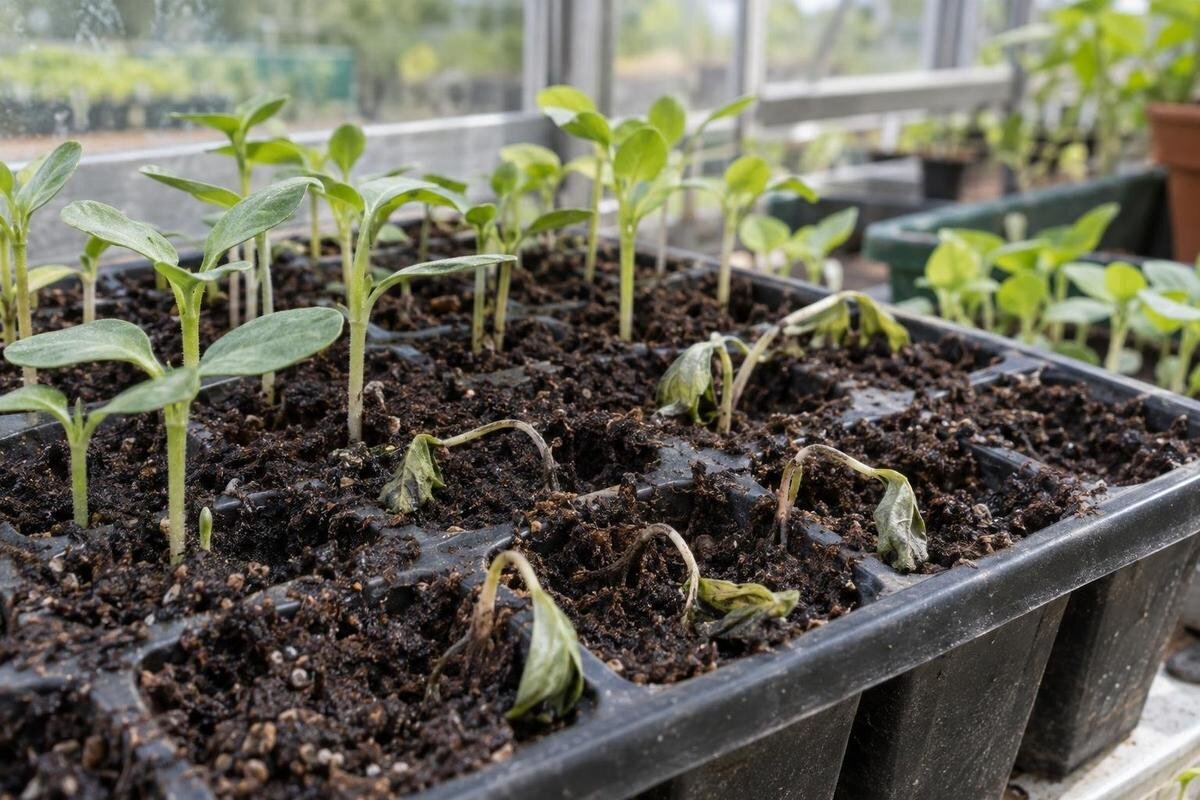
The classic sign is a weakened stem at the mix line
Post-emergence damping off often begins with a seedling that looks water-soaked, darkened or pinched where its stem meets the growing medium. The stem may narrow, soften or develop a brownish lesion at that level; the leaves then wilt and the plant can topple. Appearance varies with the crop and organism, so not every case shows the same mark. A damaged stem at the mix line, especially alongside rapid collapse, is more suggestive than limp leaves alone. Examine several seedlings, including one just starting to wilt, rather than relying only on a fully shrivelled example.
Look for progression as well as appearance. A seedling that stood upright and then bent at the base is different from a tray that becomes limp after the medium dries. The mix may still be damp, but wetness alone does not prove infection. Damping off can develop in patches or among scattered plants, and early symptoms may change quickly. Note the crop, sowing date, tray, bench position and when the first plant failed. If possible, photograph an early case before removing it; a clear record helps you compare later changes and explain the pattern if you seek a diagnosis.
Damping off can begin before seedlings emerge
Damping off can occur before emergence: a seed may rot, or a newly germinated shoot may die below the surface. The result can be a bare patch beside seedlings that have emerged normally. If you carefully check one failed cell, a soft, discoloured seed or decaying sprout supports concern, but disturbing many cells can damage seeds that are still viable. Poor emergence can also result from low seed viability, sowing too deeply or germination conditions that do not suit the crop. An empty cell is not enough to diagnose a disease.
Compare the number and position of failures, and check reliable, species-specific guidance for sowing depth and germination requirements. Record the seed lot, sowing date and medium; if one tray is affected while another sown at the same time remains healthy, note differences in watering or handling. Avoid adding water just because cells are bare: check the mix first, as extra moisture may leave the tray saturated. For future sowings, plan identifiable groups of trays rather than filling every available gap. The Bloomcabin Prestige Greenhouse range is listed from 3.77 m² to 28.08 m². Compare a chosen model’s dimensions with your trays and access needs, allowing room to read labels and inspect empty cells without moving neighbouring batches. Keep that arrangement on a simple bench sketch so your emergence records refer to recognisable positions. The overall area is a starting point for this plan, not a measure of usable bench space.
Greenhouse setup checks 2
Examine the stem and roots, not just the leaves
Inspect the transition between stem and mix closely. On a suspect seedling, a constricted, soft or darkened section near the surface is a useful clue; a root that is soft or decaying may add context, although root colour varies by crop and medium. If you need to check below the surface, lift one early symptomatic plant gently with some surrounding mix rather than uprooting a whole row. Compare it with a healthy seedling of the same crop and age. Keep the sample away from clean trays, and clean your hands or tools before handling healthy plants.
Do not treat every thin stem as a damping-off lesion. Insufficient light can produce a long, weak stem that bends higher up, while transplant or handling damage may leave a break, bruise or disturbed roots. A clear lesion at the medium line makes damping off more plausible, but no single visual sign identifies the organism. Take a close photograph with the base and surrounding mix visible, and note whether the tissue feels firm, soft or water-soaked. Those details are more useful than a distant image of collapsed leaves alone.
Compare the symptoms with other causes
Other problems can produce similar symptoms. Underwatering can cause several seedlings to wilt at once, often with dry mix; waterlogging can damage roots without an infectious disease. Heat or cold stress may affect a whole exposed area, and excess fertiliser or salts can injure roots. Inadequate light usually produces stretched, weak growth rather than a distinct soft lesion at the stem base. Insect damage or a snapped stem can also topple an individual plant. These clues are not foolproof, but they help you compare the collapse with recent conditions instead of assuming infection.
Map affected plants against tray cells, rows, watering zones and positions near doors, vents or sunny panels. A cluster can reflect spread through wet mix or shared handling, but it might also match uneven watering or a hot or cold spot; scattered cases do not rule damping off out. Record when and where new symptoms appear, and compare trays of the same crop and age. If you are considering a larger propagation area, the Spacious Greenhouse range is listed from 47 to 70 m². On your proposed layout, mark the benches and watering zones as well as doors and paths. Give each bench or tray group a consistent name that you can use in your notes. This makes a future symptom map easier to interpret than descriptions such as ‘the tray at the back’, particularly when batches move during the growing season.

Greenhouse setup checks 3
Separate suspect trays and limit movement
If a tray is suspicious, move it away from healthy seedlings without brushing leaves or spilling mix across the bench. Keep it on a separate, washable surface and do not set it above clean trays, where drainage could drip onto them. If moving it risks spreading wet mix, contain it in place until you can lift it carefully. Avoid sharing run-off or standing water between trays. Handle healthy batches first and suspect ones last, then clean any tool that touched the affected plants. Mark the tray so it is not returned to the usual watering queue by mistake.
Remove seedlings that have collapsed or show clear stem-base symptoms, along with loose debris, using clean hands or a clean implement. Do not reuse their growing medium for another sowing; follow local waste guidance if you are unsure how to dispose of suspect material. Keep unaffected plants in the same tray under observation rather than immediately pulling every seedling. When planning a separate holding area, use the footprint of a whole tray, not just a few individual pots. The Aluminium Classic Greenhouse range is listed from 3.77 m² to 28.08 m². Check whether your proposed layout leaves a washable surface accessible without carrying suspect trays over healthy batches. Include space to lift and set down a tray securely; a spare corner is not useful if reaching it means brushing against other seedlings.
Clean trays, tools and benches thoroughly
Reuse trays, pots and tools only if you can clean them thoroughly. First remove visible roots and growing medium, then wash the surfaces with detergent and water; organic residue can make subsequent disinfection less effective. If you use a disinfectant, choose one suitable for the material and follow its label for dilution, contact time, rinsing and safe use. Do not mix cleaning products or assume a quick rinse disinfects equipment. Let items dry as directed and keep them away from used mix and dirty tools while they are clean.
Include the bench, watering can, dibbers, labels and any container used to move trays, not just the seed cells. Move healthy batches away before cleaning the dirtiest items, and wash cloths used on the area. Keep clean and used trays apart during the clean-up to avoid transferring debris. Cleaning access also deserves attention when choosing a greenhouse layout. The Wall Greenhouse listing gives an area range of 3.69 m² to 14.34 m². Check how you would reach behind benches and remove trays for washing in the configuration you are considering. On your plan, trace the route from the used-tray area to wherever you wash equipment, then identify a separate place for clean items to dry. This is more useful for organising the cleaning routine than comparing floor areas alone, and it helps reveal awkward corners before you fill them with equipment.
Greenhouse setup checks 4
Review moisture, humidity and airflow together
Persistently wet growing medium and still, humid conditions can favour some causes of damping off. A greenhouse can hold moisture and warmth, but different organisms have different conditions that suit them, so do not assume every outbreak means the space is too warm. Dense sowing, poor drainage and lingering condensation can also keep seedlings and the surface around them damp. Consider the crop’s germination needs alongside how quickly the tray dries in its position; avoid changing temperature or ventilation without considering the needs of the seedlings.
Review how often and how heavily you water, whether trays drain freely, and whether any remain in run-off. Improve air movement where practical, while avoiding sudden drying or exposing young plants to unsuitable conditions. Note whether symptoms follow watering or occur in one consistently damp part of the greenhouse. Record the condition of the mix when you check it, rather than describing a tray only as ‘watered today’; that distinction helps you compare its drying pattern with neighbouring trays. If you are considering the Limited Edition Aluminium Greenhouses range, listed from 3.77 m² to 28.08 m², examine the exact configuration alongside your proposed bench positions. Identify which trays would be easy to inspect and where you would check for lingering moisture. A larger floor area does not, by itself, resolve the moisture conditions around seedlings.
Reset the sowing routine before the next batch
For a fresh sowing, start with clean containers and new, suitable seed-raising mix rather than reusing mix from suspect trays. Follow the crop’s guidance for sowing depth and spacing; crowded seedlings are harder to inspect and air can move less freely around them. Use seed from a clearly identified lot, label each batch, and avoid mixing old and new material in one tray. Good drainage matters, but seedlings still need consistent moisture for germination, so use the crop’s requirements rather than a fixed watering schedule.
Keep watering tools and clean trays separate from items used on suspect batches, and write down changes to the sowing mix, watering and greenhouse position. Before starting again, decide where each item belongs so clean equipment does not return to the surface used for removing affected plants. If storage is part of your buying criteria, the Limited Edition Aluminium Greenhouses with Storage range is listed from 5.52 m² to 28.08 m². Check the actual storage arrangement against the trays, tools and containers you intend to keep there. Include the space needed to take items out without setting them among used equipment. The product name does not establish how that separation will work in your layout. A simple allocation of clean storage, sowing space and used-equipment space makes the routine easier to follow when several batches need attention at once.

Greenhouse setup checks 5
When to seek specialist confirmation
Ask for a specialist opinion if collapse is spreading quickly, appears in several sowings, returns despite careful hygiene, or affects a valuable batch. Confirmation is also worthwhile when the stem-base signs are unclear or several possible causes fit the symptoms. Damping off is associated with more than one soil- or water-related pathogen, and other stresses can resemble it; a visual guess may not point to the right response. Avoid applying a fungicide simply because seedlings have fallen over: the cause and crop matter, and a product may not be appropriate.
Contact a local plant pathology diagnostic service or horticultural diagnostician before sending a sample. Ask what plant material they need and how it should be collected and packaged. Provide clear photographs, the crop and sowing dates, the growing medium, recent watering and any pattern across trays; note what you have already removed or cleaned. Keep your observations separate from your interpretation: ‘three seedlings bent at the mix line’ is more informative than recording an unconfirmed diagnosis as fact. Their advice may also help you decide which aspects of the growing setup to review. If that leads you to compare future propagation space, the T-Model Orangery Greenhouse range is listed from 16.52 m² to 30 m². Use your observations to define the layout questions you need answered, rather than treating a different structure as a remedy for an unidentified cause.
Keep a record to protect the next batch
After an outbreak, bring your observations together in a record you can compare with the next sowing. Include the seed lot, crop, sowing date, mix, tray, greenhouse position and watering changes, then add when and where symptoms appeared. Keep dated photographs with the relevant tray notes rather than in an unlabelled collection. Distinguish seedlings that failed to emerge from those that emerged and later collapsed, as these are different observations. If another batch fails, the record can show whether the same crop, location or routine is involved. Change one growing condition at a time where practical, so you can judge the effect of each adjustment. Record batches that remain healthy too; otherwise, your notes will describe the losses without showing what happened in comparable trays.
Plan enough bench access to inspect every tray without rearranging the whole batch. When drawing up a future space plan, the Pyramid Greenhouse range is listed from 5.53 m² to 18.9 m². Compare the chosen model’s actual dimensions with your benches and paths, paying attention to the trays furthest from the walkway. Check whether you could see the stem bases, read the labels and lift out one tray while leaving its neighbours undisturbed. Draw the trays at their actual size rather than representing each bench as an empty rectangle. This keeps the buying comparison focused on inspection access, not simply the number of trays that appear to fit. Together with consistent records, a workable layout supports closer observation without turning every failed seedling into a presumed case of damping off.
Frequently asked questions
Can damping off happen before seedlings emerge?
Yes. A seed or newly germinated shoot can decay below the surface, leaving an empty cell or patch. Poor germination has other causes too, so check the seed lot, sowing depth and crop requirements before deciding that a disease is responsible.
Should I discard every seedling in an affected tray?
Not necessarily. Separate the tray from healthy batches, remove collapsed or clearly affected seedlings, and monitor the rest. If symptoms keep appearing or most of the tray is affected, seek advice about whether removing the whole tray is the safer option.
Can I reuse a seed tray after damping off?
Reuse it only if you can remove all growing medium and debris, then clean and disinfect it with products suitable for that material. Follow the label directions and let the tray dry as directed. Replace items that are damaged or too difficult to clean.
Will drying out the seed-raising mix stop damping off?
Letting the mix dry out completely can stress or kill seedlings and does not confirm or cure an infection. Aim for the moisture and drainage the crop needs, and avoid leaving trays persistently waterlogged or sitting in shared run-off.
Should I apply a fungicide to collapsed seedlings?
Not on symptoms alone. Several organisms and non-infectious stresses can cause collapse, and a product may not suit the crop or the cause. Ask a qualified local horticultural diagnostician whether treatment is appropriate before using any product.
A collapsing seedling deserves close inspection, not an automatic diagnosis. A soft, narrowed or discoloured stem at the mix line alongside rapid collapse raises suspicion, while an empty cell or wilting leaves alone do not identify the cause. Photograph early cases, separate suspect trays, protect clean batches and review moisture and hygiene. If losses spread or return despite those steps, specialist confirmation is more useful than guessing at a treatment.
