
Pricking Out Seedlings at the Right Stage for Larger Pots
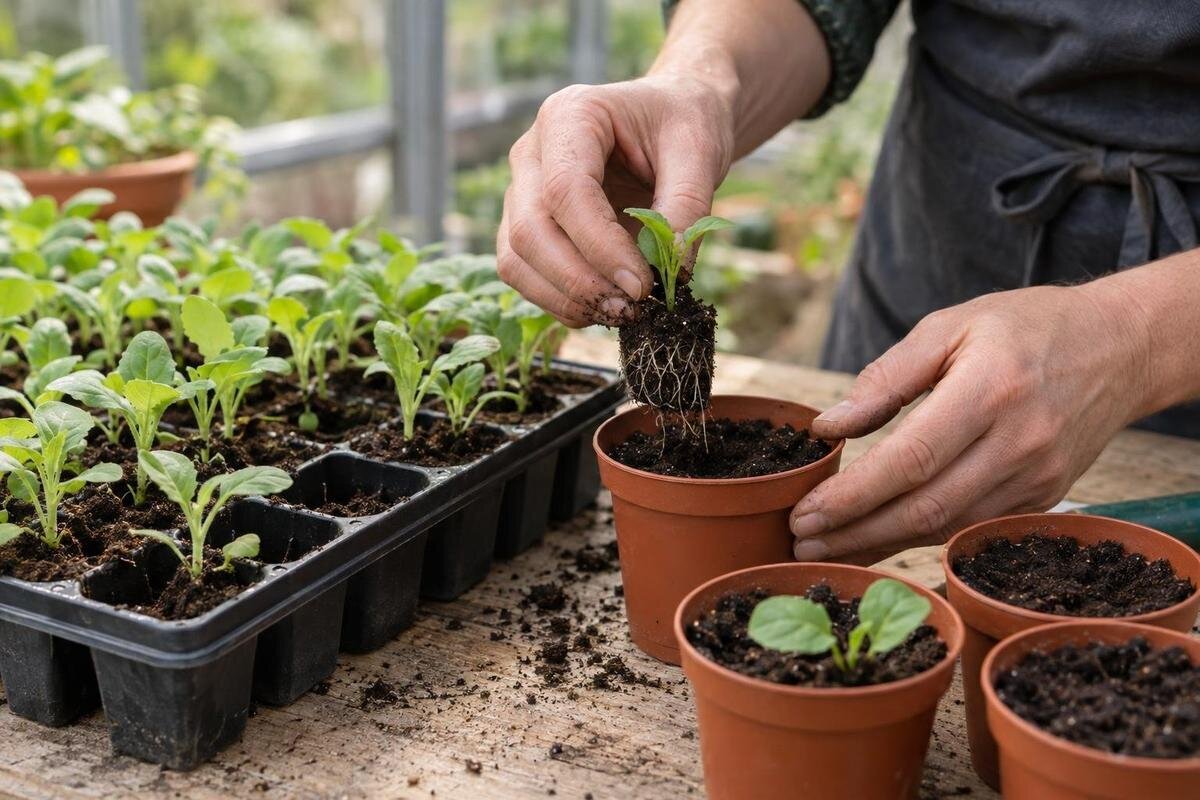
Seedling propagation
Pricking out moves young seedlings from a shared tray or cell into individual pots. The right time is not a fixed number of days after sowing: it depends on leaf development, root growth and how closely the plants are growing. This guide focuses on those signs and on lifting seedlings with minimal root disturbance. A few seedlings in one tray may be ready before the rest, so assess them individually rather than moving every plant on the same day.

01
True leaves are a better guide than a calendar date
The first leaves to appear are cotyledons, which come from the seed. They can look quite different from the plant’s later foliage, so don’t count them as proof that the seedling is ready. True leaves develop after the cotyledons and gradually take the characteristic shape of the species. For many seedlings, the first one or two open true leaves provide a practical window: the plant is large enough to identify and handle, without having to wait until a dense root mass forms. It should also stand upright and be big enough to grip by a leaf without crushing it. If you don’t recognise the foliage, compare it with a reliable species guide rather than guessing from leaf count alone. A photo of the foliage can also help you compare its development over several days.
Use development, not the number of days since sowing, as the main guide. Seeds sown together can emerge at different times, and warmth, light and moisture affect how quickly they progress. A fast-growing plant may have open true leaves while a neighbour still has cotyledons only. Check several representative seedlings, then judge the rest individually rather than assuming every cell is at the same stage. If species-specific guidance recommends a different transplant stage, follow it. A record of leaf stage alongside the sowing date also helps you compare this batch with the next one; the date is useful context, not a trigger.
Use root growth as a supporting clue
Roots help show whether a seedling can be lifted safely and whether it needs more room. In a cell tray, a few pale roots at a drainage opening show that roots have reached the base; in a shared tray, a small clump of mix may hold together when gently eased up from an edge. You do not need to empty the tray or wash mix away to inspect them. Lift one seedling or plug gently with a dibber and check whether fine roots hold a little mix around them. A plant that comes away with some mix protecting its roots is generally easier to transplant than one whose roots are exposed as the mix crumbles. One root visible below a cell is not enough to judge the whole plug. Support the underside of the plug as it comes free.
Do not wait for a thick root mat or long roots wound around the bottom of a cell. Those are signs that separation may be harder, particularly when several seedlings share a small space. At the other extreme, roots need not fill every centimetre of a pot before pricking out; small seedlings can be moved while roots are relatively delicate if their leaf development and species guidance indicate they are ready. Drainage-hole roots are a prompt to inspect, not a verdict by themselves. Look for a balance: the seedling can be lifted with some mix around its roots, but its roots have not become tightly tangled with those of neighbouring plants. If a test lift meets resistance, loosen the mix rather than pulling harder.
02
Judge crowding alongside leaf and root stage
Crowding is useful evidence because leaves and roots share a limited growing area, but leaf overlap alone does not mean a seedling is overdue. Look at the density of the group and whether neighbours are pressing against one another, shading smaller plants or making it hard to reach their bases. Pair this with the leaf and root signs: open true leaves and roots that can be separated make a stronger case than crowded foliage alone. Check the tray from more than one spot; a single corner may not represent the whole batch. Also consider whether you can get a tool between plants without damaging stems. If leaves meet but stems and roots still have space, immediate potting may not be necessary.
When several seedlings have emerged in a small cell, decide whether you want separate plants or only one plant to grow there. Pricking out is appropriate when individuals can be separated and grown on; thinning is different, because surplus seedlings are removed rather than potted individually. For a shared tray, work along a small section at a time so you can see which roots belong together. Choose an undamaged, vigorous plant when a cell is meant to hold one seedling. Transferring seedlings into individual pots also increases bench-space demand. If you are comparing greenhouse sizes, the Aluminium Classic Greenhouse listing spans 3.77–28.08 m²; distinguish the overall floor area from the bench surface available for those pots.
Treat mixed batches as separate groups
If a tray contains different species or batches sown several days apart, don’t force them into one transfer session. A plant with open true leaves and roots that lift cleanly can be pricked out while a slower neighbour stays in place. Keep track of which areas have been moved, especially if you plan to return to the tray later. This avoids lifting small seedlings simply to make the tray look uniform. One plant’s readiness does not have to dictate how long every other plant remains in its cell. Check more than one area of a large tray before treating the whole batch as ready. If cells are individual, lift only ready modules and avoid disturbing adjoining plugs.
Take only as many seedlings as you can pot and label without leaving the rest exposed for long. Where you remove a section from a shared tray, lift the group gently and separate ready seedlings from the mix; avoid tearing adjacent roots to make the remaining plants look neat. Leave undersized seedlings undisturbed if they still have room, and note when you will assess them again rather than shifting them by default. A small map or label can show which patch has been cleared. When comparing a Wall Greenhouse with your available space, allow for trays that remain in use alongside the newly filled pots, rather than planning around one batch alone.

03
Prepare pots and the work area first
Have individual pots ready before lifting seedlings. Choose a container that comfortably holds the root system with some room for the next stage, rather than putting a tiny root plug into a much larger volume of mix. Extra unused mix around small roots can stay wet longer, so a pot matched to the plant’s present size is easier to manage. Use containers with drainage openings and a fresh, suitable potting mix; follow the mix label and species guidance instead of assuming every seedling needs the same blend. If seedlings vary in size, preparing two pot sizes can avoid forcing roots or over-potting the smallest ones. Clean reused containers and remove old roots and debris.
Moisten the mix so it is workable and evenly damp, not saturated; very dry mix can be difficult to settle around roots, while soggy mix is awkward to handle. Put labels, a dibber or blunt plant label, a watering container and empty pots within reach. Set the seed tray beside the potting area and make room for finished pots separately from seedlings still waiting to move. Keep labels visible once watering begins, as a group of unmarked pots is easy to mix up. A shallow carrying tray can keep a few finished pots together while leaving their drainage clear. If you are considering the Limited Edition Aluminium Greenhouse, include this temporary working area in your bench plan, not just space for the finished pots.
Support the roots and hold seedlings by a leaf
If the tray is dry, water it ahead of the transfer and allow excess water to drain so the mix is damp rather than muddy. Slide a dibber, plant label or similar narrow tool under a seedling and lift from beneath the roots; don’t pull it up by its stem. Hold it lightly by one leaf or cotyledon; a damaged leaf is usually less serious than a crushed stem. Avoid pinching the growing tip or squeezing the leaves. If the plug resists, work the tool underneath from another side instead of levering against the stem. Keep lifted plants out of direct sun and handle only a small group at a time so the roots do not dry while you work.
If seedlings share a clump, ease roots apart with your fingers or the tool, working from the root ends and keeping as much fine root as possible. Do not shake off all the mix or tug at two stems to split them. For very fine roots, leaving a little surrounding mix attached avoids unnecessary exposure; a perfectly clean root is not the goal. For a dense sowing, divide the cluster into smaller pieces before teasing individual roots apart. If separation would require force, loosen more mix around the cluster and separate only what comes free easily. Leave very small neighbours in place where possible. Keep trays and finished pots close, with a clear patch to set down seedlings. Even when comparing the 47–70 m² options in the Spacious Greenhouse listing, plan the immediate work area so you can reach supplies without carrying exposed seedlings across it.
04
Keep roots supported and plant at the right depth
Make a hole deep and wide enough for the roots to sit naturally, without curling their tips upwards or folding them into a tight bundle. If roots are long, open the hole to fit their length instead of shortening them to suit a shallow pot. Lower the seedling into the hole, then bring mix gently around the root zone. Keep it at about the depth at which it was growing unless reliable, species-specific guidance says otherwise; some plants tolerate deeper planting, while others can be harmed if stems are buried. Do not cover the growing point or press the medium down hard. Roots left exposed or forced into a curve can struggle to establish.
Water gently after planting so the mix settles around roots, rather than blasting the seedling out of place. Add a little more mix if watering reveals a gap, then label the pot with the plant and batch. A light press closes gaps without compacting the mix. Check that the seedling is upright and the root zone is covered; repeated lifting to inspect roots defeats the purpose of a careful transfer. For a layout that includes both a potting surface and finished plants, compare the selected T-Model Orangery Greenhouse configuration’s dimensions with your proposed bench arrangement. Its listed 16.52–30 m² area range is not a measurement of bench length.
Manage moisture and light after pricking out
After the move, keep the potting mix evenly moist, not waterlogged, while roots settle into the new medium. Check the mix in each pot rather than relying on a fixed watering schedule: pot size, plant size and greenhouse conditions all affect how quickly it dries. A greenhouse can warm quickly in sun, so avoid leaving tender seedlings in a hot, drying position. Choose a bright, sheltered area and protect plants from harsh direct sun or a sudden change in conditions while they recover; don’t leave them in deep shade for an extended period. The aim is steady moisture, not continuous saturation. Empty any water that collects underneath rather than leaving pots to sit in it.
Watch for new upright growth and leaves that stay firm, rather than judging success from a single hour after transplanting. A little temporary droop can follow handling, but persistent wilting calls for a check of moisture, root contact and surrounding conditions; adding water without checking can make an already wet pot worse. Avoid automatic feeding during recovery: some mixes contain nutrients, so follow the product label and plant-specific advice. Keep pots where you can inspect them without shifting them around. When planning a layout for the Pyramid Greenhouse, leave access to individual pots so you can check their mix rather than watering an entire group by default.

05
What to do when seedlings are too small or overdue
If a seedling still has cotyledons only, is very small, or loses the mix around its roots when lifted, it may be too early to handle comfortably. If there is room in the tray, let it develop further and recheck rather than lifting it simply because a neighbour is ready. Crop-specific exceptions matter: some plants are normally moved at a younger stage, so use reliable instructions for that plant. Where the tray is crowded but a seedling is undersized, move stronger individuals in small batches and avoid damaging the one you leave. Don’t apply a fixed leaf count to a species with a different early growth form. A short delay may make a fragile seedling easier to handle if the tray still has room.
If seedlings already have several open true leaves and roots beginning to knot together, move them promptly but carefully; further waiting can make separation more difficult. Ease apart roots while the mix is moist, use a dibber to free the root zone, and pot only seedlings you can handle without yanking. A weak or broken seedling may not recover, so prioritise intact roots and an undamaged growing point rather than forcing every plant into a pot. For scarce plants, keep a few undisturbed seedlings if possible instead of making one difficult separation your only option. Label groups by stage so they remain easy to distinguish. If you are comparing the Limited Edition Aluminium Greenhouse with Storage, mark those separate groups on your bench plan as well.
When seedlings need their next pot
Pricking out separates young seedlings; later potting on moves an established plant into a larger container. Once a seedling has settled and put on new growth, watch whether roots are using the current pot and whether the rootball holds together when it is time to transplant again. Roots showing at drainage holes, a tightly filled rootball or mix drying unusually quickly can prompt a closer look, but none is conclusive alone. Pot size, mix and watering all affect these clues, so consider several signs together. A larger container is useful when the roots need it, not simply because a set number of weeks has passed; use the next size advised for the species.
Keep a simple note of the date, leaf stage, number of seedlings moved and pot size used. If one group was too small or another already tangled, the record helps refine timing for the next batch without turning it into a rigid schedule. It can also help you judge how many trays and individual pots must share the greenhouse at once. Use notes as feedback on conditions and handling, not just as a record of dates. Note the bench position too if light or warmth varies across the greenhouse. If you later compare sizes in the Bloomcabin Prestige Greenhouse range, these records give you a practical basis for estimating how much growing space your batches need.
Frequently asked questions
What counts as a true leaf?
True leaves develop after the cotyledons, or seed leaves. They gradually take on the characteristic shape of the plant. Cotyledons can look quite different, so don’t count them as true leaves.
Can I prick out a seedling with cotyledons only?
Usually, it is easier to wait until true leaves have opened and the seedling is sturdy enough to handle. Some species are moved at a younger stage, so follow crop-specific advice if it differs.
Do I need to move every seedling in a tray at once?
No. If seedlings are at different stages, move the ones that are ready and leave smaller ones in place if they have room. Label the groups so you can check them separately.
Do roots need to show through the drainage holes?
No. Roots at the holes are a reason to inspect the plug, not a requirement for pricking out. Look for a seedling that can be lifted with a little mix protecting its roots.
How large should the new pot be?
Choose one that holds the roots comfortably without surrounding a tiny root system with a large volume of unused mix. Pot size varies with the plant, so check its growing guidance rather than using one size for every seedling.
Prick out when several cues agree: true leaves are open, seedlings are sturdy enough to handle, and roots can be separated before they knot together. Work in small, labelled batches, support the roots as you lift and keep newly potted plants evenly moist while they settle. Seedlings growing in the same tray need not all move on the same date; their development is the better guide.
