
Straight or Curved Greenhouse Walls: Usable Space Compared
Greenhouse planning guide
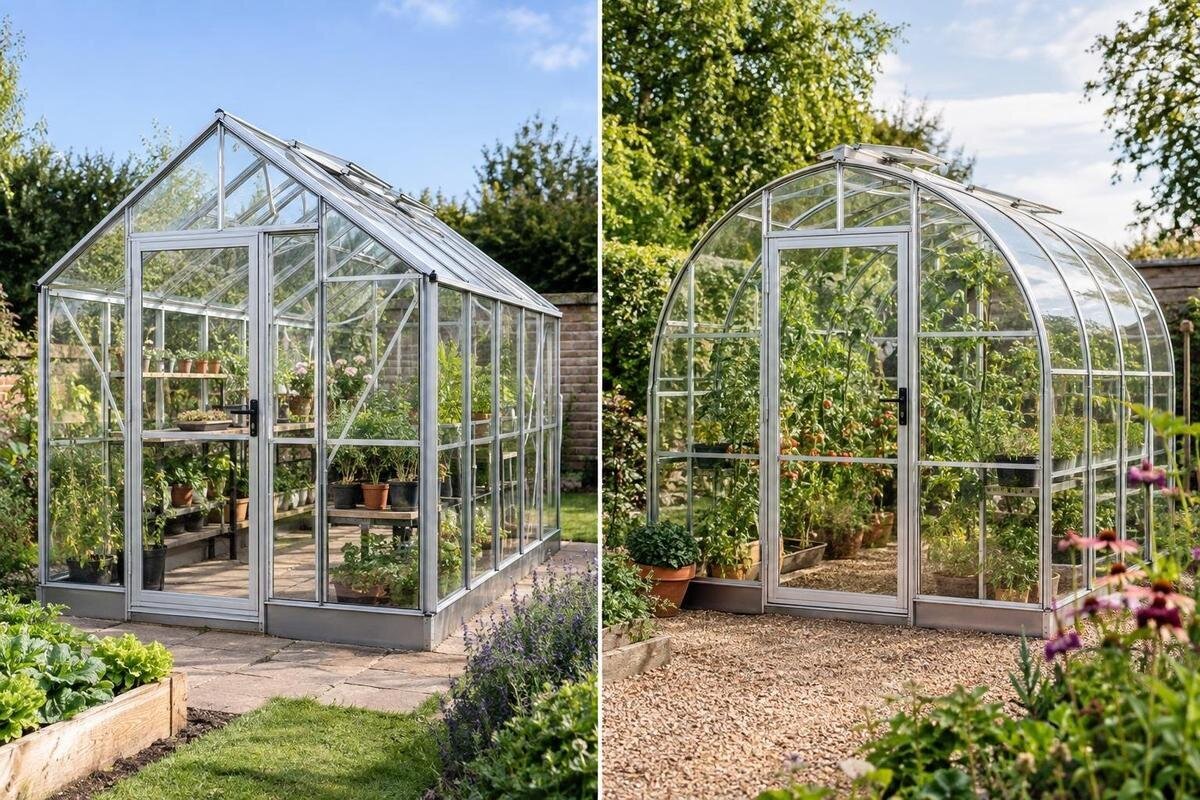
A greenhouse can have a generous outside footprint while the strip beside its wall is too low for a tall bench or upright crop. Straight-sided and curved-wall designs can use the same floor area differently, because the wall-to-roof transition affects where useful headroom begins to narrow. The comparison is not decided by a silhouette or model label: profiles vary, and a curved roof may sit above vertical sides. Check the exact inside cross-section against your benches, plants and aisle, then compare the space you can actually use.

What counts as usable greenhouse space?
Usable space is more than the area printed beside a model name. The footprint describes the ground area enclosed by the outer dimensions; clear floor area is what remains inside the frame and base. For a straight-versus-curved comparison, the extra measure is how much of that floor has enough headroom for a particular job. A low strip near the wall can still hold short pots or trays, but it may not suit a deep workbench, a tall crop or standing access. It is not automatically wasted; it simply has different limits. A bench may fit on the plan yet leave too little room to reach across it, so record what each part of the floor must do.
Make four marks on the plan: clear floor, fixed fittings or storage, bench or growing-bed footprint, and the aisle you need to reach them. Then add a cross-section showing clear height above the perimeter at each planned position. The published 47–70 m² range for the Spacious Greenhouse gives a sense of its listed area options, but an area figure cannot show whether the outer edge is full height, where the roof begins to narrow the room or how deep a shelf can be. Keep nominal area, inside width and height at the edge in separate comparison columns. Note the task beside each measurement; a low tray area and an unobstructed aisle are not interchangeable.
How the wall profile changes edge height
On a typical straight-sided cross-section, the side wall rises vertically to the eaves, and the roof then slopes or curves towards the ridge. This preserves clearance up to eaves height immediately beside the wall. If a curved wall bends inwards from near the floor, the available headroom increases as you move towards the centre. Other designs combine a short vertical wall with a curved roof, so the label curved covers more than one geometry. A rounded roof above upright sides is different from a wall that curves inwards at the perimeter. A small change where the wall meets the roof can affect shelf clearance, so judge the inside boundary in the exact section, not the silhouette in an exterior photo.
Choose the heights that matter in your greenhouse: the top of a bench, the top of a shelf, a crop canopy and the clearance you need to stand or reach. On the cross-section, mark each height above the floor and draw a horizontal line across to the inside face of the wall or roof. Note how far that intersection lies inwards from the perimeter. This shows where there is enough clearance for each task, rather than just the width across the centre. Check both sides separately, because a shelf sits beside one wall rather than spanning the whole section. A product name such as Pyramid Greenhouse does not, by itself, tell you where its wall reaches those levels, so confirm the profile for the selected model.
Benches and shelves beside the wall
A straight wall provides a flat vertical face where a continuous bench or shelf may be easier to position, provided the drawing shows enough clearance above it. With a curved wall, the space over a bench can taper towards the outside. Depending on the profile, you may need a shallower shelf, shorter sections or a freestanding bench set slightly inboard. These adjustments can reduce shelf space or take up more of the floor, so sketch them before deciding. Check the clearance above both the back and front edges, allowing room for pots, labels and your hands rather than measuring only the bare board. Include any visible frame members or supports that interrupt the run.
Plan the height and depth of each level together. A low bench may fit under a curve but still leave little room to reach the back row; a high shelf may meet the roof or a frame member. Keep the shelf edge outside the aisle and allow for containers that project beyond the board, so you can remove a tray without blocking the route. If a chosen listing names built-in storage, such as Limited Edition Aluminium Greenhouses with Storage, include its footprint and access in the plan before assigning the remaining perimeter to benches. Do not assume that storage sits outside the growing area; check where it appears in the chosen layout.
Compare greenhouse cross-sections like for like
A fair shape comparison needs like-for-like dimensions. Match outside width and length where possible, then note the clear floor width inside the frame and the clear length between end walls. Record side-wall height, the point where the roof begins, ridge height and any base or internal projection. Two greenhouses with the same advertised area can have different width-to-length ratios, changing the amount of perimeter beside a central path. If the footprints differ, an apparent gain in usable space may simply come from the larger footprint. Check that measurements use the same boundary: an external dimension cannot be compared directly with a clear internal one.
Use a dimensioned cross-section for the exact size or configuration under consideration. Put both drawings to the same scale and compare them at the same horizontal levels, not just at the floor and apex. Mark the interior boundary of the frames, the wall-to-roof transition and any braces or fixed fittings that occupy space. A family name—even T-Model Orangery Greenhouse—is not evidence of its edge clearance. Read the drawing labels as well as the lines, and ask for a dimensioned section if the product information gives only a plan or an exterior image. The point is to compare the available room, not which outline looks taller.

Plan the aisle as well as the perimeter
A cross-section shows height but not whether the whole layout works in plan. Draw the internal floor outline, then place the bench or growing bed at its actual depth and mark the aisle beside it. A perimeter strip that looks usable in section can disappear once the bench is deep enough for the pots you use. Measure the clear path between the bench edge and the opposite planting, frame or door route, allowing for containers and foliage that extend beyond their nominal footprint. Keep the door approach on the same drawing rather than treating it as a separate detail. A narrow aisle can make an otherwise suitable bench position awkward to work around.
Check how many sides can be reached and whether you can tend the back of a bench without stepping into a bed or shifting pots. A curved profile may lead you to set the bench further inboard, which can narrow the central aisle; a straight wall does not guarantee a wide path if the bench is oversized. The Wall Greenhouse listing identifies an aluminium lean-to, a different siting arrangement that illustrates why the chosen plan and access points matter. Do not assume that every greenhouse has two equivalent perimeter strips. Compare the clear internal width and the route you will actually use.
Allow for mature crops and their supports
Plan around the mature plant, not the seedling or empty pot. A tall crop beside a curved wall may meet the roof sooner as it grows, while the same crop against a vertical wall can have a taller clear zone below the eaves. But if the roof slopes sharply inwards, its upper leaves still need room, so a straight side does not make every edge position suitable. Note the crop’s height and spread, the height of any support and the space needed to inspect or harvest it. Move only the crops that require vertical clearance towards the taller part of the section, and keep their full growing area in view when placing the aisle.
Low-growing plants, propagation trays and short containers can make practical use of zones with limited headroom, if access and the plants’ growing requirements are suitable. Trellised or climbing crops need room for growth as well as a place for their mature canopy. Do not assume a greenhouse frame is an appropriate fixing point or that the wall shape indicates how a support can be attached; check the information for that configuration. The Aluminium Classic Greenhouse listing covers area options from 3.77 to 28.08 m², but area alone says nothing about crop height or fixing points. Verify those details for the exact option rather than choosing by floor area.
Check standing and reaching clearance
Usable space also includes the room to work. If you stand beside a bench, compare headroom along the route, not only the clear height over the centre of the greenhouse. A curved wall may bring the roof down over the outer part of a walkway; a straight wall can retain vertical headroom to the eaves, although the roof still narrows the space above. The relevant clearance depends on how you garden: standing to pot seedlings, kneeling to tend containers and reaching across a bench all use space differently. Test the activities you actually do rather than relying on one generic usable-height figure.
On a section, mark the floor level and the useful height for standing, reaching and working at each bench. Check the narrowest point on the route, including any frame member or shelf, and consider whether you can lift a pot or tray without catching the roof. If a product name specifies a metal base, as the Prestige Greenhouse with Metal Base does, confirm which floor reference the drawing uses: outside ground, top of base or clear interior floor. Those levels are not interchangeable when assessing low-edge clearance. Use the drawing’s stated measurement points rather than assuming the exterior dimension begins where you will stand.
Check doors, end walls and openings
Do not assume one cross-section describes every point in the greenhouse. The profile through the middle may differ from the end wall, where a door, gable frame or other member changes the clear width. Check the actual door opening and its approach, including the space needed to carry a tray through. A bench that fits beside the long wall may crowd the end route or stand in the path from the doorway to the centre. Mark the door and end clearances on the floor plan, then check overhead space above that route in a section. This is especially useful if the intended bench runs close to an entrance.
Openings and fittings can interrupt a long shelf or planting row. A side vent, brace, downpipe or other component may need its own clearance, so check the drawings and selected configuration instead of planning a perfectly uninterrupted wall. If a diagram shows an opening, identify what sits below and beside it and whether you can reach its control once plants are in place. Shape comparisons are most useful when you count the usable runs on both options and include the gaps and access space. An average measurement can hide a short section of wall where a shelf or crop will not fit.

What to look for in the drawings
Before choosing, look for documentation that matches the selected greenhouse size and configuration: a plan, a transverse cross-section and, where helpful, a side elevation. Check for internal clear dimensions, the height of the side wall before the roof curves or slopes, the point where headroom narrows, and any base or fixed storage shown. A marketing photo can show the overall appearance, but perspective, cropping and camera height make it unsuitable for measuring shelves or headroom. If only external dimensions are supplied, check whether the inside dimensions differ and which edges the measurements refer to. That distinction is important when your layout depends on a narrow perimeter strip.
Confirm the model, width, length and base shown on each drawing before comparing. A product family can cover several footprints: the Limited Edition Aluminium Greenhouses range is listed from 3.77 to 28.08 m², so that area span does not identify one cross-section or its edge height. Compare the exact option you would choose, not a convenient drawing for a different size. If cross-section dimensions are unavailable, ask the retailer or manufacturer for the relevant measurements rather than estimating from a photograph. Otherwise, your planned shelf depth, crop height and aisle access remain assumptions.
Choose the profile that fits your layout
Straight-sided walls are often practical when your plan depends on a continuous bench, shelf or tall planting row close to the perimeter, because a vertical wall can preserve clearance up to the eaves. That advantage matters only if the specified side-wall height and roof profile suit the bench and crops. A curved-wall greenhouse can also make effective use of its floor: place lower crops or containers where the profile limits height and reserve taller space towards the centre, while keeping an accessible aisle. The choice is not between useful and wasted space; it is between edge zones that suit different tasks. Think about which tasks need the perimeter and which can use lower-clearance areas.
Test a real layout before making the comparison. Draw the inside floor dimensions, place the widest bench and pots you plan to use, mark the aisle and door route, then compare the clearance above the perimeter at worktop, crop-canopy and standing heights. If a shelf or plant blocks access, adjust it and repeat the check for the other profile. This makes the trade-off visible: one shape may provide more continuous shelf space, while another may leave a useful area for low planting. Neither a straight wall nor a curve is automatically superior; the better option is the one that leaves the room and access your intended routine needs.
Frequently asked questions
Does a straight-sided greenhouse always have more usable space?
No. A vertical side wall can preserve more headroom near the perimeter, which may make benches or shelves easier to position. But the actual benefit depends on its height, the roof profile, internal dimensions and frame. Compare cross-sections at the heights that matter for your layout.
Is the low edge of a curved-wall greenhouse unusable?
Not necessarily. A lower-clearance strip may suit short pots, propagation trays or other low planting, provided it remains accessible. It may be less suitable for a tall bench or crop. Check what fits at the edge rather than treating the whole strip as either usable or wasted.
What should I look for in a greenhouse cross-section?
Check the clear inside floor width, the height of the side wall, where the roof starts to narrow the space, and any base, frame members or fixed fittings. Compare the same size and configuration, then mark the heights needed for your bench, crops and access.
Can I use the listed floor area to plan shelving?
Floor area does not show the height or width available above a shelf. Use a dimensioned cross-section to check clearance at the shelf top and at the front edge, then confirm that pots and hands will fit and that the shelf will not obstruct the aisle.
Which wall shape is better for a potting bench?
A vertical wall may make it simpler to position a continuous bench, while a curved wall may call for a shallower or freestanding layout. Neither shape is automatically better: compare the bench depth, overhead clearance and working access in the exact greenhouse you are considering.
The useful difference between straight and curved greenhouse walls is the height and access each profile leaves around the perimeter. A straight wall may make a continuous bench easier to plan; a curve may suit low planting near the edge and taller crops further in. Compare the same internal dimensions at the heights your layout needs, and choose the profile that lets you tend the whole greenhouse without sacrificing the working space that matters most.
