
White Residue on Greenhouse Soil: Salts or Something Else?
Greenhouse soil guide
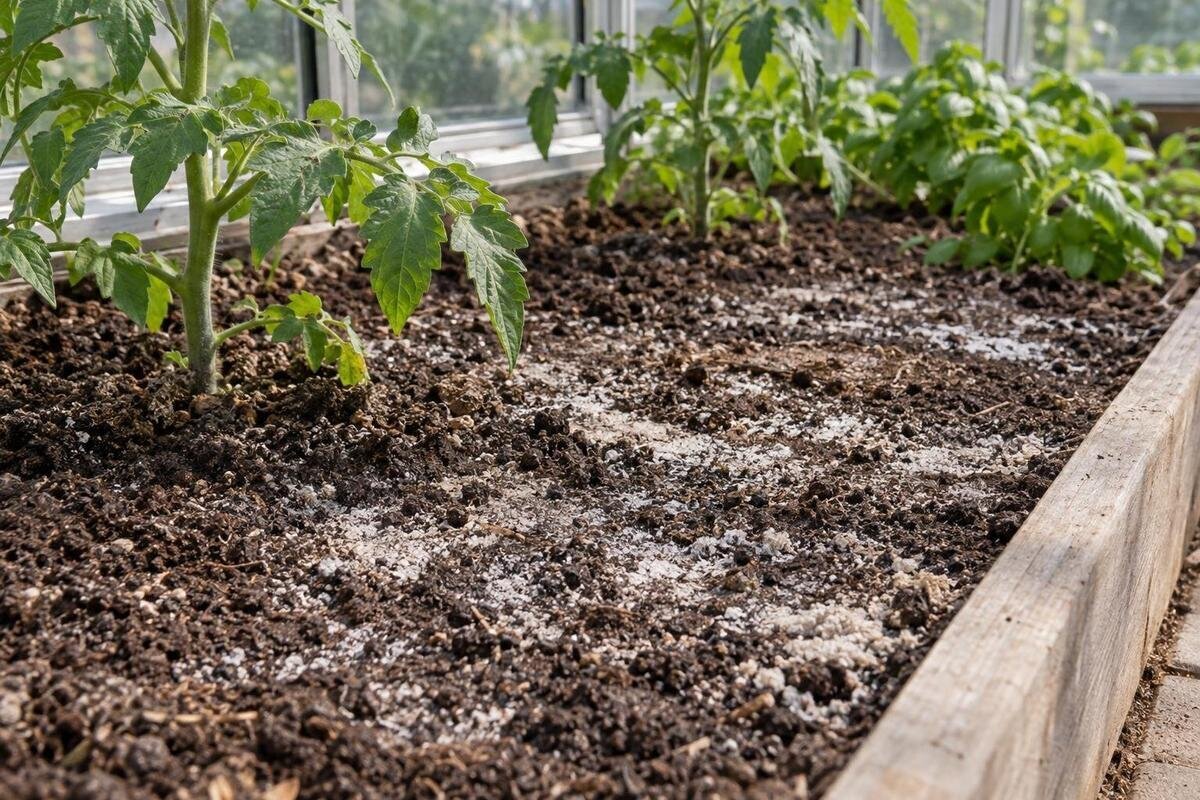
White residue on greenhouse soil can be soluble salts, but it may also be mineral scale, remnants of an amendment or surface fungal growth. Colour alone cannot identify it. A covered bed generally receives little direct rainfall, so it cannot rely on rain to move dissolved material through the soil. Map where the residue appears, trace recent water and feeding inputs, then test the irrigation water and a representative root-zone sample before choosing a correction.

Why white crust forms in a covered bed
Dissolved salts can remain in soil when water evaporates or plants take up water. Irrigation can move those salts through a bed; as the surface dries, they may concentrate at the top or along the boundary between wet and dry soil. A greenhouse roof usually excludes direct rain, so the bed receives less natural flushing than an open garden. Repeated watering may therefore redistribute salts rather than remove them, especially where drainage is limited. Visible crystals show where water has dried, but do not necessarily reveal how much salt is present or where it has accumulated within the root zone.
Possible sources include dissolved minerals in irrigation water and soluble nutrients from fertilisers, manure or compost. Mineral-rich water can leave a pale deposit as droplets dry, while fertiliser residue may gather where a product was applied or splashed. Neither location identifies the material conclusively, and the surface can differ from the root zone: a thin crust may sit above soil with normal EC, while salts can build up lower down without a striking surface layer. For a larger layout such as the Spacious Greenhouse range, listed from 47 to 70 m², mark cultivated beds separately on the plan so a deposit in one bed is not mistaken for a greenhouse-wide problem.
How texture and location help identify residue
Look at the form and position of the deposit, but treat both as clues rather than proof. A crisp or powdery film, gritty crystals or a ring at a drying edge can fit dissolved minerals left behind by evaporation. Fine, thread-like growth spanning organic particles is more consistent with fungal mycelium, particularly if the surface has stayed damp. A patch following one watering line or a recent application can help trace an input. Salts, carbonate scale and fungal growth can overlap in appearance, so a photo and texture cannot confirm the chemistry.
White flecks distributed through potting mix may be perlite or another ingredient, not a new crust. Pale granules can also be an amendment or fertiliser that has not dissolved. Check what was used and whether the material is confined to the treated area; do not assume every white particle is salt. Avoid tasting it or relying on a household acid test: neither identifies root-zone salinity nor shows whether a crop is affected. If a laboratory asks for the residue, keep a small surface sample separate from bulk soil and label its location and date.
Trace irrigation and fertiliser inputs
Reconstruct the inputs over the weeks before the residue appeared. Note every irrigation source—mains, tank, bore or a blend—as well as any source change, and write down how often and where water is applied. Record the fertiliser product, rate, dilution and timing, plus recent compost, manure, lime or other amendments. Check labels and your notes rather than estimating from memory; also note whether all beds were watered or fed in the same way. This is not a reason to stop feeding indefinitely. It is a way to distinguish a one-off deposit from a repeated load of dissolved material.
Sketch the bed and mark where residue occurs, where water from emitters or hand-watering reaches the soil, and where it drains or sits. Note whether the residue appeared after a dry spell or a change in irrigation or feeding, and compare it with an unaffected area. A band can follow the wetting pattern; an even coating may reflect a shared input, but either pattern is only suggestive. Record whether the same patch returns after watering. When planning a layout from the Aluminium Greenhouses range, listed from 3.77 to 28.08 m², include water points and bed boundaries on the plan so you can trace which areas receive each input.
Collect separate samples from the crust and root zone
Keep a sample of visible crust separate from a root-zone sample: they answer different questions. Follow the soil laboratory's instructions for sample depth, container and amount. For a bed, several small samples from the same affected zone can form a more representative composite than a scoop from one unusual spot, but exclude paths, fertiliser granules and the surface crust unless the lab specifically requests them. Use a clean tool and sample where roots are growing, not at an arbitrary depth chosen for convenience. Tell the lab if you sampled soon after watering or feeding, and ask before collecting if the right depth is unclear.
Where practical, take a separate comparison sample from apparently unaffected soil with the same texture, crop and watering history. Do not mix permanent-bed soil with potting mix, grow-bag media or another bed; unlike materials can produce a misleading average. Label each sample with location, crop, depth, date and recent inputs, and keep the water sample separate. When considering a layout from the Wall Greenhouse range, listed from 3.69 to 14.34 m², plan access to the growing areas so you can collect samples from the root zone rather than only from the easiest edge to reach. If bed depth or substrate varies, tell the laboratory rather than combining those areas.

Test irrigation water as it reaches the bed
Test irrigation water as plants receive it. If you draw from more than one source or mix water, sample the blend used on the bed; a test of one source alone may not represent what reaches the roots. Ask a water-testing laboratory which panel is suitable, including EC and, where relevant, alkalinity or bicarbonate and ions such as sodium or chloride. EC reflects the combined conductivity of dissolved ions; it does not identify them. Tell the lab the source and crop so it can recommend an appropriate analysis rather than relying on a visual diagnosis.
Water pH by itself is not a salinity result, and a clear-looking sample can still contain dissolved minerals. Compare water results with soil results and irrigation history: elevated water EC may point to an ongoing input, but it does not prove that root-zone salinity is high; a low reading does not rule out fertiliser-derived salts in soil. Mineral deposits on a hose or container can support a water-related clue, but they are not a substitute for testing. When comparing layouts in the Limited Edition Aluminium Greenhouses range, mark the irrigation source and application points on the chosen plan, distinguishing any zones supplied with a different water source or blend.
Interpret EC, pH and nutrient results separately
Electrical conductivity (EC) indicates dissolved ions in the test solution, not which salts are present or their individual concentrations. Laboratories use different extraction methods: for example, an EC from a saturated extract is not directly comparable with one from a set soil-to-water ratio. Read the method and units on the report, and ask which test suits greenhouse bed soil or potting medium. Compare results only with interpretation for the same method and the crop. A handheld meter can track change only when calibrated and used consistently; a quick probe into soil may not match a laboratory extract.
Keep pH separate from EC. pH describes how acidic or alkaline a sample is; it does not measure total soluble salts. A nutrient panel can identify particular elements, but symptoms such as leaf-edge damage, weak growth or wilting are not specific enough to diagnose salinity. Excess salts can make water uptake harder, yet other stresses can look similar. Compare results with guidance for the crop and substrate in question, not a generic threshold. If planning a T-Model Orangery Greenhouse, listed from 16.52 to 30 m², identify beds and container groups on the layout so each report can be matched to the medium sampled.
Check drainage before considering leaching
Do not flush a bed just because its surface is white. If a suitable soil test confirms elevated root-zone EC consistent with soluble salts, leaching may be considered with water of suitable quality, but only where the bed drains adequately and the crop and substrate can tolerate it. The aim is to move salts below the active roots, where drainage can carry them away, not simply wet the surface. The approach depends on bed depth, texture, water chemistry and the ions involved. Ask the laboratory or a qualified horticultural adviser to interpret the result for the crop.
If water ponds or soil stays saturated, adding more can waterlog roots and may leave dissolved material in the profile rather than remove it. A sodium result needs specific interpretation because sodium can affect soil structure; gypsum is not a universal remedy, so do not add it without evidence and advice. If only the top shows water scale and root-zone EC is not elevated, address water quality or the residue source instead of rinsing the whole bed. The Pyramid Greenhouse range is listed from 5.53 to 18.9 m², but area alone cannot set a leaching volume; bed dimensions, drainage and water results matter.
Consider mineral deposits, amendments and surface fungi
Mineral deposits from water, fertiliser granules and amendments need different responses. Evaporated water can leave scale; its composition depends on the water chemistry, so a chalk-like look is not proof of calcium carbonate or salt stress. Check whether lime, gypsum or another product was applied recently, and read its label. A deposit concentrated in one treated spot may help identify where to investigate, but it still does not confirm the material. If identifying the surface residue would change your decision, ask a laboratory whether it can be tested separately. Do not choose an amendment to neutralise a deposit by appearance alone.
Surface fungi are another possibility. Fine white growth on damp, decomposing organic matter may be saprophytic mycelium, but a photograph cannot confirm the organism or rule out another cause. Fungal strands may look quite different from hard crystals, although mixed residues can make visual identification difficult. It is not automatically evidence of a crop disease, so do not reach for fungicide without a proper diagnosis. If plants are otherwise growing normally, review surface moisture and decaying material while checking soil and water evidence. If decline continues or the deposit returns, compare root-zone and water tests instead of treating the colour.

Keep beds and containers as separate test zones
Keep permanent beds, pots and grow bags as separate diagnostic units, even when they sit under the same roof. Their substrate, root volume and watering frequency may differ, so one mixed sample can hide a problem limited to a container or bed. Mark which crop grew where and whether white material is on soil, potting mix or a container rim. A container's surface can reflect its own mix and watering pattern rather than conditions in the bed. Do not use a bed result to decide what is happening in a different potting mix; compare like with like.
Bed planning can make comparisons easier: keep access to the soil surface and draw a simple plan of beds, containers and water points. If considering the Limited Edition Aluminium Greenhouse with Built-In Storage range, listed from 5.52 to 28.08 m², distinguish the growing areas from storage when marking sample locations. Record actual bed dimensions and the medium in each bed or container group, rather than using the overall greenhouse area to describe them. Keep these labels consistent on sample bags, photographs and laboratory reports so a result from one growing system is not later used to justify a change in another.
Retest consistently and keep a record
Record starting results before making a change: water source and EC, soil method and depth, sample location, recent feeding, crop and a photo of the crust. Keep the notes with a plan of the bed and water points. After adjusting a confirmed input or treatment, repeat the same test in the same zone with the same method, at an interval recommended by the laboratory or crop-specific guidance. Changing water, fertiliser and amendments all at once makes it hard to see which mattered. The goal is a trend and an explanation, not a residue-free surface at any cost.
If planning or rearranging a greenhouse, mark repeat sampling locations on the selected plan. For a layout from the Prestige Greenhouse range, listed from 3.77 to 28.08 m², label those locations against identifiable beds and water points so you can find the same zones when retesting. Seek crop-specific horticultural or laboratory advice if EC remains high, drainage is poor, plants continue to decline, or a test reports elevated sodium or chloride. Share the test method, water source, amendments and crop history, along with earlier results, so advice addresses the recorded conditions rather than the colour of the crust alone.
Frequently asked questions
Does white crust always mean salt build-up?
No. Soluble salts are one possibility, but mineral deposits from irrigation water, fertiliser or amendment residue, perlite and surface fungal growth can look similar. Even if salts form the crust, a separate root-zone test is needed to establish whether salinity is elevated where the roots are growing.
Should I scrape the residue away?
Scraping does not correct salts in the root zone. Photograph and record the patch first, then test representative soil and irrigation water. If a laboratory requests a sample of the crust, collect it separately rather than mixing it into the bulk soil sample.
Can I flush the bed with extra water?
Not as a default. Leaching can help with confirmed soluble salts only when the water quality and drainage are suitable. Poorly draining soil can become waterlogged, while a superficial mineral deposit may not call for flushing at all. Test first and seek crop-specific advice.
Is a pH test enough?
No. pH measures acidity or alkalinity, while EC is used to assess dissolved ions. A nutrient analysis can identify particular elements. Ask for a method that suits the soil or potting mix, then interpret the result using guidance for that method and crop.
Which samples should I test?
Ask a laboratory how to collect representative root-zone soil and irrigation water as applied to the bed. Keep visible crust separate, and take a comparison sample from unaffected soil if the lab recommends it. Label samples with their location, depth, crop and recent inputs.
A white crust is a starting clue, not a diagnosis. The clearest answer comes from keeping surface material separate, testing the irrigation water and root zone with suitable methods, and reading EC alongside pH and the crop's needs. Let those results, together with drainage and application history, determine whether to change the water, feeding or moisture management—or leave the bed alone. That way, you address the likely source rather than treating the colour.
