
Greenhouse Floors: Gravel, Brick, or Pavers Inside?
Greenhouse flooring guide
The surface underfoot inside a greenhouse has a different job from the base that supports the frame. Gravel, brick, and pavers can each make a useful walking surface, but they differ in footing, cleanup, upkeep, and the way water moves through or across them. The best choice depends on how you use the space and what lies beneath—not on the material alone. Treat the interior floor finish and the greenhouse foundation as two related decisions. First confirm the support system for the specific greenhouse and site; then plan beds, benches, circulation, and drainage before choosing a walking surface. Comparing those details together helps avoid a finish that is difficult to clean, awkward for carts, or in conflict with the base.
Before you choose 1
The walking surface is not the greenhouse foundation
An interior floor is the surface you walk on: gravel, brick, or paving units. The foundation is the prepared support that carries the greenhouse frame and accommodates its required anchoring. They do different jobs. Paving can provide a useful path without being an acceptable support for the structure; a suitable foundation, in turn, may not be a comfortable or easy-to-clean walking finish. A decorative surface does not reveal what sits below it, how the site was prepared, or whether the base matches the selected greenhouse. Keep the terms separate when comparing proposals or deciding what materials to buy.
Use the manufacturer’s drawing for the exact model and configuration to establish its base, support points, and footprint. Then plan where the finish will stop, how it meets the threshold, and which areas stay open around beds or frame supports. If you are considering the Bloomcabin Prestige Greenhouse, request the drawing for the version you select before finalizing the flooring plan. A product’s listed area is not a substitute for those details. Do not assume a gravel layer or a course of pavers can replace required support, or that a finish can cover an anchoring point. Coordinate the structural base and finished-floor plan before materials are ordered.
Water behavior depends on the whole site
Water reaches the greenhouse floor from watering, irrigation, wet footwear, cleanup, condensation, or rain that blows through an entrance. Gravel lets water pass between pieces, but that only moves it below the walking surface. Hard paving may send water across the surface or into its joints. In either case, the layer underneath and the conditions around the greenhouse determine whether water drains away, pools, or returns to the path. A surface that looks open is not, by itself, a drainage plan. Water can also cross the threshold from outside, so assess the approach as well as the interior.
Trace where water appears and where it goes before you choose a finish. Notice low spots, wet edges beside beds, water carried in from outside, and any threshold that stays damp. Compare conditions after watering with conditions after rain to help distinguish an interior spill from water entering the structure. For a layout based on the Large backyard greenhouse, mark watering areas and nearby flow routes on the selected floor plan rather than treating the entire interior as one drainage zone. If water repeatedly pools or seeps in, arrange a site-specific review with a qualified groundwork professional. An arbitrary floor slope or another layer of gravel may simply move the problem.
Before you choose 2
Gravel: footing, drainage, and debris
Gravel is loose aggregate, so water can pass between pieces into the layer below. That can suit a project where a permeable walking surface is wanted, but gravel does not guarantee drainage: a compacted or slow-draining base may still hold water, and runoff can emerge somewhere else. The aggregate and its edge containment also affect how firm the route feels. Small cart wheels, pots, and dragged hoses can displace loose pieces, so the path may need raking and replenishment to stay comfortable underfoot. Try a sample with the footwear and equipment you actually use, since the surface can feel different during everyday movement than it does in a display area.
Gravel is adaptable for informal paths, spaces between beds, or areas whose layout may change. It is harder to sweep clean because soil, seed husks, and leaves settle among the stones; raking or hand removal is often more practical. In a flooring plan for the Classic aluminum greenhouse, distinguish loose-surface areas from places where you will frequently pot plants or set down trays. A contained potting area can keep spilled growing mix out of the gravel. Ask the aggregate supplier about particle size, shape, and fines, then compare samples rather than choosing by color alone. Decide how edges will keep stones from migrating into the doorway or onto a hard path.
Brick paths: surface texture and joints
Brick makes a hard, defined walking line when units stay stable underfoot. It can separate a route from planting areas and give carts or trays a more predictable surface than loose aggregate. The result depends on more than the word brick: texture, unit alignment, joint material, edge details, and the layer beneath all affect everyday use. A patterned surface may look regular while still having uneven joints, and small shifts can become noticeable when you push something across it. The installation system also affects how joints are maintained and whether a damaged unit can be removed. Consider the complete surface, especially where watering may leave the route damp.
Joints deserve attention before you settle on the look. Soil, seed husks, and small leaves can lodge between units, while joint treatment influences how readily a broom reaches them. For an interior planned around the Lean-To Greenhouse, mark the door-side paving and perimeter edges on the exact layout before deciding on a brick pattern. Ask the paving supplier whether the proposed bricks are intended for pedestrian paving and suitable for the expected moisture and exposure. Reclaimed units need individual inspection for damaged edges and uneven faces. Check a sample when damp, too: brick finishes vary, so appearance alone cannot establish grip, ease of cleaning, or how smoothly a cart will roll.
Before you choose 3
Paver shapes, joints, and replacement
Paving units come in different shapes and surface finishes, so inspect the actual product rather than treating pavers as one uniform material. Repeated units can make it straightforward to define a route and plan a pattern. If a unit is damaged, localized replacement may be possible, depending on how the pavers were installed. Joints, perimeter cuts, the supporting layer, and surface texture all affect how the path feels and cleans. Pavers are not automatically permeable: tight joints, open joints, and the material below can lead water in different directions. Ask how the proposed assembly is meant to handle water.
For a flooring layout in the Limited Edition Greenhouse, compare paver dimensions with the intended path width rather than ordering from the greenhouse’s total area. A pattern with many small cuts may require more installation work and leave awkward pieces at borders. Ask the flooring contractor to show where full units, cuts, and joints will fall, especially at the entrance. Compare textured samples using a broom as well as your footwear; a finish that offers useful traction may also retain more soil. If the installation allows individual units to be lifted, ask about keeping matching replacements. Product colors and finishes may be difficult to match later.
Choose a surface that suits daily movement
Plan for the movement that actually happens in the greenhouse: rolling a cart, carrying pots, moving a hose, reaching a bench, or turning at an aisle end. Loose gravel can shift beneath small wheels or be pushed aside by repeated traffic; a stable hard path usually makes rolling easier, although uneven joints and raised edges can interrupt it. What feels comfortable on an empty floor may be awkward with containers in place. Think about the route in both directions and at the points where you stop, turn, or cross from one material to another. Testing the actual surface with your usual equipment can reveal issues that a sample viewed from above will not.
Use the selected T-Model Greenhouse Orangery layout to test complete trips between the entrance, growing areas, and work surfaces. Mark benches and beds at their intended size, then move your usual cart along the route with a representative load. Include stopping, turning, and passing a hose rather than testing only a straight, empty aisle. Large trays can restrict your view of the floor, making raised edges and scattered stones particularly inconvenient. If someone will use a mobility aid, include that equipment in the planning discussion. For a specific accessibility requirement, confirm the surface and clearances with a qualified local professional instead of guessing from a material label.
Before you choose 4
Compare how much cleaning each surface needs
Greenhouse work drops soil, leaf fragments, seed husks, and plant matter onto the floor. A continuous, relatively smooth hard path is generally easier to sweep than loose gravel, but brick and pavers still have joints where debris collects. Gravel resists a quick broom cleanup because small material can move along with the debris; a rake or hand picking may take longer. Spills can be cleaned from any of these surfaces, but the method varies with the finish and joint design. No floor makes the growing space sterile, so compare how easily it can be kept orderly rather than expecting a maintenance-free surface. Also consider whether you can reach the floor beneath or behind benches.
Make a cleaning plan for the areas that will actually get dirty. In a Pyramid-type greenhouse layout, as in other greenhouse layouts, identify where you will repot plants, remove spent foliage, and store bags of growing mix. Those tasks can concentrate debris in a small part of the floor. Check whether a broom can reach under benches and whether trays or containers can be moved without dismantling the workspace. Remove loose debris before wet cleaning so it is not washed into joints or water outlets. For cleaning products, follow the surface supplier’s guidance and the product label, including precautions around plants. A hard floor helps with access but does not replace routine housekeeping.
Plan paths around beds, benches, and access
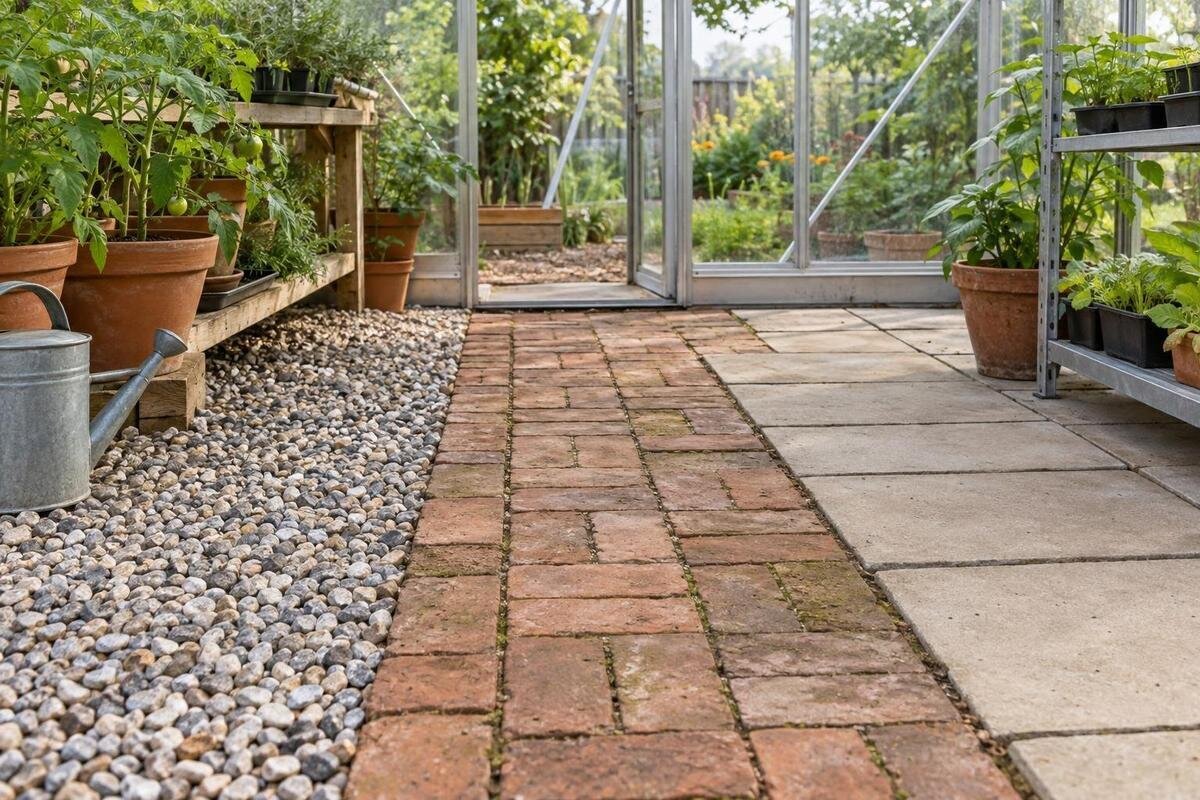
Draw the working layout before deciding how much floor to cover. Mark beds, pots, benches, shelving, watering points, and spots where you need to turn or set down a tray. A fully paved surface can create continuous access, while a defined paved path with gravel or planting zones elsewhere can limit the hard-surface area. Loose material may migrate if boundaries are not well planned. No single aisle width suits every greenhouse: account for the actual equipment, door access, and arrangement you expect to use rather than copying a layout from a different model. Marking the route on the ground can help you test turns before choosing materials.
Material transitions need to work as part of that plan. Keep the walking line clear at the doorway and avoid an edge that catches a wheel or creates a trip hazard. When comparing the Aluminum Greenhouse with Built-In Storage, confirm the selected storage arrangement and its access requirements before setting path edges. Allow for retrieving bags, tools, or containers without blocking the main aisle; the model name alone does not establish those clearances. Also mark where movable items will sit during busy periods. A route that works with empty shelves can become cramped when supplies are being unloaded. Keep borders outside those working clearances and make changes in surface level easy to see.
Before you choose 5
A mixed floor can balance different needs
Compare the installed cost and upkeep of each zone, not just the price of the surface material. A gravel quote may include containment and periodic replenishment; a brick or paver quote may include bedding, joint material, cuts, and edge work. Ask each contractor to identify what is included so unlike proposals do not appear equivalent. Consider future changes as well: moving a bed or bench may be simpler beside a limited paved aisle than on a fully finished floor. Repair methods matter, too. Ask how a displaced edge, uneven unit, or contaminated patch of gravel would be addressed. These practical differences can justify using more than one surface.
Mixed floors are a reasonable option when different zones have different jobs: a firm main path with gravel in a less-traveled strip, for example. Keep loose material contained so it does not spread over the path, and make transitions stable and easy to cross. Check that the boundary does not interfere with the greenhouse base, anchoring, or planned water route; an edging piece is not a substitute for structural support. Test samples together, not only separately, since grit can transfer and elevations can meet awkwardly. A small trial area can expose cleaning and movement issues before the full surface is installed.
Coordinate the floor finish with the greenhouse base
Once a surface is chosen, coordinate it with the actual greenhouse base before installation. Obtain the manufacturer’s base drawing for the exact model and option; a generic footprint or a neighbor’s foundation plan cannot establish the support details for yours. Compare that drawing with site measurements and photos, and show where the finished floor will meet the frame, doorway, and any open areas. If the ground, water behavior, or existing surface raises questions, ask a qualified groundwork professional to review the site. Photos that show the current surface and any recurring wet areas can help explain the conditions. Structure, drainage, and finish need to agree without being treated as the same thing.
Confirm who is responsible for each layer and when it is installed. The greenhouse installer and flooring or groundwork contractor need the same plan for supports, anchoring, threshold level, transitions, and any route reserved for water. The correct sequence can vary with the base system, so have the people doing the work agree before materials arrive rather than covering details and correcting them later. Estimate only the intended path and floor area, and ask the supplier or installer about material quantity and preparation for the chosen surface. With that coordination in place, the finish can serve daily use without being mistaken for the foundation.
Frequently asked questions
Is gravel a greenhouse foundation?
No. Gravel is an interior walking surface; it does not, by itself, establish the support, level, or anchoring arrangement the greenhouse needs. Use the selected model’s foundation information to plan the structural base, and treat gravel as a separate finish unless the manufacturer’s design says otherwise.
Does gravel automatically prevent standing water?
No. Water can pass between the stones and still collect or move through the layer beneath. If the underlying material or site drains poorly, a gravel surface will not correct the problem. Trace where water comes from and have persistent pooling reviewed on site.
Which greenhouse floor is easiest to clean?
A relatively smooth brick or paver path is generally quicker to sweep than loose gravel, but joints can hold soil and plant debris. Compare the actual surface and joint details, and consider how easily you can reach the floor around benches and beds.
Can I combine gravel and pavers inside a greenhouse?
Yes. A firm main route with gravel in a less-traveled area can serve different tasks. Contain loose stones, make transitions stable and easy to cross, and keep the floor plan separate from the structural support and any planned water route.
Should I install the floor before the greenhouse?
There is no universal order. The base design, anchoring points, finished floor level, and installation method all matter. Check the drawing for the selected model and agree on the sequence with the greenhouse installer and flooring or groundwork professional before work begins.
An effective greenhouse floor fits the tasks you do there and the way water behaves on the site. Gravel offers a loose, adaptable surface but makes debris removal harder; brick and pavers create firmer paths, with joints and installation details to manage. None replaces the foundation or resolves a site drainage problem on its own. Choose the walking route from the actual interior layout, compare surface samples, and test transitions with the equipment you use. A firm main aisle and a different finish in less-traveled areas may be more practical than covering the whole greenhouse with one material.
