
Greenhouse Glazing Seals: When Cleaning Is Not Enough
Greenhouse repair guide
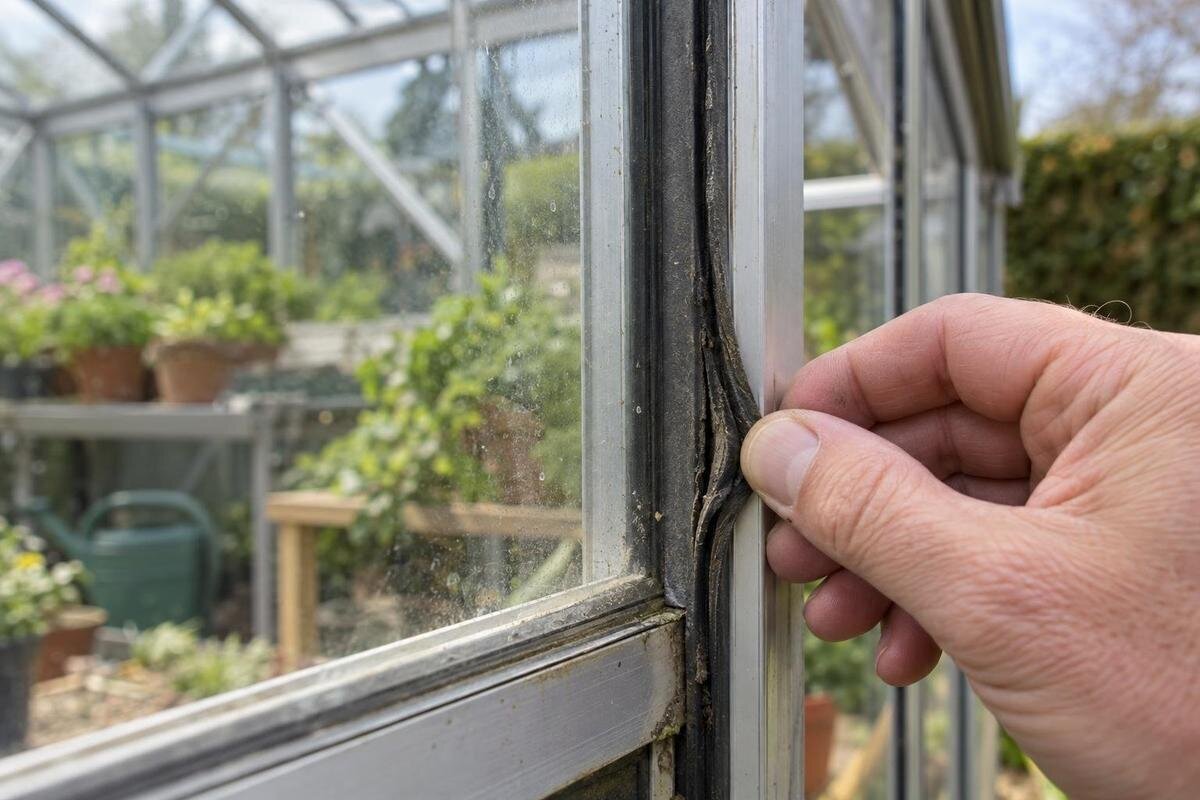
Greenhouse glazing seals can collect dirt long before they need replacement. Rinsing may remove pollen or grime, but it cannot restore a gasket that has split, shrunk, hardened, pulled out of its channel, or lost the shape required by its glazing system. This guide explains how to tell the difference, what to record before requesting a replacement, and when to involve a greenhouse glazing professional. The right part depends on the exact greenhouse model and seal profile; a generic description such as rubber greenhouse gasket is not enough to confirm compatibility.

01
Dirt and seal damage are different
Surface dirt along a pane edge is common and does not, by itself, show that the gasket has failed. Soil, pollen, dust, and residue can collect where glazing meets a frame or retaining bar. Some seals also change appearance with age while remaining seated. Conversely, a clean surface can hide a split on the less-visible side or a gap at a corner. Treat grime and color as clues to investigate, not as a replacement trigger. Compare the suspect area with another accessible section of the same greenhouse, looking for differences in shape, continuity, and position.
Follow the greenhouse manual for cleaning products and access. If its instructions allow, use water and a mild detergent with a soft cloth, then rinse and let the area dry so moisture does not hide a crack. Avoid scraping with a blade, abrasive pad, solvent, or strong cleaner unless the manufacturer specifically approves it; a product safe for the glazing may not suit the seal. Cleaning is enough when residue lifts and the seal remains continuous and seated as designed. It cannot reverse material damage, and repeated scrubbing will not restore a gasket that has lost its shape.
Where greenhouse glazing seals fit
A glazing seal sits at the joint between a pane and part of the greenhouse frame or retention system. Depending on the design, it may help close gaps against water or drafts and cushion or position the glazing. It is not always the component that mechanically holds a pane in place: bars, clips, beads, or another part may provide that function. Because systems vary, identify the seal by where it sits and how it meets the glazing, rather than assuming every black strip around a pane serves the same purpose.
A greenhouse can also have separate seals around doors, vents, and other openings. Those weatherstrips are not necessarily interchangeable with glazing gaskets, even when they appear similar. An opening vent may have a seal around its perimeter as well as a gasket where its pane meets the vent frame; describe which joint you mean. If your greenhouse is identified in its purchase records as the Pyramid-type greenhouse, include that model name, but also identify the affected component. The complete-model listing does not identify its individual seals. Use an overview photo to distinguish the pane edge from the opening perimeter, then add a close-up. This gives the supplier useful context without requiring you to know the technical name of every strip or to remove anything for identification.
02
Signs a glazing seal needs closer attention
Look for splits, cracks, missing pieces, or ends that have pulled away from a corner or channel. A seal that has become brittle, unusually hard, or shrunken may no longer follow the pane edge as intended. Loose sections that lift or slide out of position are another reason to investigate. A flattened appearance deserves context: some seals are compressed when installed, so flatness alone does not prove failure. Compare the suspect area with an intact section of the same type, and use the manufacturer’s drawing or instructions when available rather than judging by appearance alone.
Notice how much of the greenhouse is affected and whether the same damage appears in comparable locations. A split at one corner, several separated ends, and deterioration along an entire run are different observations worth recording. Note when you first noticed the change and whether earlier photos show the seal in the same position. If your records identify a greenhouse with built-in storage, use that full model description in your condition report rather than shortening it to aluminum greenhouse. This helps identify the structure without implying which seal it uses. Keep the report factual: describe visible gaps or missing material instead of declaring that the whole glazing system has failed. The pattern of damage can help the manufacturer or installer decide what needs examination and whether the problem is isolated, but it does not establish the cause by itself.
Inspect the seal without removing glazing
After gentle cleaning, examine the seal while it is dry and in its normal position. Good light can make small gaps, split corners, or a section that has shifted easier to see. Follow the edge from one end to the other, but do not pull at the gasket to test it. If the pane looks loose, cracked, or poorly retained, stop and seek advice instead of trying to expose more of the channel. A visible check can help document the condition; it is not a reason to remove a pane or loosen the parts that hold it.
Record what you can see before ordering anything: the location, approximate length of the affected run if it is safely visible, and whether the problem appears at one pane or several. Take an overall photo that shows where the seal is, then a close-up of the damage. A draft or damp mark can have causes other than a failed glazing gasket, so do not treat either as proof of the correct replacement part. If the source or condition is unclear, give the photos to the manufacturer or an installer for review rather than making a repair based on a single symptom.

03
Match the original gasket profile
A replacement must match the greenhouse’s glazing system, not just the visible width of the old strip. Relevant details can include the gasket’s cross-section, how it fits into a groove or retention channel, the glazing type and thickness, and the location where it is used. The manufacturer’s parts diagram or exact spare-part identifier is a better starting point than a general description such as rubber seal. If a profile is not shown in your manual, ask the manufacturer or installer to identify it before ordering.
Two gaskets can look similar from the outside yet differ where they fit into the frame. A mismatch may leave the seal poorly seated or interfere with the way the glazing is retained. For an existing Bloomcabin Prestige Greenhouse, the model name is a starting point for finding the relevant documentation, not proof that any gasket described as Prestige-compatible will fit. Ask which drawing and part reference apply to your particular configuration. If the drawing shows several seals, check the callout for the affected pane rather than selecting the closest-looking illustration. Measurements from an aged or compressed strip may not represent the replacement part’s original dimensions. When documents conflict or the profile remains uncertain, have the manufacturer or a qualified installer resolve the identification before placing the order.
Identify the model and the affected pane
Look for the greenhouse manufacturer and model name in the original paperwork, order confirmation, parts list, or any identification label. A serial number, approximate purchase date, or configuration details may help the manufacturer narrow down the correct documentation. For a greenhouse recorded as the large backyard greenhouse, retain the complete description and any order reference rather than identifying it only by size. Do not guess the model from frame color or overall shape; similar-looking structures may use different glazing systems. If you inherited the greenhouse or bought it used, explain which details are known and which are uncertain. An old receipt, manual cover, or photograph of an accessible label may help establish identity. Keep those records separate from the condition photos so the supplier can distinguish identification evidence from evidence of damage.
Describe the seal’s exact location in ordinary terms: for example, a side pane, roof pane, door, or vent, and whether the glazing is fixed or part of an opening. Use the manual’s labels if they differ. Photos should show both the detail and enough surrounding frame to locate it; a close-up with no context can be hard to interpret. If you can safely see a part number or an existing drawing reference, include it. Do not remove an intact gasket or pane simply to get a better photograph or uncover information that an installer can access safely.
04
What to include in a replacement-parts request
Send a concise record rather than only asking for a greenhouse seal. Include the manufacturer, exact model, any available serial or order reference, the seal location, and clear photos. Add the relevant page or part number from the manual if you have it, and explain whether the seal is cracked, missing, loose, or no longer seated. If more than one area is affected, say so. These details help distinguish a glazing gasket from a door or vent weatherstrip and give the supplier a way to check the right parts information before anything is ordered.
Ask the manufacturer or parts supplier to confirm the exact replacement identifier and where it is intended to fit. Also ask how the part is supplied: as a measured length, a prepared section, or part of a kit, if those options apply. Confirm what the quoted item includes and whether any associated components require separate assessment; do not assume a gasket order includes retaining hardware. For an existing Classic aluminum greenhouse, reference the greenhouse’s own order details alongside the model name so the request concerns its parts rather than a new complete unit. If dimensions or a sample are needed, obtain them only as instructed and without disturbing glazing. Before accepting a substitute, request confirmation that it is approved for the identified joint. Save the supplier’s response with the quotation so the agreed part and scope remain clear.
Why a generic gasket or sealant may not work
A generic strip can have the wrong profile, fit, or compression for the channel, even when its width looks close. It may sit loosely, fail to meet the glazing edge, or interfere with a separate retaining component. A different material or shape can also behave differently in the intended location. Do not choose a replacement solely because it is sold as a greenhouse gasket or resembles the old piece. The correct match is the part specified for the model and glazing system, or an alternative explicitly confirmed by the manufacturer or a qualified installer.
Do not fill a gap with silicone, adhesive, or another sealant unless the greenhouse instructions approve that product and method for the exact joint. An improvised repair can make later service harder or interfere with the original system. If your greenhouse is a Lean-To Greenhouse, identify the specific pane or opening in the request; the overall greenhouse type does not tell you whether a particular joint uses a gasket, sealant, or another arrangement. Tell the supplier if a previous owner has already added adhesive or sealant, and provide a photo rather than attempting to strip it away. That history may affect how the joint is assessed. Avoid cutting, drilling, or altering frame or retention parts to make a generic gasket fit.
05
When to bring in a greenhouse glazing professional
Get professional help if identifying or replacing the seal would require removing, lifting, or loosening glazing, or if a pane is cracked, loose, or overhead. Glass and other glazing panels can be heavy or fragile, and the parts that retain them may not be obvious. Follow the greenhouse manual and have a qualified greenhouse glazing professional or installer assess work that involves disturbing the pane or its retention system. A visual inspection and photographs are useful for an initial enquiry, but they do not replace an in-person assessment when the pane or frame may be unstable.
A professional can also help separate a seal problem from damage to adjacent glazing, hardware, or the frame, and confirm whether the issue is limited to one run. Provide any known service history before the assessment: previous seal replacements, pane changes, and repairs to the affected area are useful details. For a structure identified as a limited-edition aluminum greenhouse, include its original records and describe any later changes instead of assuming the current assembly matches the original order. Ask the professional to explain which component is defective, whether the specified replacement is available, and what access the work requires. This turns a general concern about aging seals into a defined repair scope. It also helps distinguish replacing a gasket from correcting a separate retention or glazing problem.
Seal replacement or full greenhouse replacement?
A single damaged seal on an otherwise serviceable greenhouse may call for a focused parts enquiry. Widespread seal deterioration, unavailable parts, or separate concerns with the glazing, frame, or hardware may justify a broader assessment. Age alone does not determine which route makes sense. Compare the scope of the repair, the availability of a confirmed part, and the condition of the other components; ask for an installer’s view when the extent is uncertain. If you are considering a complete replacement, keep that purchase decision separate from the question of which gasket fits the existing structure.
A full-unit comparison should consider your space requirements and the support available for each proposed model, rather than assuming a new greenhouse shares parts with the old one. If a T-Model greenhouse is among the options you are considering, request its relevant maintenance documentation and ask how replacement seals are identified and ordered. The listing alone does not establish compatibility, spare-part availability, or easier future repairs. If you proceed with a seal repair instead, keep the confirmed part identifier, supplier response, and applicable instructions with the existing greenhouse records. During later cleaning, compare the repaired location with its documented condition and look for new cracks, gaps, or movement. Follow the manufacturer’s maintenance guidance rather than imposing an unsupported age-based replacement schedule.
Frequently asked questions
Can I clean greenhouse glazing seals instead of replacing them?
Yes, if the problem is surface dirt or residue and the seal is still continuous and seated correctly. Follow the greenhouse manual for cleaning products. Washing can remove grime, but it cannot restore a seal that is split, brittle, shrunken, or no longer fitting its channel.
Can I use a universal greenhouse glazing gasket?
Do not assume a generic gasket will fit. Profiles that look similar can differ in their retaining shape, dimensions, or compatibility with the glazing system. Ask the manufacturer or a qualified installer to confirm the correct part for your exact greenhouse model and configuration.
Should I replace every seal if one is damaged?
Not necessarily. Check whether the deterioration is isolated or appears along several glazing edges, and compare it with the manufacturer’s maintenance guidance. A single damaged run may need a different response from widespread deterioration, but appearance alone is not enough to decide that every seal should be replaced.
Can I replace a seal without removing the glass?
That depends on how the greenhouse glazing is retained. Some seals may be accessible in place; other systems require work near components that hold the pane. Do not pry out glazing or disturb an overhead or loose pane to identify a gasket. Have a qualified greenhouse glazing professional assess the work when access or retention is uncertain.
What information should I provide when requesting a replacement seal?
Provide the manufacturer and exact model name, any serial or order information, the pane or opening location, and clear photos of the seal in place. Include the manual’s part number or drawing reference if available. Only provide measurements or a sample if they can be obtained safely and without disturbing the glazing.
Cleaning is useful when the problem is residue; it is not a repair for a gasket that has lost its shape or no longer sits correctly. Identify the affected location, record the greenhouse model, and confirm the part against manufacturer documentation before disturbing the glazing. A well-matched replacement may address an isolated seal issue, while widespread deterioration deserves a broader assessment. Keeping the confirmed part information with the greenhouse records makes the next repair decision clearer.
