
Choosing an Internal Greenhouse Floor: Gravel, Brick or Paving
Greenhouse planning guide
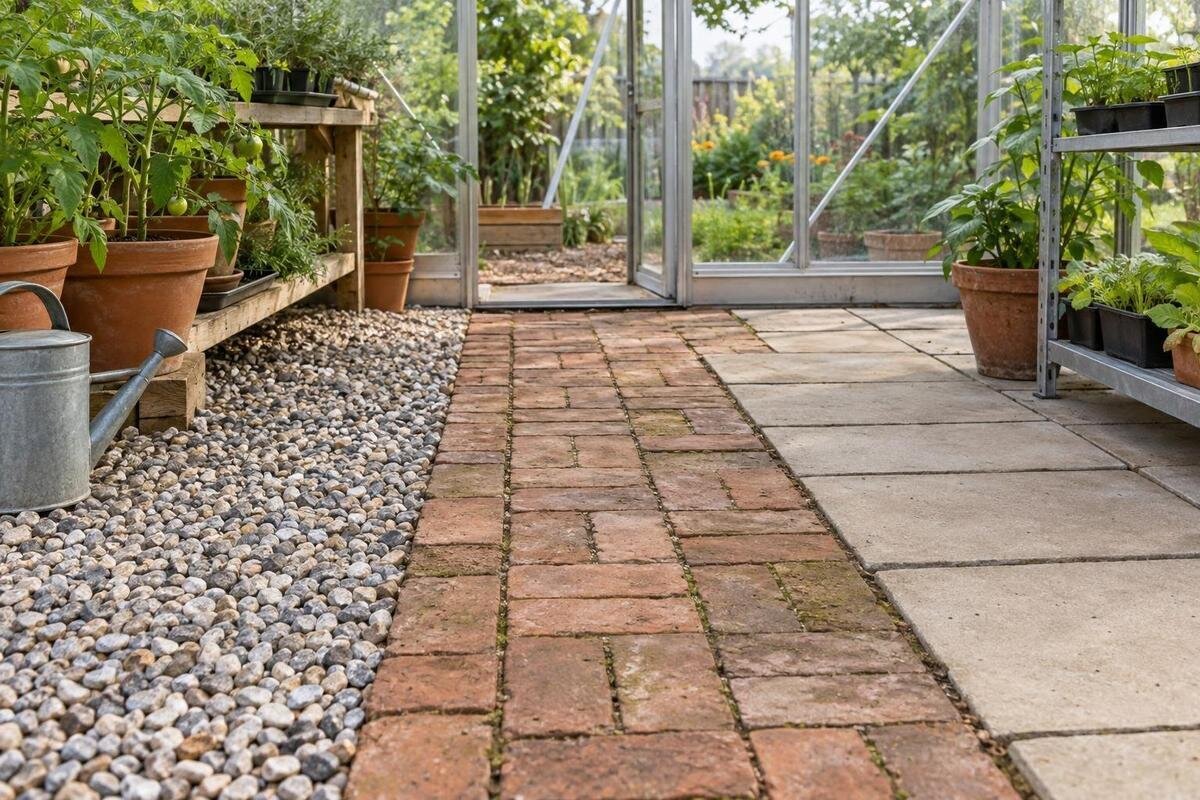
An internal greenhouse floor has to work with watering, carrying trays and cleaning, not just look finished. Gravel, brick and paving each affect footing, routine maintenance and the movement of water, and none automatically solves a drainage problem. Choosing the walking surface is also separate from deciding on the foundation and anchoring arrangement that supports the greenhouse. This guide compares the three finishes, explains what to check below and around them, and helps you plan a layout that suits the way you grow.

Before you choose 1
Separate the floor finish from the structural foundation
Gravel, bricks and paving describe the surface you walk on; they are finishes, not automatically a greenhouse foundation. The foundation is the structural support and anchoring arrangement for the greenhouse, designed to suit the selected model and site. A tidy-looking floor cannot correct a base that is out of level, unstable or unsuitable for the specified anchoring. Equally, a hard surface does not become a suitable foundation simply because it feels solid underfoot. Treat these as linked but separate decisions: establish how the greenhouse is supported first, then plan the interior surface around it. The perimeter support may meet the inside floor at a different level, so both elevations need to be coordinated.
That distinction matters when deciding whether to pave the whole interior. Many growing layouts have beds, pots or a working path, so the walking surface can cover only the areas that need it, if the ground and the structure's design allow. Keep the internal finish clear of any base components that must remain accessible, and agree the finished level at the door and perimeter before work starts. For a Bloomcabin Prestige Greenhouse, as for any chosen model, use the relevant base drawing and installation information to confirm the support line; do not infer it from the product name or floor pattern. Show the intended finish to whoever reviews the base, rather than adding it as an afterthought.
Plan the floor around daily greenhouse tasks
List the jobs the floor must support before choosing a material. A path used to carry seed trays or a watering can needs a different surface from an area where you stand at a bench, kneel beside pots or move a trolley. Mark where beds, benches, potting space and stored tools are likely to sit; a clear route between the entrance and those points prevents awkward detours. Consider the objects you actually move through the doorway, too. A path can look generous on a plan but be frustrating if its joints catch a trolley wheel or its loose surface shifts under a load. Try the route at the scale of your equipment before fixing its width.
Choose whether the whole interior needs a finished surface. A permanent growing bed can remain soil, while a central path or work zone gets gravel, brick or paving. In container-only growing, more of the floor may be in regular use, but pots still need room to be reached and repositioned. Compare the footprint of the selected structure rather than estimating from an exterior photograph; the Spacious Greenhouse listing states an area range of 47 to 70 m², but the exact version's drawing is what you need to lay out doors, beds and walking routes. Ask for the clear internal footprint, not just a headline floor area: walls and base details can reduce the space available for paths. Area alone is not a floor plan.
Before you choose 2
Gravel: water movement and loose-surface upkeep
Gravel is worth considering when you want a loose surface rather than a continuous hard finish. Water can pass between stones, which may reduce water sitting on top, but that does not guarantee drainage: the stone grading, compacted layer, soil below and a route for excess water all affect the result. Where the subsoil drains slowly or the ground holds water, moisture can collect beneath the gravel instead. Ask what grading is proposed and check what happens after ordinary watering or rain reaches the site. If the outlet or sub-base is unclear, seek qualified groundwork advice; do not choose gravel on the assumption that it will make a wet site dry.
Underfoot, gravel can shift, leave footprints and spread into beds or doorway areas. A fine, compacted surface may feel different from larger loose stones, so look at the actual material and consider how you will walk over it while carrying trays. Leaves, fallen petals, potting mix and small labels are harder to remove cleanly from loose stone than from a continuous slab: they settle between pieces and can be awkward to rake out. Fine particles may also travel with footwear or a trolley. Plan for edging and periodic levelling or topping up, and think about where displaced gravel could end up. An edge should contain stones without creating an unexpected lip. If you prefer a surface you can sweep in one pass, gravel may need more routine attention.
Brick: a firm route with joints to maintain
Brick can give a greenhouse a firm, modular path, and individual units can be arranged around a planned route or work area. Its practical performance depends on the bricks, how they are laid and the condition of the supporting layer, so do not assume every brick surface feels the same. Check whether the top face is comfortable to walk on when damp and whether the surface remains even where people turn, carry pots or move a trolley. Small height differences between units may be noticeable underfoot and can catch narrow wheels. If the plan has corners, bed edges or fixed bench feet, lay out the pattern before committing to cuts.
The joints are the main maintenance trade-off. Potting mix, leaves and spilled growing material can lodge between bricks; weeds may appear in open joints, and uneven or worn jointing can make sweeping harder. A surface with tight, well-maintained joints is usually simpler to keep clear than one with deep gaps, but no joint treatment makes a brick floor maintenance-free. Decide whether you are willing to brush debris from gaps and keep the edges tidy. When planning a brick path for the Aluminium Classic Greenhouse, use the selected version's drawing to check the floor outline and entrance position before ordering. If using reclaimed bricks, sort them by thickness before setting out, as mixed heights can make it harder to keep the path even.

Before you choose 3
Paving: a firm surface that needs drainage planning
Paving is a broad category: paving units and slabs differ in surface texture, size and joint layout. For greenhouse use, think about both the feel underfoot and the number of joints to maintain. A stable, level walking route is useful when carrying pots or moving a trolley, while a very smooth finish may feel slippery when wet. Inspect the actual finish rather than choosing by colour or appearance alone, and consider how grit, potting mix and water will show on it. Larger units may reduce the number of joints but can require cuts at edges; smaller units give more joints to keep clear. Check where bench feet will sit so individual supports are not left rocking on an uneven joint.
Hard paving changes how water behaves. Irrigation spills and wash water tend to move across the face or collect in low spots instead of disappearing through the surface, depending on the paving and what lies below it. Check the drainage plan before fixing the finished level, especially at the entrance and perimeter. If the shortlist includes a wall-side structure such as the Lean-to Greenhouse, include its threshold and adjacent edge in that check; the selected product's layout and support details still govern where a floor can meet it. Avoid assuming that paving needs no drainage just because it is easy to sweep. At a doorway, consider where water and loose material could be tracked in.
Plan where irrigation and other water will go
Plan for every source of water that reaches the floor: watering cans, hoses, drips from pots, splashes while cleaning and any water that enters from outside. Trace where it is meant to go, and whether the chosen surface lets it pass through, carries it across or holds it in joints. With gravel, investigate the layer beneath; with brick and paving, identify low spots and an appropriate route for surface water. The aim is not to make the whole greenhouse uniformly dry, but to avoid uncontrolled puddles or water being directed towards vulnerable edges. Separate routine irrigation from water coming in at the doorway, since the latter may point to an outside-level or site-drainage issue. Site conditions matter, so a drainage question should be reviewed with a qualified groundwork professional rather than answered by a generic floor recipe.
Where the greenhouse includes planted beds, decide whether irrigation should remain within them or reach the path. Keeping a clear walking strip can limit muddy footprints, but a raised bed edge can also redirect water if the levels are poorly planned. On a fully paved interior, check how routine watering and cleaning will be managed without leaving standing water. Do not add a fall, channel or drain by guesswork: those details depend on the site and support design. Observe the area after rain where possible, not only on a dry day. For a Limited Edition Aluminium Greenhouse, mark the intended beds, paths and water routes on the selected version's plan so they can be considered together.
Before you choose 4
Clean the floor and clear plant debris
Think about what you will need to remove. Leaves, dead plant material, soil and potting mix are normal greenhouse debris, and the floor affects how easily you can collect it. Paving provides a sweepable surface, although joints still catch fine material. Brick has similar joints, often more numerous, while gravel lets debris drop between stones and can be difficult to clear without disturbing the surface. A floor that looks clean after a quick sweep is not necessarily sanitised; material choice alone does not prevent plant problems. The useful question is whether you can remove everyday debris regularly and reach corners behind benches and pots. If you pot up inside, a work area over a sweepable surface can make spilled mix easier to collect.
Include cleaning in your routine, not only in your choice of material. Check whether you can shift pots to reach the floor beneath them, sweep around bed edges, and manage water from occasional washing. Choose a surface and joint pattern that fit the tools you already use; a stiff brush can lift debris from paving joints, while loose stone needs a different approach. Avoid letting wash water carry soil into places with no drainage route. The T-Model Orangery Greenhouse listing gives an area range of 16.52 to 30 m². When laying out work zones in your chosen version, allow access for cleaning behind fixed equipment as well as along the main path.
Check grip, doorway transitions and trolley access
Test the surface in the conditions in which you will use it, not only when dry and empty. A surface that seems fine under a steady step may feel different with damp shoes, a watering can in hand or a loaded tray. Gravel can roll underfoot; brick joints and paving edges can catch a toe or a small wheel if levels vary. Look at transitions from the path outside to the greenhouse, across the doorway and between floor types. Keep the route free of loose material and unexpected lips, and make sure doors and stored equipment will not block it. These checks matter for comfort as well as reducing everyday trips and spills.
If someone using the greenhouse needs a particularly even or easy-to-roll route, decide that before choosing a material and consider tailored advice on the layout. A firm route can be kept through one part of the interior while beds or looser areas remain elsewhere, provided the edges are stable and water can still be managed. For the Pyramid Greenhouse, use the selected version's exact plan to work out floor cuts and clearances rather than assuming a generic rectangular layout. Check whether a trolley can turn where you need it and whether benches or stored tools will narrow the route.

Before you choose 5
Coordinate floor levels with the foundation design
Coordinate the floor with the order of installation. The structural base, anchoring points, door threshold, finished floor level and any drain or bed edge can affect one another. If paving is laid too high, it may interfere with a threshold or leave an edge that traps water; if it is planned too low, the entrance may be awkward. These are possibilities to resolve from model information, not universal rules about how high a floor should sit. Bring the intended surface and finished level into the conversation before groundwork is completed, so the person assessing the site can account for both the support and the inside finish. Ask the installer which work needs to happen first; there is no single sequence that suits every site.
Use the manufacturer's foundation drawing for the exact model, then have site-specific groundwork reviewed where the ground, an existing base or drainage is uncertain. A plan should show the greenhouse outline, internal zones, entry route, any beds or benches, and where water is expected to travel. If considering the Limited Edition Aluminium Greenhouse with Built-in Storage, confirm the selected configuration's footprint and how the storage area relates to the growing space before ordering floor materials. Do not borrow a foundation detail or generic dimension from another greenhouse and assume it will fit.
Choose the surface that matches your routine
Use your priorities to compare the surfaces. Gravel may suit a greenhouse where you want a loose, open path and accept the need to keep stones level and clear of debris. Brick may appeal when a modular, firm path fits the planned layout, provided you are comfortable maintaining the joints and watching for uneven units. Paving may suit a route that needs a firm, easy-to-sweep surface, provided its wet grip, edges and water route are acceptable. These are trade-offs, not guarantees: material, laying quality, sub-base and site conditions change the result. A mixed-surface layout can be practical if the transitions are carefully planned.
Before committing, mark out the interior with the actual footprint and a full-size route using string, tape or temporary boards. Walk it while carrying a tray; check where a trolley turns, where water from normal watering lands, and whether you can reach the edges to sweep. If possible, inspect a sample of the proposed surface damp, and see how potting mix and leaves are removed from it. Record any bed, drain or threshold levels for the installer or groundwork professional. Keep future changes in mind too: a surface that is simple to lift or adapt may matter if the growing layout is likely to change. This trial tests how you will use the greenhouse without pretending that a sample can verify the foundation or drainage design.
Frequently asked questions
Is gravel the best greenhouse floor for drainage?
Not by itself. Water can pass between stones, but drainage depends on the material below, the ground and a route for excess water. If those layers hold water, gravel can hide a problem rather than solve it. Check the site conditions before choosing it.
Should I pave the whole greenhouse floor?
Only if a fully hard surface suits your growing method and you have planned where water will go. Many growers prefer a firm path and leave beds or other growing areas as soil. Full paving can make moving pots easier, but it covers the ground and changes how water moves.
Are bricks easier to clean than gravel?
Brick faces can be swept, but joints collect soil and plant debris, so cleaning depends on their spacing and condition. Gravel lets water pass between stones but catches debris below the surface. Choose according to whether you prefer brushing joints or managing loose aggregate.
Does paving stop puddles?
No. Water can run across paving and pool at a low point; a continuous surface can make its route more visible, not eliminate it. Check the finished levels and drainage approach for your site, particularly at the door and edges.
Can paving inside the greenhouse serve as the foundation?
Do not assume so. A floor finish and the structural support and anchoring arrangement serve different purposes. Use the manufacturer's drawing for the exact model and ask a qualified groundwork professional to assess how the proposed base suits the site.
No one surface is best for every greenhouse. Gravel offers an open, loose finish but needs regular tidying; brick provides a firm path with joints to maintain; paving gives a sweepable route but still needs surface-water planning. Base your choice on the jobs you do, test the route and wet grip, then coordinate the finished level with the model's foundation drawing and site drainage. The result should make everyday work easier without confusing a comfortable floor with a sound structural base.
