
Choosing Mulch for Greenhouse Beds: Moisture and Slugs
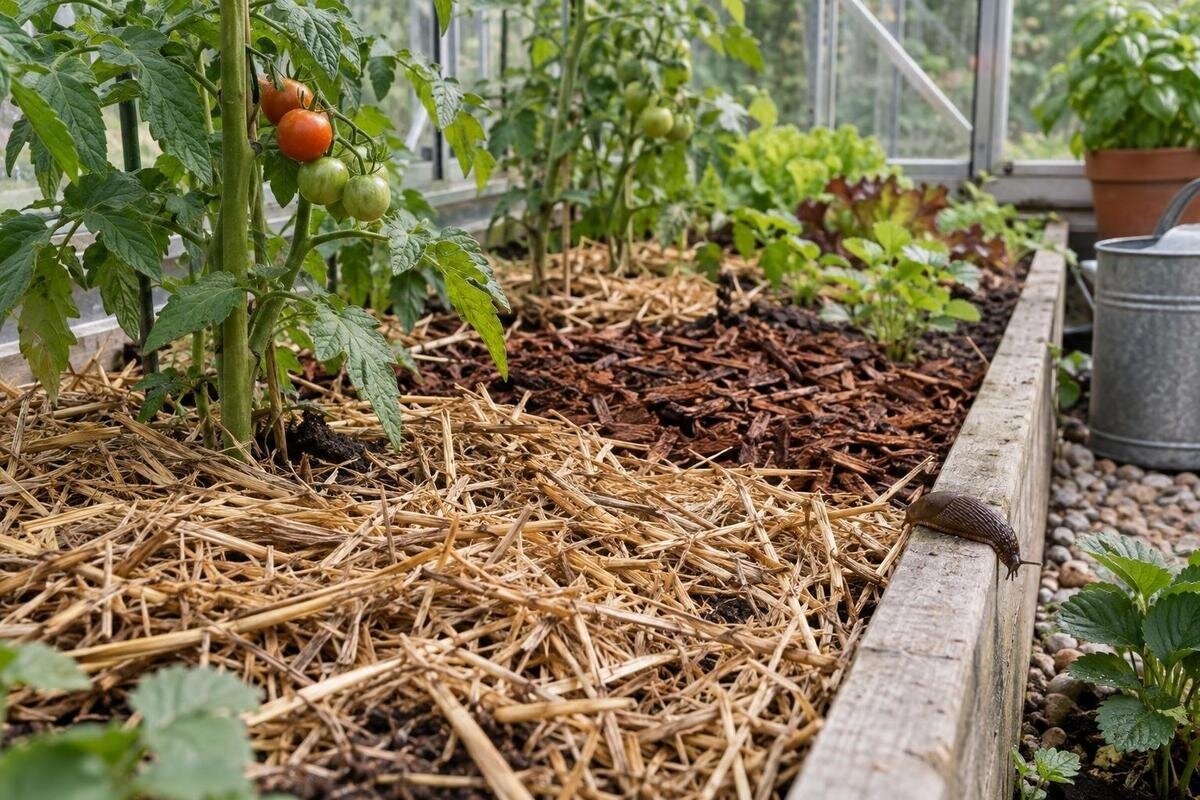
GREENHOUSE GROWING GUIDE
Mulch can make a greenhouse bed easier to manage, but a roof changes the balance: rain does not fall directly on the soil, watering is controlled by you and a damp layer can hide slugs. The best choice depends on how quickly the bed dries, what the crop needs and whether you can inspect the surface. Compare materials by their behaviour, then test a small area before covering every bed.

Before choosing a mulch 1
How a greenhouse roof affects bed moisture
Mulch inside a greenhouse works under a different water supply from mulch outdoors. The roof keeps most direct rain off the beds, so you largely control their water supply; a wet outdoor bed after a shower is not a useful comparison. A covered bed can still dry quickly when it is warm, ventilated or supporting actively growing plants. Air movement, soil structure, plant cover, bed depth and watering method all affect moisture loss. Mulch can slow evaporation from the soil surface, but it does not add water and it hides the surface from view. Treat mulch and irrigation as parts of the same routine, rather than assuming a mulched bed always needs less water.
Conditions may vary even within one structure. A bed beside an opening can dry differently from one farther inside, and a drip line often wets a narrower strip than hand watering. Observe an unmulched bed through ordinary watering cycles before choosing a material or changing your routine. If you are comparing greenhouses as well, the Lean-to Greenhouse is listed in sizes from 3.69 m² to 14.34 m². Use the exact option’s dimensions to plan beds and an aisle: the listed area is not the same as planted surface, and access affects how easily you can inspect the mulch.
Match mulch to the crop and irrigation system
Start with the crop and its stage rather than a material you happen to have. A newly sown row needs a clear surface for emergence, and coarse pieces can obscure small seedlings or make them awkward to water accurately. Around established plants, keep the stem base and any area that crop guidance says should remain uncovered visible. Then map how water reaches the root zone: hand watering, overhead irrigation and drip lines each wet the bed differently. Choose a cover that does not obstruct sowing, planting, emitters or routine checks. Crop-specific instructions take precedence over a general recommendation to mulch every exposed patch.
Check what the material is made from, how it was processed and whether its supplier identifies it as suitable for the crops you grow. Appearance alone does not establish the contents of material from an unknown source. Consider whether you will need to sow through it, lift it between crops or add a separate soil amendment. Greenhouse size affects the room available for those tasks; Limited Edition Aluminium Greenhouses are listed from 3.77 m² to 28.08 m², but the listed area cannot show whether your planned beds, paths and watering method will fit. Work from the exact version’s dimensions and intended layout.
Before choosing a mulch 2
Check moisture below the surface
Once mulch covers the soil, its appearance alone is a poor guide to root-zone moisture. Check the soil beneath it near a plant, using a finger or a small trowel where you will not disturb roots. Check more than one part of the bed and at a similar depth each time, so the comparison is meaningful. A damp mulch surface can sit above drier soil; a dry-looking layer can also cover soil that is still moist. Judge the bed by conditions around active roots and the crop’s normal needs, not by the colour or feel of the mulch alone.
Check where water lands as well as how the soil feels. With overhead watering, some material may intercept water before it reaches the bed, so lift the cover and check the soil beneath it. With drip irrigation, keep the line and connectors accessible and check between emitters as well as beside them; a wet spot at one outlet does not establish that the row is evenly watered. For a new growing layout, the T-Model Orangery Greenhouse is listed from 16.52 m² to 30 m². Compare the exact option’s dimensions with your proposed bed layout so each bed can be inspected without stepping into it.
Plan beds and paths for easy inspection
Before selecting mulch, work out where beds, paths and watering access will sit. You need to reach the surface to check it, lift a patch to look for slugs and clear material away from young plants. A bed packed against a boundary may leave an edge difficult to inspect; a tight path can make watering and harvesting awkward. Mark the intended bed lengths and widths on a plan, then include space to stand, turn and reach across each bed. This is a practical access check, not a claim about a particular greenhouse’s internal dimensions.
The listed greenhouse area is only a starting point for that plan. For example, Pyramid Greenhouse options are listed from 5.53 m² to 18.9 m², but that figure does not tell you how much surface will become a bed or whether its edges are reachable. Check the chosen version’s dimensions and arrange the beds and aisle before estimating mulch. If you already have a greenhouse, measure the actual bed surfaces instead. Space to inspect is part of the mulch decision: material that is easy to spread but difficult to lift or monitor may not suit a crowded layout.

Before choosing a mulch 3
Compare mulch materials before buying
Organic materials change as well as cover soil. Straw is light and straightforward to move, though it may shift or settle when wet. Leaf mould is a soft, decomposing cover that can hold moisture. Bark and wood chips are coarser and often remain recognisable longer, but can get in the way of sowing or small planting jobs if spread everywhere. Mature compost can contribute nutrients, so do not treat it as an inert layer; include it in the bed’s amendment plan rather than assuming it only changes evaporation. Mineral covers and purpose-made fabrics behave differently again, so check water movement, access and crop suitability before using them.
Choose according to what you need the layer to do: reduce exposed-soil drying, shade the surface or make the bed easier to manage between plantings. Ask how well it lets water through, whether it will mat, how easily you can remove it and whether it is suitable for use around food crops. No mulch is automatically slug-proof, and a tidy appearance is not proof of suitability. Storage is a separate planning question: the Limited Edition Aluminium Greenhouses with Storage range includes built-in storage, but confirm the available space before assuming a bag or bale will fit. Follow the mulch supplier’s crop-use guidance for the material itself.
How mulch can provide slug shelter
Slugs can still be present in a greenhouse, and a damp, opaque cover can give them somewhere to shelter during the day. Straw, leaf mould and other organic materials may offer more cover when they remain moist, but the material name alone cannot predict what will happen in a particular bed. Stones or coarse pieces are not a guarantee against slugs either. Look beneath the cover and around its edges, then check nearby pots, boards, fallen leaves and other debris. The practical question is whether the material makes activity harder to spot or creates a persistently damp hiding place, not whether a label promises slug resistance.
When you notice more activity, lift a small section and inspect the soil rather than automatically adding another layer. Clear loose debris from bed edges, check that one emitter is not keeping a patch wet, and thin or remove material if it blocks inspection. Keep the cover away from plant bases and out of paths, where spilled material is harder to monitor. The Bloomcabin Prestige Greenhouse is listed in sizes from 3.77 m² to 28.08 m²; whatever footprint you choose, plan enough access to look under bed-edge mulch. The published size range does not confirm a particular internal bed arrangement.
Before choosing a mulch 4
Measure the bed before calculating quantities
Calculate from the bed surface, not the greenhouse floor. For a rectangular bed, multiply its length by its width, then multiply that area by the layer depth selected from suitable crop and material guidance. For example, if guidance for your particular use calls for 30 mm (0.03 m), a bed measuring 2 m by 0.8 m needs 2 × 0.8 × 0.03 = 0.048 m³, or 48 litres, before any allowance for settling. This is an arithmetic example, not a recommended depth for every crop or material. For an irregular bed, divide it into measurable sections and add them.
Check how the mulch is sold: litres, cubic metres, weight and compressed pack sizes are not interchangeable unless the supplier gives a coverage or expansion rate. Do not infer how much a bag covers from its appearance; use the stated coverage and layer depth, then total the quantities for each bed separately if materials differ. The Spacious Greenhouse range is listed from 47 to 70 m², but a greenhouse’s listed area still does not equal its mulched bed area. Use the exact bed measurements for your calculation and allow for settling or waste only where the supplier’s guidance supports it.
Test and apply mulch in a manageable layer
Before applying a layer, identify young plants, sowing lines, emitters and any fittings you need to see. Clear loose crop debris, then spread material only where crop guidance permits. Keep it away from stems, crowns and plant bases, and leave access to labels and irrigation connections. Do not bury a line or connector that needs checking. If the system runs below the mulch, confirm it is working before covering it; if water is applied from above, check that it passes through rather than running off or remaining in the cover. Start with an even, manageable layer rather than building a thick mound.
Trial the material on one representative part of a bed first, leaving a nearby area uncovered if you want to compare drying. Keep the watering routine steady during the trial, then check soil beneath the cover over several ordinary watering cycles. Note whether it stays too damp, dries as expected, conceals slugs or makes planting awkward. If selecting a greenhouse at the same time, Aluminium Greenhouses are listed from 3.77 m² to 28.08 m²; compare the exact option’s dimensions with a layout that preserves access to each test area. Scale up only when the material suits the crop and is easy to inspect.

Before choosing a mulch 5
Adjust watering as the season changes
Mulch does not create a permanent watering schedule. As plants grow, their roots and leaf cover change, while seasonal heat, ventilation and the amount of light entering the greenhouse affect how quickly the bed dries. A newly watered bed may remain moist beneath a cover while a nearby bare strip dries sooner. Check the root zone at consistent places and water according to the crop and actual soil condition, rather than a fixed number of days. Weather outside can influence conditions under cover, but rain on the roof should not be counted as irrigation for the beds.
Water in a way that reaches the intended root area, then check beneath the mulch after the watering cycle. Do not treat a damp surface as proof that the full bed is saturated or evenly watered. Compare beds when their soil, crop size or water delivery differs; one watering amount may not suit all of them. If the soil remains wet longer than expected, review irrigation amount and timing, mulch depth and ventilation before adding more water. If a plant looks stressed while the surface is damp, inspect below the cover instead of assuming that more watering is the answer. Keep a note when you adjust the routine so the result is clear.
When to thin, remove or skip mulch
Mulch settles and breaks down, so inspect it during ordinary bed work, not only when a crop struggles. Lift small patches and check whether the material has become compacted or persistently damp; make sure stems, sowing rows and irrigation points remain visible. Organic cover may need replacement as it decomposes, but adding fresh material over a wet or pest-filled layer can hide what is happening. Thin or remove a cover if it prevents inspection, keeps the surface wetter than you want or makes irrigation difficult to judge. Follow the supplier’s advice on handling and replacing material when its condition changes.
Leaving a bed bare is a reasonable choice where slug shelter, access or moisture monitoring matters more than a cover. You can mulch some beds and not others; there is no need to treat a whole greenhouse uniformly. Reassess when crops change or irrigation is rearranged, because a material that worked around one planting may obstruct another. A useful mulch suits the crop, lets water reach the roots and remains easy to inspect. If a trial does not meet those aims, remove it and adjust rather than persisting simply because the material is commonly used.
Frequently asked questions
Is mulch useful in a greenhouse bed?
It can slow evaporation from exposed soil, but a greenhouse roof changes how the bed gets water. Use mulch only if it suits the crop and watering method, and keep checking moisture below the cover. An uncovered bed is also a reasonable choice if you need to inspect it easily.
Does greenhouse mulch cause slug problems?
Mulch does not automatically cause a slug problem, but a damp, opaque layer can provide shelter. Check beneath it and along bed edges if you notice more activity. No material is guaranteed to be slug-proof; thin or remove the cover if it makes monitoring difficult.
Which mulch is best for greenhouse vegetables?
There is no single best material for every crop or bed. Compare how the material handles water, whether it breaks down, how easily you can remove it and whether its supplier confirms it is suitable for your crops. Try a small area before using it throughout the greenhouse.
Should I water less after adding mulch?
Not automatically. Mulch can slow evaporation, but it may also catch water before it reaches the soil. Check the root zone at several points and adjust watering to the crop and actual bed conditions, rather than following a fixed schedule.
How deep should greenhouse mulch be?
There is no universal depth for every material and crop. Follow suitable crop and material guidance, then calculate the amount from the bed’s length, width and chosen depth. A greenhouse’s listed area is not a substitute for measuring the surface you intend to cover.
Greenhouse mulch is useful when it helps manage moisture without hiding what is happening at soil level. Choose an identified, crop-suitable material, calculate amounts from measured beds and check the soil beneath the cover. If a layer stays too damp or gives slugs a place to shelter, reduce it or leave that bed bare. The aim is not to use one particular material; it is to keep the bed easy to water accurately and inspect.
