
Straight-Sided or Curved-Wall Greenhouse: Comparing Working Space
GREENHOUSE PLANNING
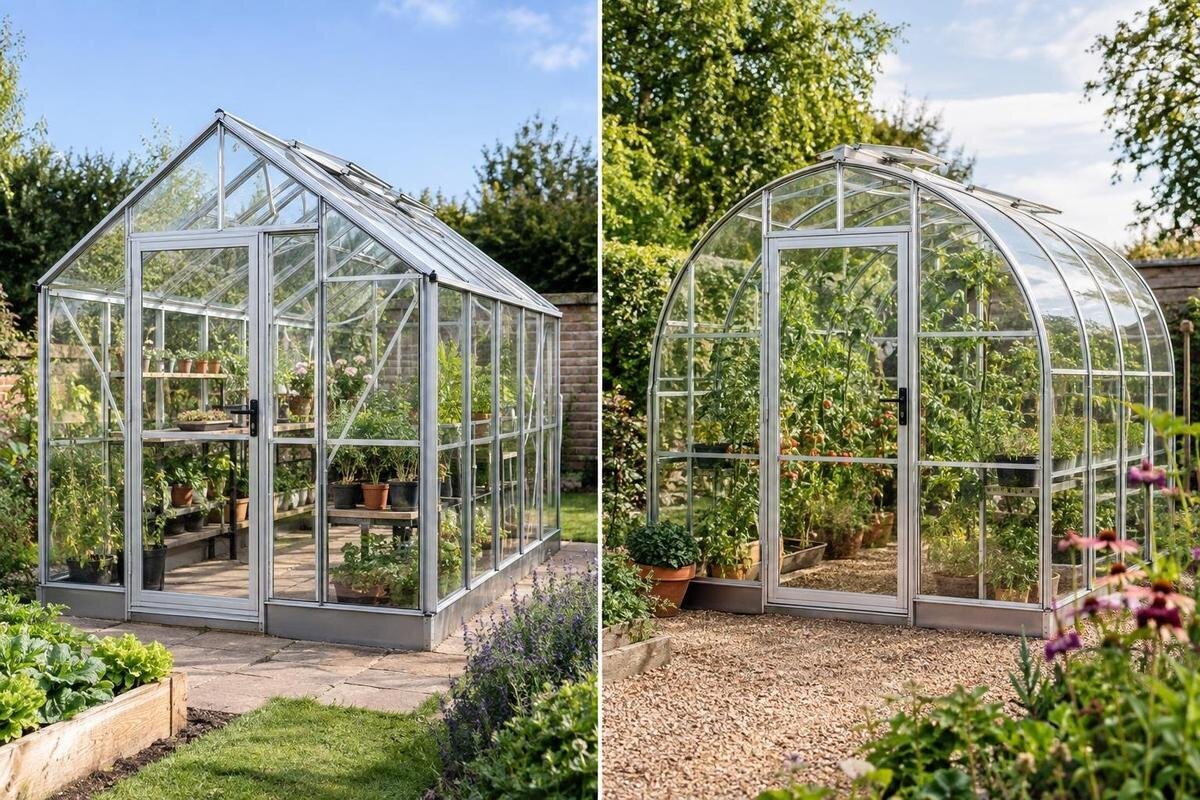
Choosing between a straight-sided and a curved-wall greenhouse is less about which outline looks larger and more about where the height falls. A floor plan shows the area covered; a cross-section reveals whether the strip beside each wall can take a bench, shelf, tall pot or comfortable standing space. Compare profiles at the same internal width and floor level, then test them against your equipment and crops. That is more reliable than using peak height or advertised area as a stand-in for working room.

How wall profiles affect usable space
A greenhouse’s footprint is a useful first filter, but it does not measure working room by itself. Two structures with similar floor areas may distribute their height differently: one retains more headroom beside the walls, while the other concentrates it near the ridge. That matters if you want a long side bench, a tall pot or space to stand upright. The floor beneath a low eave is still there, but it may be less convenient for a high shelf or a plant with a spreading canopy. Usable space includes clear floor area, vertical clearance at planned positions and a comfortable route to reach them.
A published area figure can help you narrow down size. The T-Model Orangery Greenhouse listing gives a range from 16.52 m² to 30 m², but those figures do not show the height over a bench line. For a fair comparison, pair the area with a cross-section drawn across the width. Check whether the dimensions are internal clear measurements or outside measurements, and whether both drawings start at the same finished floor level. If one figure describes the base and the other the clear interior, they are not directly comparable. Keep the floor plan and the section together: each answers a different question about the space. The internal width at bench level also matters, because room to move around furniture depends on its depth as well as the listed area.
Usable height beside straight walls
With straight sides, the wall remains vertical until the roof begins. That can give you a consistent strip of height along the perimeter, useful for placing a bench or shelf against the side, or for standing close to it. Where the run is uninterrupted, the height can remain predictable along the length. The usable height is set by the side-wall or eaves height, though, not by the roof peak. If the wall is low, a steep roof may give generous central headroom without making the edge suitable for taller items. Posts, braces, gutters, doors and other fittings can interrupt an otherwise clear run, so read the section and the plan together.
Check where the roof meets the vertical wall and measure clearance where furniture would sit. A style name alone cannot establish this: the Pyramid Greenhouse listing identifies a model, but you need its dimensioned cross-section to assess the space beside its walls. Record the height at the wall and above the front edge of your proposed bench. Those measurements show how much clearance the bench and its contents would have, rather than simply whether the wall is upright. For shelves at different heights, plot each shelf separately.
A curved wall changes headroom across the width
A curved-wall greenhouse can have a different clearance pattern across the same width. Where the curve descends close to the floor, the roofline moves lower as you approach the perimeter; where a vertical lower wall comes before a curved roof, some of the edge still has a regular height. The label curved-wall does not tell you where the bend begins or how quickly it turns. Compare the actual outline and its dimensions. Two curved profiles can place quite different amounts of headroom over the same bench position, even if their ridge heights look similar. It is the transition point, not the name, that determines how much room a shelf can occupy.
On the drawing, mark a vertical line up from the back and front edges of a proposed shelf, then from the centre of a pot and the spot where you expect to stand. Compare each line with the roof’s inner face, leaving room for the actual shelf height, container and plant. Use the tallest expected plant, not just the empty pot, when judging the clearance. This makes the narrowing visible without treating the whole perimeter as either usable or unusable. A curve may restrict a high shelf near the wall but leave room for a lower bench; another profile may keep a straight side below the curve. Check the frame as well as the glazing line.
Separate side-wall height from peak height
Peak height, side-wall height and clear height are different measurements. Peak height describes the highest point; side-wall or eaves height describes the upright section before the roof slopes or curves; clear height is what remains inside at a particular position. The terms used on a drawing may vary, so look at the dimension line rather than assuming a label means internal space. A general overall-height figure is especially limited when the roof has a broad curve, because it says nothing about shoulder height. Measure from the intended inside floor surface, and note whether a raised base or floor changes that reference point. Record the height at the wall and at each planned shelf edge, not only at the ridge.
The Limited Edition Aluminium Greenhouses with Storage listing identifies a product line, but its name does not specify where storage sits or how much clearance remains beside it. For an option with built-in storage, mark its floor area and height on the drawing, then assess the adjacent bench and aisle. Check that shelves, stored items and the roof frame do not overlap. Establish whether the storage dimensions include projecting parts and whether the surrounding space allows you to use it comfortably. This distinguishes the room occupied by storage from the room needed to access it.

Compare cross-sections on the same basis
Like-for-like means comparing the same kind of measurement on both outlines. Ideally, use dimensioned internal sections for the exact sizes you are considering, with the same floor reference point and scale. If the greenhouses have different widths, compare clearance at matching distances from each inside wall as well as at the centre. Otherwise, a wider structure can appear more usable simply because it has more floor. Use matching internal widths where possible; if that is not possible, record the difference rather than comparing side clearances as if the widths matched. A product photograph cannot reliably show the full cross-section, and perspective can distort height. If a drawing has no scale or interior dimensions, ask for them instead of measuring the image.
Also compare where the roof begins, the side height, the highest point and any structural members projecting into the growing area. The Bloomcabin Prestige Greenhouse page identifies the model; use dimensions for the selected size and configuration in your comparison. Place the two sections side by side and mark the same bench depth, shelf height and standing position on each. This shows whether your intended layout fits both profiles. Note any missing dimensions, external measurements or optional bases that prevent a direct comparison.
Check shelf depth and working clearance together
Benches and shelves occupy floor space, but their contents also need vertical clearance. Check the roof above both the back and front edges at the intended shelf height; where the roof rises towards the centre, clearance will differ across the shelf’s depth. Include the height of pots, trays and containers, with room for plants above them. A narrow shelf may fit closer to the wall, but tall contents can still meet the roof. Allow room to inspect and harvest plants, and check whether posts, braces or openings interrupt the shelf’s length. The empty shelf fitting is only part of the assessment.
The Spacious Greenhouse listing gives an area range of 47 to 70 m², but an area figure cannot tell you whether a particular shelf line will sit beneath the roof. Fix the shelf depth and height in your own plan before comparing sections; otherwise, you may unconsciously adjust the furniture to make one profile look better. If you expect to rearrange the interior, test a fixed bench position and a second, more flexible layout. Include room to reach behind containers and lift trays out, not just enough clearance for the shelf itself. If foliage will overhang, mark its outer edge as the practical boundary rather than using the shelf frame alone.
Measure the aisle after placing benches and pots
The central aisle is often the only route between a door and the far end, so draw it after placing benches, shelves and pots, not before. Measure the remaining clear width between actual obstructions. Include space occupied by plant canopies and any equipment you will move regularly; a path that appears wide on an empty plan can narrow once pots and growth are added. Check door positions and the space needed to approach them. If you will carry a tray or watering can along the aisle, check the narrowest point rather than relying on an average width. The cross-section tells you whether the sides support the layout, but a plan view is still needed to confirm the route runs through the full length.
For a model in the Aluminium Greenhouses range, use the dimensioned plan rather than dividing the published area into assumed bench and aisle strips. A curved profile can limit shelf placement without changing the floor outline, so check how the resulting layout affects the route. Pay particular attention to corners and the entrance, which a central cross-section may miss. Where the roof or layout changes along the length, examine those positions separately. Keep working positions on both sides accessible without having to move pots out of the aisle.
Place crops where their mature height fits
Choose plant positions by mature height and spread, not only by the size of the plant at purchase. Include the pot, container or bed level, any support you plan to use and the space needed to tend the plant. A tall crop placed at a low perimeter can meet the roof even when the centre has plenty of height; a compact crop may suit a lower shelf. For climbing crops, include the support as well, since it changes the height and access you need even if it does not widen the pot. Do not assume that all tall plants belong at the ridge or that a straight wall automatically makes every side position suitable. Check the clear height where each plant will stand.
For a Lean-to Greenhouse, the style name alone does not establish clearance at a planting position. Map likely plant centres onto the drawing for your chosen configuration. For a row of containers, check whether it runs across or along a changing roof profile: clearance may differ between its ends. Mark the canopy as well as the pot, leaving space to reach the plant. For a full-length bed, check any changes in the roof or frame along its length rather than assuming that one cross-section represents every position.

Count storage and fittings as part of the layout
Account for storage and fittings in the same way as growing equipment. A fixed storage unit, shelf, water container or work surface uses floor area and may create a taller obstruction at one end of the greenhouse. Mark its documented position, width and height on the plan and section; do not assume that a named storage option sits outside the usable growing area. This matters especially when storage is fixed: its usefulness should be considered alongside the space needed to reach it. If the interior will change with the seasons, distinguish items that stay in place from those you can move. Include permanent obstructions when judging perimeter height and aisle width.
When planning a layout for the Limited Edition Aluminium Greenhouses range, distinguish included fittings from those you intend to add. Mark both on the same sketch so that storage and growing equipment are not allocated the same space. Leave space unassigned where a fitting’s dimensions are unknown. The aim is not to fill every metre of wall: an uncrowded section can provide room to handle pots, reach plants or rearrange equipment. Decide which items need a permanent position and which can move when seasonal planting changes.
Test the plan before choosing a profile
Bring the measurements together in a simple plan and cross-section. On the plan, mark the clear floor width, door, benches, shelves and aisle; on the section, mark wall height, roof outline, shelf edges and standing position. Graph paper is sufficient if you use a consistent scale and keep internal and external dimensions separate. To assess reach and movement, you can also mark the furniture’s footprint at full size at home. Use measured dimensions for this exercise, not proportions estimated from a product photograph.
Compare the layouts against the way you actually work: where you pot plants, which crops need height, how often you reach the side benches and whether equipment must pass through the aisle. Mark priorities such as standing along one side or keeping taller crops out of the route; these are the conditions your comparison should resolve. If a critical dimension is absent, confirm it for the exact model and size before treating the space as usable. A greenhouse with the tallest peak is not automatically the best working fit, and a curved wall is not automatically a wasted edge. The better choice is the profile that provides enough clearance where you will use it, while leaving a clear route between those positions.
Frequently asked questions
Does a straight-sided greenhouse always have more usable space?
No. A straight wall can provide a more consistent band of vertical clearance, but its height, the roof profile and the interior fittings all matter. A curved wall may retain useful headroom if the curve starts above a vertical lower section. Compare the actual internal cross-sections at the positions where you plan to stand, grow plants or place shelves.
Which greenhouse height should I compare?
Look at the clear height beside the wall, the height where the roof begins and the ridge height. Confirm whether each measurement is taken from the same floor level and whether it describes the inside or outside. For bench planning, also check the clearance above the bench’s back and front edges.
Can I put shelves against a curved wall?
Possibly, depending on the curve, shelf depth and height. Check the roof clearance above both edges of the shelf and allow room for what you intend to store or grow on it. A lower bench may fit where a high shelf does not. Also account for any frame members or fittings that interrupt the space.
Where should I place taller plants?
Use the measured clearance at the plant’s actual position, not the greenhouse’s peak height. Include the container, the plant’s expected mature height and spread, and any support you plan to use. A tall plant at the perimeter may meet the roof sooner than one nearer the centre, depending on the profile.
Is the listed floor area enough to compare greenhouses?
No. An area figure helps with overall size, but it does not show how height is distributed across the width. A plan view shows where the floor and fittings sit; a cross-section shows clearance at the wall, shelf and centre. Use both for the exact size and configuration you are considering.
There is no universal winner between straight sides and a curved wall. The useful comparison is the height available at your bench, shelf, crop and standing positions, together with a clear route between them. When the plan view and cross-section both work for the way you garden, the profile is doing its job.
