
Keeping Seedlings from Becoming Root-Bound Before Planting
Seedling propagation
Root-bound seedlings are often a sign that a batch has spent longer in its first container than the sowing plan allowed. The answer is not simply to choose the largest cell: larger pots occupy more bench space, and a later planting date can shift every batch behind it. A reliable plan connects the intended handover date with container size, potting-on stages and the peak number of trays the nursery can hold.

Greenhouse space check 1
What root-bound seedlings look like
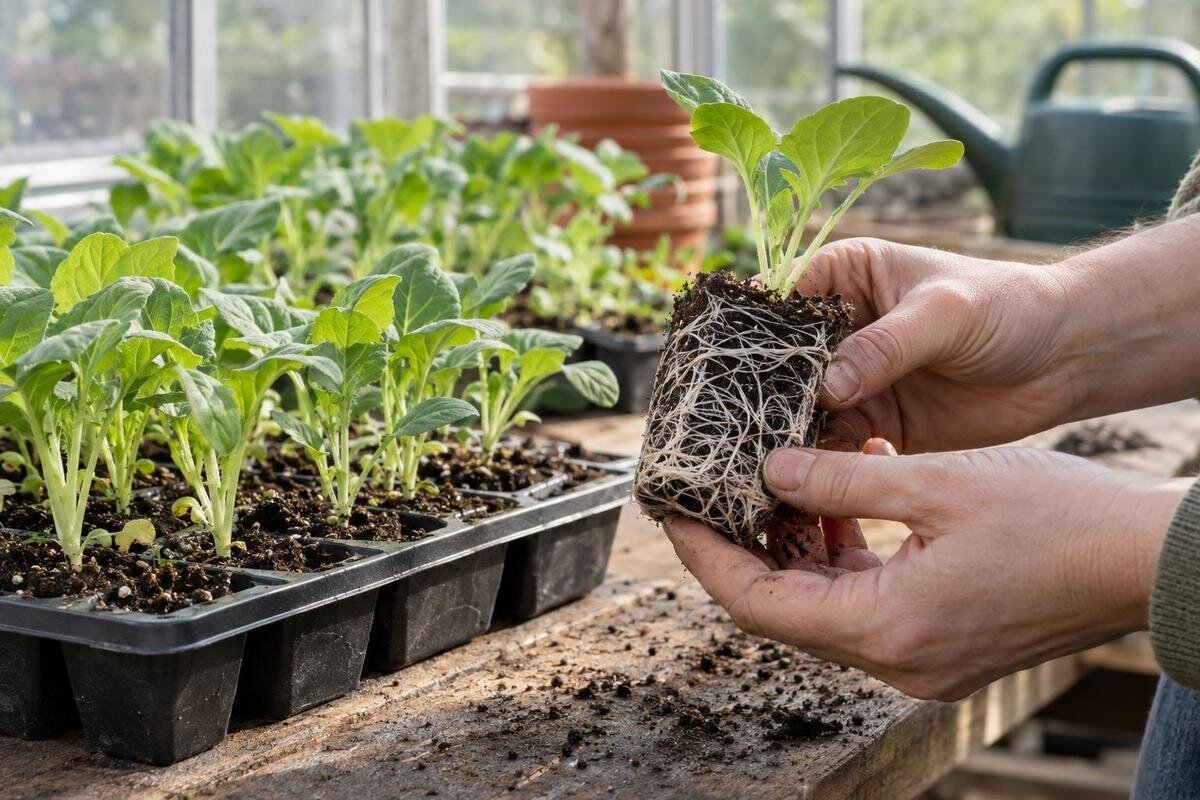
Root-bound describes a root system that has outgrown its container and become crowded, rather than simply a seedling with roots visible at the edge. In a cell, fine roots normally reach the walls as the plug forms; that is part of a plant becoming established and ready to move. Concern rises when roots are packed against the sides, loop repeatedly round the base or form a dense mat with little growing medium visible. At that stage, roots have limited room to extend and the small volume of mix offers less reserve for moisture. The useful distinction is a knitted plug with room for further growth versus a congested one: the term describes the root-to-container relationship, not plant size alone.
Look for more than one clue before changing your plan. A tray that dries much faster than before, roots emerging from drainage holes, or growth slowing may indicate a nearly full cell, but each can also reflect watering, exposure, feeding or another condition. One root at a drainage opening is not proof by itself. Gently ease out one representative plug rather than pulling at every stem, then compare it with another plant from the same batch. Note whether roots spread through the mix or circle tightly, and how much mix remains around them. This small sample is more reliable than judging readiness by shoot height alone, and it avoids disturbing the whole tray.
Set the sowing date from the planting date
Choose the intended planting-out window first, using crop-specific guidance and the conditions at your site. Then work backwards through every stage that occupies nursery space: any hardening-off period, time in the final container, earlier potting-on and growth from emergence to the first move. This gives an approximate sowing window, not a guarantee. Germination and growth vary with seed lot, season, light, temperature and care, so leave flexibility rather than assigning every batch a fixed date. A change in weather or a delay in preparing the receiving bed can move the handover. The seedling is not plantable simply because the calendar says it is. Use recent notes from the same crop where available, while allowing for a different season.
Write a timeline for each crop: sowing, expected emergence, first root inspection, likely potting-on stage, any hardening-off start and intended handover. Beside each date, estimate how many trays or pots will occupy the bench; delays extend that occupancy. Sow in small waves when plants are needed over a longer period, rather than raising the entire season’s supply at once. When assessing the greenhouse footprint for this peak period, the T-Model Orangery Greenhouse listing shows area options from 16.52 m² to 30 m². Compare the listed area with your bench sketch and other uses; it does not itself tell you tray capacity. This ties the sowing window to the space you can actually manage.
Greenhouse space check 2
Choose a cell size for the expected nursery stay
Choose a starting cell with the expected nursery stay, crop size and number of seedlings in mind. Small cells let you raise many plants in a compact tray, but their limited mix gives roots less room and may dry more quickly as roots fill it. A larger cell can extend the interval before potting on, yet occupies more bench area and uses more mix from the outset. There is no single best cell size for all crops or sowing dates. Start with crop-specific guidance from the seed supplier or a trusted growing source, then check that recommendation against how long your greenhouse will hold the plants and the pace of growth you have observed.
Think about how the crop is best started as well as the cell volume. Depending on the crop, seedlings may tolerate being moved from a communal tray into individual cells, or be better started singly to avoid unnecessary root disturbance. Seed size alone does not settle the question: a small seed can grow into a plant that needs a longer stay and more root room. Avoid choosing a container so large that moisture becomes difficult to judge around a very young root system, and do not assume a large cell prevents crowding indefinitely. The aim is a suitable first stage that leaves enough time and space for the next move. Follow species-specific recommendations where available.
Pot on before roots form a dense mat
Pot on when a seedling is established enough to handle and its roots are using the cell, but before they become a tight coil. A plug that holds together when eased from its cell, with roots distributed through the mix and room for further growth, is often a better cue than a fixed number of days. If the plug falls apart, it may not yet be well-knit; if it is a firm web of looping roots, it has likely been held too long. Check a representative plant from each crop because seedlings in one tray do not always grow at the same pace. As the planting date approaches, inspect batches more often rather than waiting for visible stress. This gives you time to make space before the whole tray is ready.
Use root inspections to identify which batches need moving first, rather than waiting until every tray needs attention at once. Check whether development is even across a tray; differences may reflect position, moisture or light as well as restricted roots. Potting on creates an immediate space demand because one tray becomes a group of larger pots. If you are comparing greenhouse footprints at this stage, the Pyramid Greenhouse is listed from 5.53 m² to 18.9 m². Map the larger-pot stage onto your proposed benches before moving seedlings, leaving the batches that are not yet ready in their existing positions.

Greenhouse space check 3
Plan each potting-on stage
Choose the next container before the seedling reaches the limit of its current one. It should provide meaningful additional mix without jumping unnecessarily to a very large volume; excess unrooted mix can make moisture management less straightforward. Prepare enough labelled pots and suitable growing medium for the batch, then work gently so the root ball and stem are not damaged. Set each plant at the depth appropriate for its species, and water in line with the crop’s normal needs so the mix settles around the roots. Return seedlings to appropriate growing conditions and watch how they respond. Handling requirements differ between crops, so follow specific guidance where a species needs special care. Organising supplies first also reduces the time roots are exposed during the move.
One potting-on stage may be enough for a fast-growing batch, while a long nursery stay or a larger final plant may call for another; decide from root development and planting plans rather than adding routine moves. Each move uses labour and mix and temporarily reduces available bench positions. Map the sequence before sowing so trays, small pots and larger pots do not all peak at once. The Limited Edition Aluminium Greenhouses with Storage listing spans 5.52 m² to 28.08 m². When assessing a size, allocate positions for each container stage as well as the supplies needed for potting on.
Calculate peak tray and bench capacity
Calculate space from the busiest point in the cycle, not simply from the number of seed trays you sow. For each stage, multiply the number of trays or pots by the surface area each occupies, then total the groups that will overlap on the same dates. Use the actual outside measurements of trays and containers and the usable bench surface, not just the greenhouse’s listed area. Include clear access for lifting and watering, and allow movement between working areas; packing a bench edge to edge may give a theoretical maximum but make daily care awkward. Record the peak number of tray positions and when it occurs, because the busiest week may be brief but still determines capacity.
After potting on, a tray of seedlings may occupy a much larger footprint as individual pots, so calculate each stage separately. Count plants waiting for a bed, backup seedlings you intend to keep and trays that have not yet been cleared; do not count every narrow gap as usable space. The Bloomcabin Prestige Greenhouse listing shows area options from 3.77 m² to 28.08 m², but those figures are not a tray count. Use the area of the size you are considering, then plan benches and access against peak demand. If your calculation exceeds usable bench space, stagger sowings, reduce the batch or arrange another growing space before roots become crowded.
Greenhouse space check 4
Include working space in the nursery plan
Nursery capacity is more than a flat surface for trays. Reserve a place to fill containers and handle seedlings, a clear route for moving trays without brushing other plants, and enough room to inspect and water each batch. Keep age groups identifiable and avoid placing plants where another tray blocks light or air movement. If the greenhouse also holds mature crops, equipment or supplies, account for their space before estimating what remains for propagation. A simple sketch using your bench and tray measurements can reveal bottlenecks that a listed area figure cannot. Include temporary jobs such as sorting, labelling and potting on; they need room even when they do not occupy it throughout the season.
Separate the space needed for daily care from the space occupied by plants. The Spacious Greenhouse is listed from 47 m² to 70 m²; compare the option you are considering with a layout that includes both. Keep pots, labels and growing mix accessible without letting supplies take over seedling positions. Identify where you will put a tray while inspecting plugs or labelling newly potted plants. If the plan leaves no working surface free during the busiest week, revise the layout or batch overlap rather than relying on temporarily moving plants into access routes.
Track root growth without disturbing every seedling
Use a repeatable check instead of waiting for seedlings to look distressed. During each inspection, ease out a representative plug from each crop or batch, note root spread and the amount of mix left, and compare drying speed with the previous check. Label every tray with the crop and sowing date; mixed or missing labels can make an inspection sample misleading. Record when a batch needs potting on and how many pots will be required, so the next space calculation is based on observed growth. Check growing conditions as well, because temperature, light, air movement and watering affect the pace of growth. A crowded plug is not the only explanation for a poor-looking seedling. Make checks close enough together to act before roots tangle.
Those notes help separate a timing problem from a greenhouse-capacity problem. If roots filled cells sooner than expected, bring the next batch’s inspection or potting-on stage forward; if ready pots had nowhere to go, revise the space allocation. The Aluminium Classic Greenhouse listing spans 3.77 m² to 28.08 m². Compare your recorded peak tray and pot footprint with the bench layout you could accommodate in the size under consideration. Keeping root observations beside occupancy dates helps you decide whether later sowing, a smaller batch or more nursery space would address the actual bottleneck.

Greenhouse space check 5
Allow for hardening off and the final handover
Planting readiness has two parts: the seedling must suit its crop and the outdoor conditions must be appropriate. A sturdy plant with a cohesive root plug may still need acclimatising before it moves from protected conditions into the garden. Follow crop-specific instructions for hardening off, introducing exposure gradually rather than moving a sheltered batch directly into a harsher setting. Include any required hardening-off period in the backwards schedule and reserve a place for plants while it happens. If weather or the receiving bed delays planting, inspect roots again and decide whether another potting-on stage is needed. Do not let the planned planting date obscure the condition of the seedling or the receiving site.
Allow for overlapping batches during hardening off: older plants may still need a holding area while younger seedlings occupy the nursery benches. The Lean-to Greenhouse listing gives area options from 3.69 m² to 14.34 m². When considering a layout, mark where each batch will stand during this transition, including any plants whose move outside has been delayed. Keep their expected departure dates in the space plan rather than treating the first day of hardening off as the day nursery space becomes available. If the overlap is too great, stagger sowings instead of holding every seedling in a small cell.
Use each batch to improve next season’s plan
After planting, record what happened rather than treating the first schedule as fixed. Note sowing and emergence dates, when roots first filled the cell, potting-on dates, when hardening began and whether planting took place as planned. Add the peak tray and pot count and how long each stage occupied the benches, along with any weather or care changes that affected growth. At the end of the season, look for repeated patterns. If the same crop becomes crowded before its planned move, sow later, use a suitable larger starting cell or plan an earlier potting-on stage. If plants were ready well in advance, the sowing date may have been too early. Use more than one batch before making a permanent change.
Change one or two parts of the plan at a time so the next batch gives useful feedback. A delayed handover may call for fewer plants or a larger intermediate container; a bench bottleneck may call for staggered sowing; uneven root growth may call for closer checks and a review of conditions. If you are comparing greenhouse sizes, the Limited Edition Aluminium Greenhouses listing gives area options from 3.77 m² to 28.08 m². Use your peak-use notes to distinguish a recurring shortage of space from a brief overlap that a revised schedule could resolve. Aim for seedlings to reach the planting window without spending longer than necessary in their nursery containers.
Frequently asked questions
What is the clearest sign that a seedling is root-bound?
Look for roots forming a dense mat or repeatedly circling the plug, with little growing mix left around them. Check a sample from the tray. Faster drying or slower growth can support that clue, but either sign on its own may have other causes.
Are roots coming through drainage holes a problem?
Not automatically. A root can reach a drainage hole while the plug still has room for growth. Check how densely the whole plug is filled, whether roots are circling, and how long the seedling must remain in that cell before planting.
When should I pot on a seedling?
Use crop-specific guidance and inspect the root plug. Move an established plant when roots are filling the cell but have not formed a tight coil. The right timing depends on the crop, its growth pace and the planting schedule; a fixed number of days will not suit every batch.
Will a larger cell prevent seedlings becoming root-bound?
It can give roots more room and may delay the next potting-on stage, but it does not remove the need to plan for the nursery stay. Larger cells use more growing mix and bench space, so check that the batch will still fit your peak-capacity plan.
What should I do if planting is delayed?
Check how much room remains in the root plug and whether the seedling can stay in its current container. If roots are becoming congested and there is time before planting, pot on into an appropriate next size and allow for the extra bench space. If space is tight, reduce overlapping sowings rather than crowding the batch.
Keeping roots from becoming congested is a coordination job: sowing dates, container volume, potting-on time and bench space have to line up with the real planting window. Use a root check to guide each move, and reserve space before seedlings need larger pots. If the handover shifts, adjust the batch plan early. A record of when roots filled each cell will make the next schedule more accurate and help seedlings reach planting time without being held too long in a container that is too small.
