
Why Greenhouse Seedlings Collapse: Recognising Damping Off
Greenhouse propagation
Seedlings that fall over at the growing-medium surface can be showing damping off, but a fallen plant is not a diagnosis. Similar losses can follow overwatering, drought, heat, cold, poor emergence or physical damage, and some cases begin before seedlings break through. Look for changes at the stem base, examine roots and compare affected with unaffected cells. Those observations help you decide what to remove, what to clean and whether a plant-health specialist should confirm the cause.

Planning a greenhouse workspace 1
What damping off means
Damping off is a collective name for diseases that affect seeds before emergence or seedlings soon after they appear. Pre-emergence damping off can destroy a seed or emerging root, leaving an empty cell. After emergence, infection may rot the stem at or just below the growing-medium surface, or damage roots until the plant falls. Several pathogens can be involved, including fungi such as Rhizoctonia and Fusarium, and fungus-like oomycetes such as Pythium. They do not all behave alike, so the name describes a pattern of loss rather than one organism or a single treatment.
Young seedlings are vulnerable because they have little stem and root tissue to spare. Organisms may persist in contaminated growing medium or plant debris and may be carried on trays, tools, hands or splashed water; the route varies by pathogen. A greenhouse that feels humid is not proof of infection, and an empty cell may result from poor seed viability, sowing depth or unsuitable conditions. In pre-emergence cases the seed or root may decay in place, leaving no visible symptom above the medium. Compare failures with healthy seedlings from the same sowing and follow crop-specific seed instructions before assuming disease.
Inspect the stem at the growing-medium line
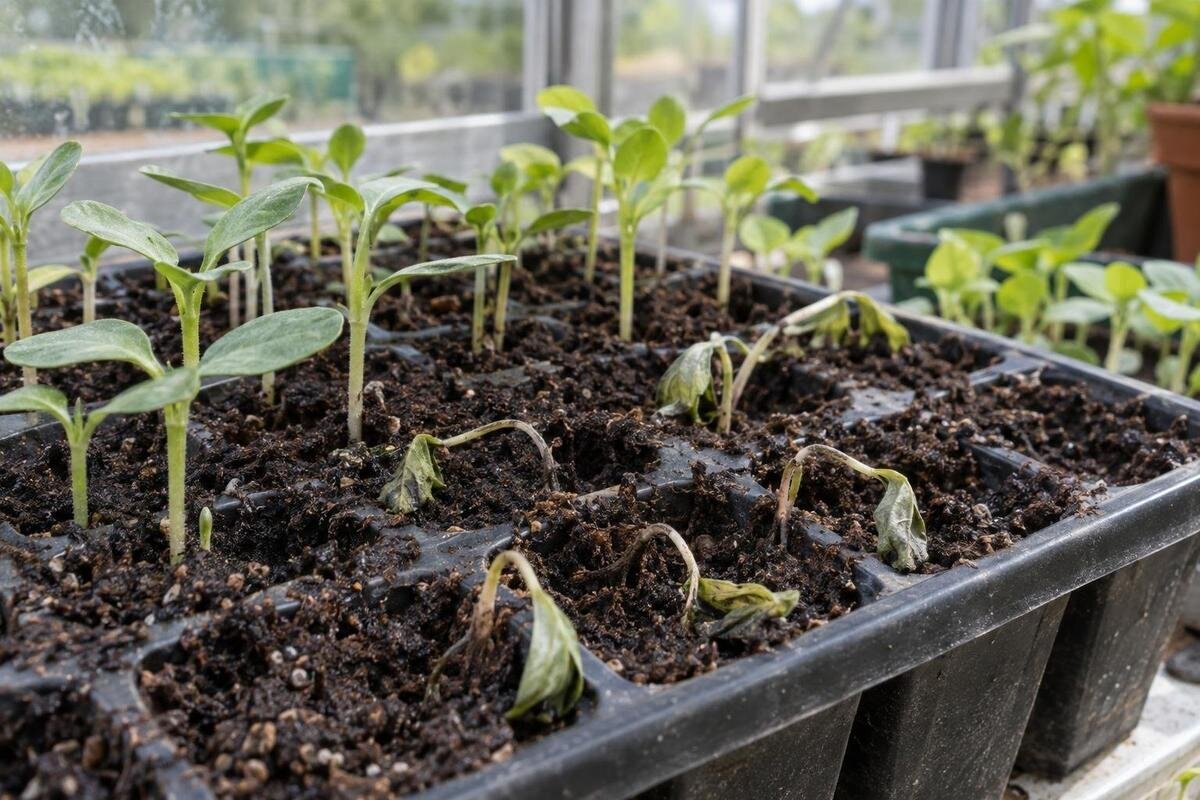
Look closely at the point where the stem enters the medium, using good light and a gentle touch. Post-emergence damping off often starts as a translucent, water-soaked or dull patch at the base. The tissue may narrow, darken or soften until it looks almost thread-like; the seedling then bends at that point and lies on the surface. Leaves above the damaged area may remain green for a while, so a healthy-looking top does not rule out damage at the base. Some seedlings wilt first because their roots are affected, and not every pathogen produces a classic pinched stem.
Before removing a plant, note its position and photograph the stem base. Compare several affected seedlings: the earliest symptoms can be easier to interpret than a stem that has already dried out. Record what you can actually see, such as a narrowed base, a soft patch or a bend, rather than labelling every fallen plant as diseased. A photograph of the whole tray alongside a close-up preserves both the pattern and the individual symptom. Make a simple sketch if losses are clustered, marking affected cells without disturbing the remaining plants. Access matters when planning this inspection work: the Bloomcabin Prestige Greenhouse range is 3.77–28.08 m². On a plan of your selected layout, check whether you can see and reach the seedlings on each bench without moving other trays out of the way; the listed footprint alone does not establish that access.
Planning a greenhouse workspace 2
Check roots and the pattern across the tray
Carefully lift one recently affected seedling with a clean tool, rather than inspecting only plants that have been dead for several days. Look at the lower stem, roots and root tips. Decayed roots may be brown, soft, sparse or damaged, but colour varies with the crop and growing medium. Compare them with a healthy seedling of the same age. A small, careful sample can add useful evidence without disturbing the whole tray; pulling up every plant may damage healthy roots and make the pattern harder to read.
Record whether losses occur in one corner, across a row, under a cover or throughout the tray. A localised patch may point to a wet spot or a shared handling route; a row of losses may relate to how the tray was filled or watered. These are clues, not a way to identify a pathogen. Compare the affected area with the rest of the tray, noting any differences in moisture, covers or handling. Keep the dates of observations together so you can distinguish the original patch from later losses, rather than relying on memory. If you are planning space to keep batches apart for observation, the Spacious Greenhouse listing spans 47–70 m². Sketch the proposed batch positions and access routes within the chosen layout: that floor-area range does not specify bench capacity or the number of separate growing zones.
Other problems can also make seedlings collapse
A seedling may wilt or topple because its medium has become too dry, or because persistently wet medium has left roots short of air. Heat or cold stress can also cause wilting, while a leggy, weak stem may fall without rotting at the base. Poor emergence can reflect seed quality, depth or conditions rather than pre-emergence damping off. These problems can overlap: an environmentally stressed seedling may also be more vulnerable to disease, so one explanation does not automatically exclude another.
Check the stem and roots alongside the medium, not just the leaves. A snapped or chewed stem may suggest physical damage, whereas a soft, decayed base and damaged roots support a disease concern; neither observation confirms the exact cause. Separate your observations from your interpretation in any notes. For example, record a firm stem and dry medium as observations rather than immediately calling the problem drought. Note whether affected plants share a position, cover or watering pattern, and whether unaffected seedlings nearby experienced the same conditions. This gives you a clearer comparison when several explanations seem possible. When mapping those positions in a planned greenhouse, the Aluminium Classic Greenhouse range covers 3.77–28.08 m². Use the selected configuration to mark benches, doors and covered trays; total floor area is not itself a diagnostic clue.

Planning a greenhouse workspace 3
Moisture and airflow influence risk
Persistently wet growing medium, poor drainage, dense sowing and limited air movement can create favourable conditions for several common causes of damping off. High humidity may keep surfaces damp, but humidity alone does not prove that seedlings are diseased. Different organisms respond to different conditions, and crop needs vary too. There is no single greenhouse temperature or moisture setting that suits every seedling; use the seed supplier's guidance for the crop and stage you are raising.
Keep drainage holes clear and avoid leaving trays saturated. Space seedlings so they are not crowded, and ventilate as appropriate without exposing young plants to a drying or chilling draught. If a cover is used for germination, follow the crop's guidance on venting or removing it after emergence instead of keeping seedlings enclosed by default. When reviewing conditions, distinguish between moisture in the growing medium, damp surfaces and air movement around the seedlings. Describing all three simply as humidity makes it harder to explain what needs attention. Record whether a cover was in place and whether trays were standing in water when symptoms appeared. For a proposed Lean-to Greenhouse, listed at 3.69–14.34 m², review ventilation in relation to the intended tray positions. The area range cannot tell you how air will move at tray level in your chosen arrangement.
Isolate a suspected outbreak
Remove seedlings that have collapsed with a rotted stem base, and take nearby symptomatic plants out of the tray for closer inspection. Handle them gently so contaminated medium is not shaken onto other containers. If practical, move the suspect tray away from clean sowings, taking care not to brush it against healthy plants or splash water as you work. Keep unaffected seedlings under observation; an isolated loss does not mean every plant in the greenhouse is infected.
Place discarded seedlings and affected medium in a container or bag rather than spreading loose material around the growing area. Do not reuse medium from a suspect batch. If many cells are affected, it may be more practical to discard the tray and medium than to try to rescue each plant. Decide where suspect material will go before lifting it, so you are not carrying an open tray around while looking for somewhere to put it. Keep retained trays clearly identified, with their original batch details and the date symptoms were noticed, so they remain distinguishable from clean sowings. When considering the Limited Edition aluminium greenhouse, whose listed range is 3.77–28.08 m², include a proposed observation area in the bench plan. Check whether it fits alongside your normal work and access space rather than assuming that extra floor area provides a separate isolation area.
Planning a greenhouse workspace 4
Clean trays, tools and benches between batches
Remove growing medium and plant debris from reusable trays, pots, labels, tools and bench surfaces. Scrub with detergent and water, paying attention to corners and drainage holes where material can collect, then rinse. Cleaning matters because dirt and plant residue can shield organisms from a disinfectant. Keep suspect equipment separate from clean items until it has been washed; otherwise, the cleaning process itself can transfer contaminated material to a new sowing.
If you use a disinfectant suitable for the equipment, follow its label directions, including any contact time and rinsing instructions. Do not mix cleaning products. Damaged or deeply grooved items can be difficult to clean thoroughly; consider retiring them from seedling use if they cannot be cleaned properly. A clean-to-dirty workflow also helps: prepare new trays first and handle suspect material last, then wash your hands and tools. Give washed equipment a clearly designated place, separate from items still awaiting cleaning, so you do not have to guess which trays are ready for reuse. Include labels and small tools in that arrangement, not just the larger containers. The T-Model Orangery Greenhouse listing spans 16.52–30 m². When assessing a layout, identify where dirty equipment will be collected and clean equipment kept; the stated area does not establish cleaning access or provide details of available work surfaces.
Sowing and watering habits that reduce risk
Use a fresh growing medium intended for raising seedlings, and do not use garden soil in trays. Avoid reusing medium from a batch affected by unexplained collapse. Sow at the depth and spacing recommended for the crop, and thin crowded seedlings when appropriate so air can move around them and you can inspect individual stems. Clean containers before filling them, and keep unused medium stored as its packaging directs. These steps reduce common routes for contamination, but they cannot guarantee that disease will not occur.
Aim for even, crop-appropriate moisture rather than a constantly saturated tray or repeated extremes of drying and soaking. Water carefully to limit splashing between cells, and do not leave trays standing in shared water. Bottom watering may reduce splash in some setups, but it is not a complete safeguard; water and containers still need to be clean. Judge the result at the tray rather than assuming that a particular watering method has solved the problem. Include a check for standing water in your routine, and note which batches need attention instead of treating every sowing identically. A workable bench arrangement should let you inspect and water individual trays without reaching across suspect plants. For the Pyramid Greenhouse, listed at 5.53–18.9 m², plan that arrangement using actual tray and bench measurements. Total floor area is not a measure of usable bench length.

Planning a greenhouse workspace 5
Keep sowing batches easy to trace
Label each batch with the crop or variety, sowing date and, if known, seed lot. Record the growing medium and where the tray sat in the greenhouse, along with any notable watering or temperature changes. If seedlings collapse, these notes can help you see whether losses follow a particular tray, seed lot, medium or position. Keep new sowings distinguishable from older batches rather than combining them, so an emerging problem is easier to contain and compare.
A simple bench sketch can show tray locations, covers, doors and the route you use when watering or cleaning. It is useful for spotting repeated problem areas and planning a workflow that keeps fresh sowings away from suspect trays. Give each bench position a simple name or number that matches your batch notes. If a tray moves, record both its previous and current position; otherwise, later observations may be attributed to the wrong place. Keep the system brief enough to use consistently: a dated sketch and a few clear notes are more useful than an elaborate record left unfinished. For workspace planning, the Limited Edition greenhouse with built-in storage listing covers 5.52–28.08 m². Treat the stated area as one planning input, then check the selected layout for bench space, access and the places where you intend to keep batch records and supplies.
When to ask for specialist confirmation
Ask a plant-health specialist or diagnostic service for help if losses are widespread, recur in successive sowings despite improved hygiene, affect several crops or remain difficult to explain. Confirmation is especially useful before you choose a treatment: the visible symptom called damping off can have several causes, and non-infectious stress can look similar. A photograph can help explain what you saw, but it may not be enough to identify the organism. Local agricultural extension services, plant diagnostic laboratories or a qualified horticulturist or plant pathologist may be able to advise.
Contact the service before sending material and follow its instructions for collecting and packing a sample. A recently affected seedling with its roots and lower stem intact is generally more informative than a fully dried, collapsed plant; ask whether the service also wants growing medium or a healthy comparison. Include the crop, sowing date, seed lot if known, medium, watering history and the pattern of losses. Avoid applying a fungicide solely because seedlings have collapsed: the cause needs to be understood, and any product must be suitable for the crop and used according to its label.
Frequently asked questions
What does damping off look like?
A common sign is a soft, dark or water-soaked section at the stem base, followed by a seedling bending or collapsing at the growing-medium line. Roots may also look brown or decayed. These signs suggest damping off but do not identify the organism.
Can a collapsed seedling recover?
If the stem has rotted through at the base, the seedling cannot recover from that damage. Remove it carefully and check nearby seedlings. A plant that is wilted but has a firm, undamaged stem may be suffering from another problem, so assess the roots and growing conditions too.
Is damping off the only reason seeds fail to emerge?
No. Poor seed viability, sowing depth, temperature and moisture can all affect germination. Pre-emergence damping off is one possibility, but an empty cell on its own is not enough to confirm it.
Does watering from below prevent damping off?
It can reduce splashing between seedlings, but it does not prevent damping off on its own. Use clean trays, avoid leaving them in standing water and keep the growing medium appropriately moist rather than saturated.
When should I ask a specialist to confirm the cause?
Seek plant-health advice if losses spread, recur despite improved hygiene, affect valuable seedlings or remain unclear after you inspect the stems, roots and growing conditions. Ask a diagnostic service how to collect and send a sample before dispatching it.
A collapsed seedling is a reason to inspect closely, not to assume a single cause. Check the stem base and roots, look for patterns across the tray, then contain suspect material and clean equipment before the next sowing. Keeping simple batch notes makes repeat losses easier to trace, while specialist confirmation can distinguish damping off from other problems when the signs or pattern remain unclear.
