
Do Moisture Sensors Improve Greenhouse Watering?
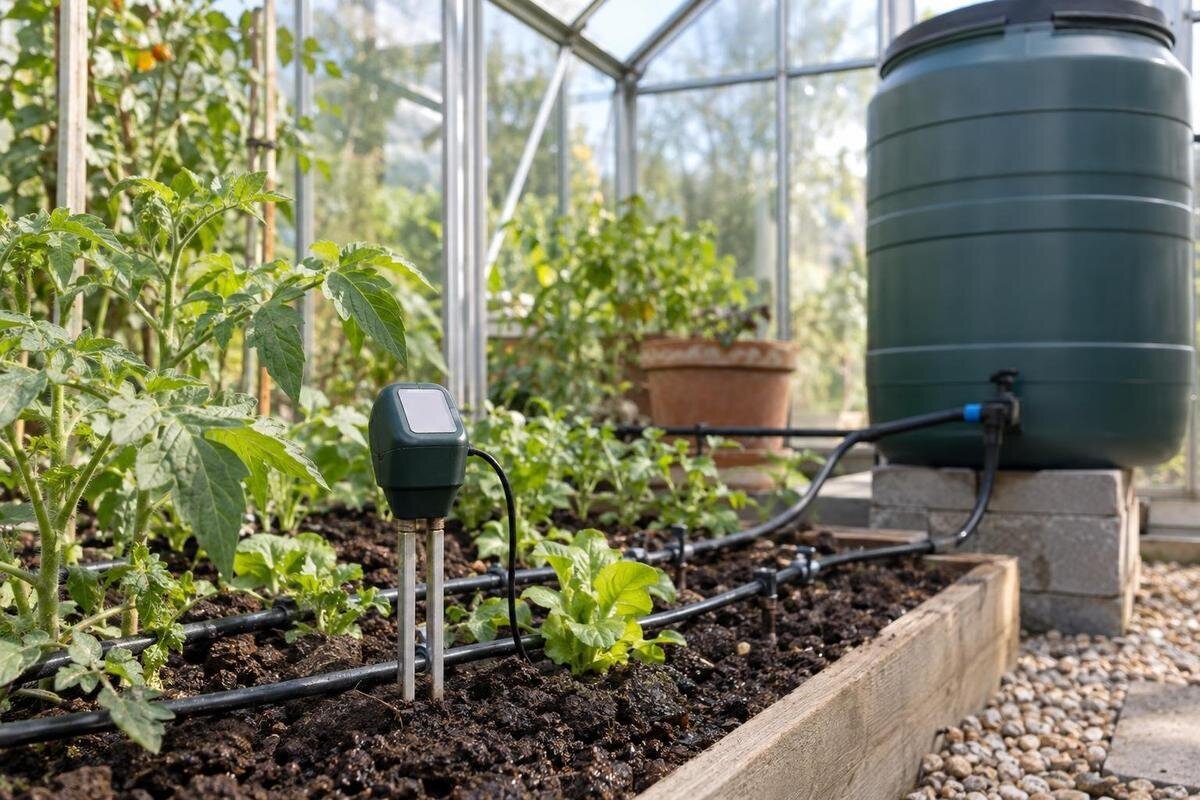
Greenhouse watering
Moisture sensors can make greenhouse watering more deliberate, but a reading is useful only when it reflects the medium around active roots. A probe samples one small place, and its response depends on sensor type, placement and growing mix. Calibration and a manual cross-check matter before a controller is allowed to act on the result. This guide explains how to test a sensor, choose a representative position and decide whether automation is helping rather than simply following a number.

01
What a moisture sensor tells you
A soil-moisture sensor measures a property associated with water in the medium around its sensing area, not plant thirst directly. Some devices estimate water content; others respond to how strongly water is held. Displays may show a percentage, a scale or a raw value, and those outputs are not automatically comparable between sensor types, brands or growing media. A precise-looking number still describes one limited spot. Read the instructions to learn what the device reports, which way the scale moves and whether it needs medium-specific calibration. Once installed consistently, repeated readings at the same point are more useful than comparisons between unrelated devices: they show a local trend, not a universal watering instruction.
A plant’s water use also depends on the crop, root development and conditions in the greenhouse. A sensor cannot identify a nutrient problem, damaged roots or a blocked water supply, and one reading cannot describe every part of a bed. Depending on the technology, contact with the medium, air gaps, dissolved salts or temperature can affect the result; follow the manufacturer’s guidance for the particular model. If a reading changes unexpectedly, consider whether the medium or probe position has changed before concluding that the whole bed needs water. Sensors are most helpful when their trends agree with what you observe in the root zone.
Why one reading may not represent the whole greenhouse
A greenhouse is sheltered from direct rainfall, but its growing area is not uniformly moist or uniformly exposed. Sunlight and ventilation can create different drying patterns; a pot may dry faster than a bed, and a drip outlet wets a small area first. The surface can look dry while the root zone is still moist, or seem damp after a short watering while deeper roots remain dry. These differences can occur over a short distance, so a convenient probe may describe only its immediate surroundings. A single buried sensor does not provide a whole-greenhouse average. Sketch the crops, containers and irrigation lines as distinct areas before deciding what one reading should represent.
Footprint matters because it affects how many separate growing areas fit, not because area alone determines a sensor count. The listed Aluminium Greenhouses range from 3.77 m² to 28.08 m²; in any footprint, the useful question is where the crops and water-delivery points actually sit. Mark the beds, pot groups, brighter and more shaded areas, and any different watering circuits on a simple plan. Then ask whether the proposed sensor location represents that zone. A change in crop layout can make an old reading less representative even when the greenhouse itself has not changed.
02
Where to position the probe in the root zone
Place a probe within the active root zone of a typical plant, at a depth where roots are taking up water, rather than at the surface simply because it is easy to reach. The right depth depends on the crop, its growth stage and the medium, so there is no single depth for every greenhouse bed. Seedlings, mature plants and shallow containers can have different root distributions. Follow the sensor maker’s insertion guidance and avoid damaging major roots. Choose a plant that represents the area, rather than one with an unusual position or condition, and make a note of where you placed the probe so later readings can be compared fairly.
Position matters across the bed as well as down it. A probe pressed against a pot wall or bed edge may sample a drying boundary; one directly beneath an emitter may register a wet spot before the rest of the root area is reached. Locate the probe within the area the plant’s roots occupy, following instructions for how much of the sensing portion must be in the medium. When planning a Lean-to Greenhouse, listed from 3.69 m² to 14.34 m², mark probe positions alongside beds and irrigation outlets. Keep those positions identifiable so that later manual checks sample comparable points.
Calibrate for the growing medium
Calibration relates a sensor’s output to the medium and moisture conditions where it will be used; it is not a universal number that can be transferred from garden soil to potting mix. First identify the sensor type and read how its maker expects calibration to be done. If the device has a calibration function, follow that procedure. If it does not, establish reference readings in the actual bed or container, using consistent placement and observations of the medium when it is relatively dry and after normal watering has settled. Avoid recording a reference while water is still moving through the probe area, as that may not represent the condition you want to monitor.
Use the same medium, depth and position for those comparisons. A fine potting mix, a coarse mix and mineral soil can produce different readings even when they feel similarly moist, so a displayed percentage is not a universal measure across all three. If you are planning beds and containers in one of the Limited Edition Aluminium Greenhouses, listed from 3.77 m² to 28.08 m², record which medium each probe monitors. Keep its reference readings alongside your observations by hand. If a bed is renewed, a container is repotted or the probe is moved, reassess the reference instead of relying on the previous setting.

03
Set a controller threshold from observed conditions
An automatic controller needs a decision point, but setting one from an online example can be misleading because sensor scales, substrates and crop needs differ. Use the manufacturer’s explanation of the measured value and the calibration you made on site. Confirm whether a higher displayed value means wetter or drier. Decide what condition should prompt watering for that crop and medium, then compare the reading at that moment with a manual check. A threshold should describe an observed condition in your own root zone, not merely a tidy number on a screen. If the controller uses separate start and stop limits, understand both and follow its instructions before relying on them.
Test a proposed setting while you are still supervising watering. Keep a short log of the probe reading, manual observation, whether the crop was watered and what the medium looked like after water had spread. Look for a consistent relationship across ordinary cycles rather than adjusting a threshold after one unusually hot day or one wet reading. For a T-Model Orangery Greenhouse, listed from 16.52 m² to 30 m², label each controller setting against the growing zone it serves on your plan. This keeps settings tied to particular crops and media. If readings swing unexpectedly, review placement before repeatedly changing the threshold.
Cross-check readings by hand
A manual check gives you an independent reference for a sensor. At intervals during the trial, inspect a small sample of medium close to the probe and at a similar depth, rather than judging only the top few millimetres. Feel and appearance can help you compare wetter and drier conditions in the same soil or mix, although the cues vary with texture and are not a universal numerical scale. You can also notice whether a container feels heavier after watering, but weight is useful only when comparing the same pot and contents. Avoid disturbing roots unnecessarily or treating leaf droop alone as proof that the soil is dry.
If the sensor says dry while the nearby sample is clearly moist, or says wet while the root area is dry, do not treat its output as a command. Check that the probe has firm contact with the medium, has not shifted and remains at the intended depth. Confirm that water is reaching the relevant area instead of assuming that a watering routine has wetted it. Recheck the sensor instructions if the difference persists. When laying out crops in a Pyramid Greenhouse, listed from 5.53 m² to 18.9 m², leave access for manual checks near the probe and elsewhere in the growing area.
04
How to group crops into monitoring zones
Choose sensor numbers by management zones, not by a rule such as one probe per plant or one per fixed number of square metres. A zone is an area you water and manage in much the same way: for example, a bed with the same crop and medium, or a group of similar containers on one routine. Separate areas may need separate monitoring when crops, substrates, exposure or water delivery cause them to dry at different rates. You do not automatically need a sensor in every distinct zone, but one probe should not silently stand in for areas that manual checks show behave differently.
Start with a representative point in each area you need to understand, then add or move probes only when checks reveal meaningful variation. If one controller serves multiple areas, find out whether the system can respond to those zones separately; a sensor may reveal a mismatch without being able to correct it. The Limited Edition Aluminium Greenhouses with Storage range runs from 5.52 m² to 28.08 m². That listed footprint is not a recipe for probe numbers: map storage, beds, containers and crop space as they will actually be used, and base monitoring on the growing areas rather than the building’s total area.
Check that water reaches the measured root zone
A probe can be well calibrated yet give an unhelpful result if watering does not reach the roots around it. Note where water enters the bed or pot and compare the sensor reading with the nearby medium after water has had time to spread. A reading taken during or just after watering may describe the immediate wetting path rather than the settled condition of the wider root zone. There is no single waiting period for every system and substrate; follow the sensor instructions and use manual checks to see when the reading becomes stable enough to compare.
Look for patterns across the growing area: does the medium near the probe become moist while another part stays dry, or does water pass below the active roots? A sensor cannot measure total delivery or confirm that every outlet is working. Watch the actual medium and drainage, and compare locations instead of responding to a solitary number. On a crop plan for a Bloomcabin Prestige Greenhouse, listed from 3.77 m² to 28.08 m², mark the watering outlets and the points you inspect. Recording where uneven wetting occurs makes subsequent comparisons more useful than noting only that the sensor read wet.

05
Trial automation before relying on it
Begin in monitoring mode if possible: record what the sensor reports while you continue your usual watering routine and perform manual checks. This shows whether readings track changes you can observe in the root zone. Once the relationship is consistent, use the controller’s instructions to test a watering threshold while continuing to supervise the routine. Do not assume the system has corrected a problem simply because an automatic cycle ran. Check whether the medium reached the intended condition and whether plants across the same zone received water. Do not withhold needed water solely to force the sensor to display a particular value.
Keep automation adjustable. Retain a manual override if the system provides one, note when a setting changes, and revisit it as crop size, weather, ventilation or the growing medium changes. In a larger layout, keep observations organised by growing zone so you can see which areas respond consistently to their settings. The Spacious Greenhouse range is listed from 47 m² to 70 m²; a monitoring record should identify the crop area associated with each reading rather than treating it as a result for the entire building. Sensor-guided watering remains a routine to test and monitor, not a set-and-forget promise.
Keep the sensor useful as crops change
Keep a brief record of probe position, depth, medium, crop, reading and the result of a manual check. A note about where the probe sits and whether watering has settled makes later readings easier to compare than a loose series of numbers. Follow the maker’s cleaning and storage instructions, and do not leave a probe in conditions it is not designed for. If it is moved, reinsert it consistently and compare its reading with the medium again. A log can help distinguish a gradual change in moisture from a probe that has been disturbed or has stopped behaving consistently.
Revisit the setup when seedlings become established, plants are replaced, containers are moved or a bed is topped up with new mix. Root distribution and water pathways change as a crop develops, so a once-representative spot may no longer describe the area. Seasonal shifts in light and ventilation can also change how quickly the same place dries; a familiar threshold still needs observation. The best test is not whether the display changes, but whether its readings support repeatable decisions that agree with root-zone checks. When they do not, review measurement and placement before adding more automation.
Frequently asked questions
Do all soil-moisture sensors need calibration?
Not in the same way. Some models have a calibration procedure; with others, you establish reference readings in the medium where the probe will be used. Follow the manufacturer’s instructions and do not transfer a threshold from a different sensor or substrate. If you change the medium or move the probe, check whether your reference still applies.
Where should I put a sensor in a container?
Place it in the active root zone of a representative plant, following the sensor’s instructions for depth and insertion. Avoid positions that only show an extreme, such as right against the container wall or directly beneath a watering outlet. The goal is to sample the area you want the reading to represent.
Can one probe control watering for the whole greenhouse?
Only if the area it samples is a fair guide to the growing zone being watered. Different crops, media, exposure and watering patterns can produce different moisture conditions. Compare the reading with manual checks in other areas before allowing one probe to determine watering across them.
Should I automate watering as soon as the sensor is installed?
It is safer to observe first. Compare readings with the medium and your usual watering routine over ordinary cycles, then test a controller setting while continuing to check the root zone. Keep monitoring after automation begins, because a sensor reading does not confirm that water reached every plant.
Why can a sensor read wet after watering while another part of the bed feels dry?
The probe may be close to the first area reached by the water, while the rest of the root zone has not yet wetted. Check the medium near and away from the probe, and allow time for water to spread before comparing readings. There is no single waiting period for every sensor and growing medium.
Moisture sensors can improve greenhouse watering by replacing guesswork with repeatable readings, provided the sensor is calibrated for the medium and positioned among active roots. A sensor does not measure the whole greenhouse, confirm water delivery or identify crop needs. Compare its readings with manual checks through normal watering cycles before relying on automation, and reassess the setup as the crop changes. If the sensor and the growing medium disagree, inspect the placement, the medium and the watering pattern before changing the controller.
