
When to Prick Out Seedlings into Bigger Pots
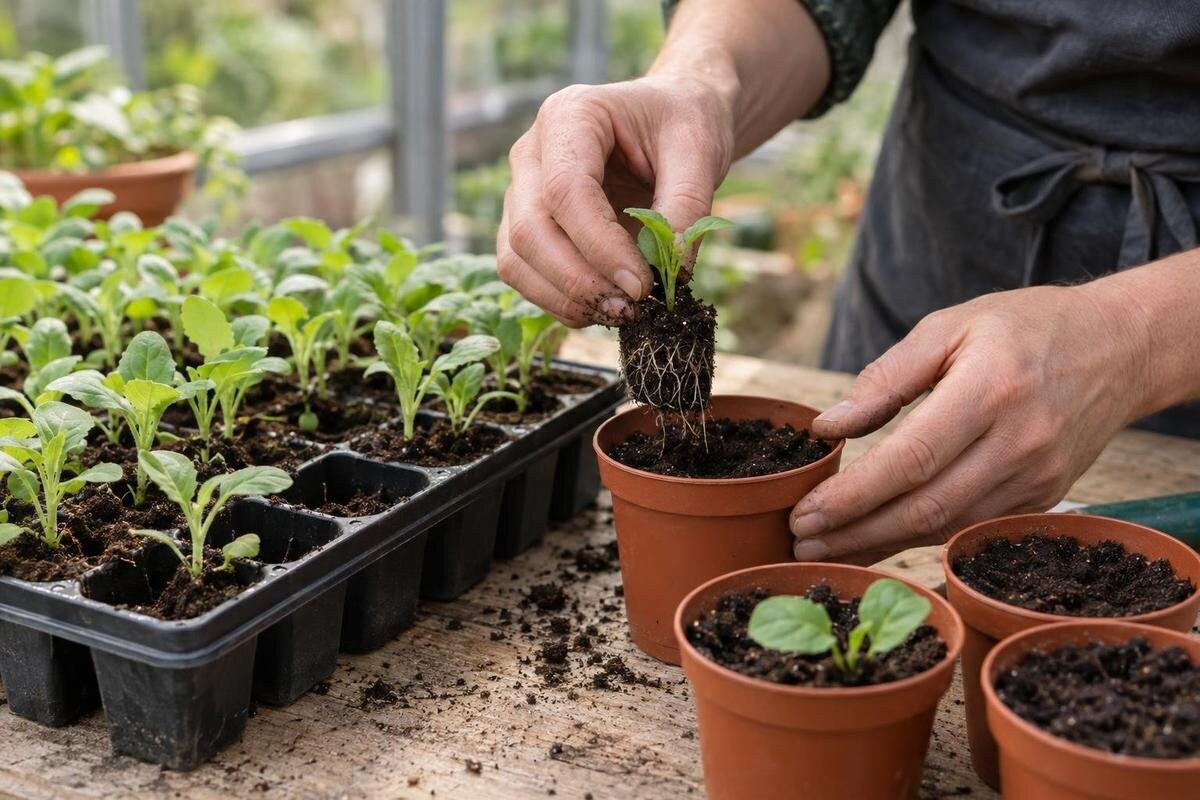
Seedling propagation
Pricking out is easiest to time by reading the seedlings, not by counting days from sowing. Look for true leaves, roots that can hold a small plug together and enough crowding that neighbours are becoming difficult to separate. The right moment varies by crop and growing conditions: move seedlings while they are sturdy enough to handle, but before their roots tangle or growth stalls. This guide explains what to look for and how to make the transfer with as little disturbance as possible.

01
Pricking out is not the same as potting up
Pricking out is the first move from a shared seed tray into separate cells or small pots. It gives seedlings individual root space after germination; it is not the same task as sowing. Potting up usually describes a later move from a container a plant has outgrown into the next size. Gardeners sometimes use the terms loosely, but the distinction helps with timing: a seedling crowded with neighbours may need pricking out even though it has not filled a pot, while a solitary seedling needs potting up only when its own container is becoming restrictive. That later move usually follows a spell of growth in its own cell, so the two jobs call for slightly different checks.
Before moving a whole tray, check how the seeds were sown. If each seed went into an individual cell and the plant still has room, leave it there until its roots and growth show that a larger container is needed. If several germinated together, separate the sturdy seedlings rather than trying to save every weak or damaged one. Some crops are best raised one per container, and some do not respond well to root disturbance, so follow seed-packet instructions or reliable crop-specific guidance. Transplanting asks a plant to re-establish its roots; a set number of days after sowing is not, by itself, a reason to move it. When only some seedlings are ready, work through the tray in stages rather than uprooting them all together.
True leaves help identify the right stage
The first leaves to appear above the mix are the cotyledons, or seed leaves. They emerge from the seed and often look simpler than later foliage. True leaves follow, with a shape and texture that begin to resemble those of the mature plant. Count those later leaves when assessing development; a pair of cotyledons alone does not show that a seedling is ready to handle. Shapes vary between crops, and some have a different leaf arrangement, so if the distinction is unclear, check a species-specific image or guide rather than judging by size or colour alone.
True leaves are a useful cue because they show the seedling has moved beyond emergence, but they are not a universal threshold. A plant with a newly opened true leaf may still be too delicate to lift, while a quick-growing crop may need room before it has several. Look for active growth and roots that move with some surrounding mix. If the true leaves are still folded or just opening, give them time to expand if the tray is not yet crowded. Treat leaf stage as a prompt to inspect roots and spacing, then follow crop-specific advice. For a larger propagation set-up, the Bloomcabin Orangerie Spacious Greenhouse range is listed from 47 to 70 m². Use the number of seedlings you intend to keep, rather than the number sown, when planning space for their individual pots.
02
Root growth and crowding show how much time is left
Roots can give a more practical answer than a leaf count. At the edge of a tray, ease up one seedling with a dibber or plant label and look at its root ball; there is no need to pull up every plant to inspect it. Fine roots beginning to hold the mix together make a seedling easier to lift and replant. If the mix falls away and roots are very sparse, it may be too early to move that plant unless crowding leaves little choice. A small test at the tray edge limits disturbance and shows how firmly the rest may be held.
Look across the surface as well. Leaves that overlap, seedlings leaning into one another or roots from neighbouring plants beginning to tangle are signs to act before separation becomes a struggle. A dense root mat or tightly looping roots suggest the tray has been left too long; do not wait for every root to reach a drainage hole. Visible roots alone do not mean a seedling is badly rootbound, so read them alongside the plant’s growth and the species. Check several seedlings, not just the largest one, because growth can be uneven across a tray. When considering the Classic aluminium greenhouse range, listed from 3.77 m² to 28.08 m², plan for the space occupied by separate pots after pricking out, not just the original shared trays.
Crop-specific guidance on transplanting
Growth rate differs between crops, and even the same crop can reach transplant stage at different times in separate sowings. Variety, sowing density and growing conditions all affect how quickly true leaves and roots develop. A date on a calendar, or a fixed number of days after germination, cannot cover those differences. Use the seed packet or a trusted growing guide for the preferred transplant stage, then check the actual seedlings. When guidance says to sow individually or warns that roots are sensitive, do not prick out simply because other seedlings are ready.
Temperature and light also affect the pace, so treat a timetable as a reminder to inspect rather than a deadline. Keep batches labelled by crop and sowing date; compare their development, not just their age, before deciding which tray to move. This helps when different sowings share a covered growing area and are ready at different times. Do not use transplanting to solve slow or weak growth: moving an undersized seedling can add stress without correcting the cause. If you are considering the Lean-to Greenhouse range, listed from 3.69 m² to 14.34 m², allow for batches at different stages to remain clearly separated and labelled.

03
Prepare pots, mix and a work surface first
Set out the pots or cells before removing seedlings, so roots are not left exposed while you look for equipment. Choose containers with drainage holes and enough room for the next stage, but avoid surrounding a tiny root ball with much more mix than it needs. Excess mix can make moisture harder to judge around a small plant. Use fresh potting mix suited to seedlings, pre-moistened so it holds together but is not soggy. Fill the containers and firm the surface lightly; compacted mix is harder for fine roots to explore. Label each crop or variety before different batches are on the work surface together.
Have a dibber, small spoon or plant label ready for easing seedlings from the tray, along with a gentle way to water the new pots. If you use a shared potting surface, clear soil and debris from it first and keep labels with their tray. The Limited Edition Aluminium Greenhouses range is listed from 3.77 m² to 28.08 m², but those areas do not describe an equipped potting station. Plan your work surface separately, with space for the seed tray, filled pots and tools. Arrange them within easy reach so you can lift and replant each seedling without stopping to rearrange equipment.
Lift seedlings gently and separate roots with care
If the tray mix is dry, water it gently beforehand and give it time to become evenly moist, not waterlogged. Work with a small group at a time. Loosen the mix beneath a seedling with a dibber or blunt plant label, lifting from below so the roots and a little surrounding mix stay supported. Hold the seedling by a cotyledon or true leaf, not by the stem: a damaged leaf is generally less serious than a crushed or snapped stem. Keep lifted seedlings out of direct sun and wind while you finish the group.
Separate seedlings by easing the mix and roots apart with your fingers or a tool, not by pulling the shoots in opposite directions. Fine roots can break if you tug, and intertwined roots can make separation difficult. If the roots are held in a small plug, support it rather than crumbling it unnecessarily. Do not leave bare roots exposed while preparing the pots. For anyone considering the T-Model Orangery Greenhouse range, listed from 16.52 m² to 30 m², a useful layout check is the route between the potting surface and the growing bench. Leave somewhere to set down a tray of newly planted pots without having to move other seedlings first.
04
Plant each seedling without folding its roots
Make a hole deep and wide enough for the roots to sit naturally. Guide them down with a dibber, keeping them spread rather than folded into a tight J-shape. Set the seedling at the depth recommended for that crop; the previous soil level is a useful reference, but species-specific instructions take precedence. Keep the growing point and leaves above the mix. If the roots are too long for the hole, deepen it rather than shortening healthy roots or forcing them into a knot. Use one seedling per container unless the crop’s guidance recommends another arrangement.
Backfill around the roots and press the mix gently so the seedling is supported, not tightly compressed. Water gently to settle the mix, then allow excess water to drain. Check that the plant has not sunk too far or fallen over; adjust it while the mix is loose. When planning a set-up in one of the Pyramid Greenhouse options, listed from 5.53 m² to 18.9 m², include a place for this watering and drainage stage. Pots should be able to drain without leaving the next batch waiting with exposed roots while you clear the work surface.
Watering and light after pricking out
Once the initial watering has drained away, keep the mix evenly moist rather than continually wet. Small pots can dry faster than the original tray, but a fixed watering schedule is unreliable because the mix, container and conditions differ. Check moisture below the surface and water when needed, rather than responding only to a pale-looking surface. Check pots individually where seedlings differ in size or were moved on different days; do not assume the whole batch needs water at once. Empty water that collects in trays, and do not leave freshly moved seedlings standing in water.
Return the plants to suitable light and avoid a sudden shift into harsh sun or very high heat while roots are settling. Covered spaces can warm quickly in direct sun, so check the growing area during warm periods and maintain conditions appropriate for the crop. Temporary filtered light may help where the seedlings face an abrupt change, but deep shade should not be the default. Check the potting-mix label before feeding; some mixes already contain nutrients. The Limited Edition Aluminium Greenhouse with Storage range is listed from 5.52 m² to 28.08 m². When comparing options, consider where you will keep potting supplies and labels as well as where the plants will stand.

05
Investigate persistent wilting before moving seedlings again
A little droop just after handling can reflect disturbed roots, but persistent or worsening wilting calls for a check rather than another automatic transplant. Feel the mix below the surface: a dry root ball may not have been wetted through, while continually wet mix can leave roots short of air. Check that the stem is firm, the seedling is not planted too deeply and the pot drains freely. Make one change at a time so you can see whether conditions improve.
If the plant remains weak, inspect its roots gently and compare it with healthy seedlings from the same batch. A stem that is pinched at soil level, spreading damage or unusual marks should not be dismissed as ordinary settling; isolate the affected pot and seek crop-specific advice if the cause is unclear. A repeated pattern across a tray may point to a wider issue than one damaged seedling. Avoid lifting or repotting every plant in response to a single problem. The Bloomcabin Prestige Greenhouse range is listed from 3.77 m² to 28.08 m². In a proposed layout, check that you could inspect pots at the back of a bench and remove an affected plant without disturbing the whole batch.
Use records and pot size to plan the next move
Once plants have settled, do not move them again just to make every pot the same size. Wait until the seedling is growing strongly and roots are beginning to fill its current container, or the crop-specific guide gives the next transplant stage. Roots at drainage holes or a plug that lifts together can be useful signs, but do not wait until they form a dense, circling mass. Choose the next pot to give roots room for their next stage, not as a large final container by default. If seedlings in one batch differ, assess them individually rather than making the smallest plant follow the largest.
If a tray is too large to prick out in one sitting, work through it in manageable groups. Finish planting the seedlings you have lifted before taking a break, and return the remaining tray to suitable growing conditions. Keep a simple record of crop, sowing date, true-leaf stage, root development, transplant date and response. After a few batches, those notes show when a particular crop or variety in your conditions needs a closer inspection. Record whether the roots separated easily and how the plants grew afterwards, rather than noting the date alone. Those observations make future timing more useful than a generic calendar and help you avoid both premature moves and rootbound seedlings.
Frequently asked questions
Do seedlings need true leaves before I prick them out?
True leaves are a useful sign that a seedling has developed beyond emergence, but they are not a fixed rule. Check that it is sturdy enough to handle and that its roots can be moved with some mix around them. Follow crop-specific guidance, especially for plants best raised in individual cells.
How can I tell if seedlings are becoming rootbound?
Look for a dense mat of roots, tightly looping roots or seedlings whose roots are tangled together. Roots visible at a drainage hole are a reason to inspect, but do not prove a plant is rootbound. Check the root ball alongside the seedling’s growth and the space between its leaves.
Should I water seedlings before pricking them out?
If the tray mix is dry, water it gently in advance so it is evenly moist and easier to work with. Avoid a waterlogged tray, which can be awkward to handle. Moisten the new potting mix as well, then water the pots gently after planting to settle mix around the roots.
How large should the new pot be?
Choose a container that gives the roots room for their next stage of growth without being far larger than the seedling needs. It should have drainage holes, and its size should suit the crop and how long it will stay there. Follow species-specific guidance where it gives a preferred container size.
Should I feed seedlings straight after pricking them out?
Not automatically. Potting mixes vary, and some contain nutrients. Check the mix label and the crop’s requirements before adding fertiliser; follow any feeding guidance rather than applying extra feed simply because the seedling has been moved.
Pricking out depends on several signs working together: true leaves show development, roots indicate whether a seedling can be lifted, and crowding signals when waiting may make separation harder. Use those cues alongside crop-specific instructions, prepare the pots before you start and handle each plant gently. A calendar can organise sowing batches, but it cannot replace checking the tray. Once roots have settled and growth is underway, leave seedlings in their new pots until their own development calls for the next move.
