
Wall-Mounted vs Floor-Standing Sauna Heaters: Space and Layout
Sauna layout
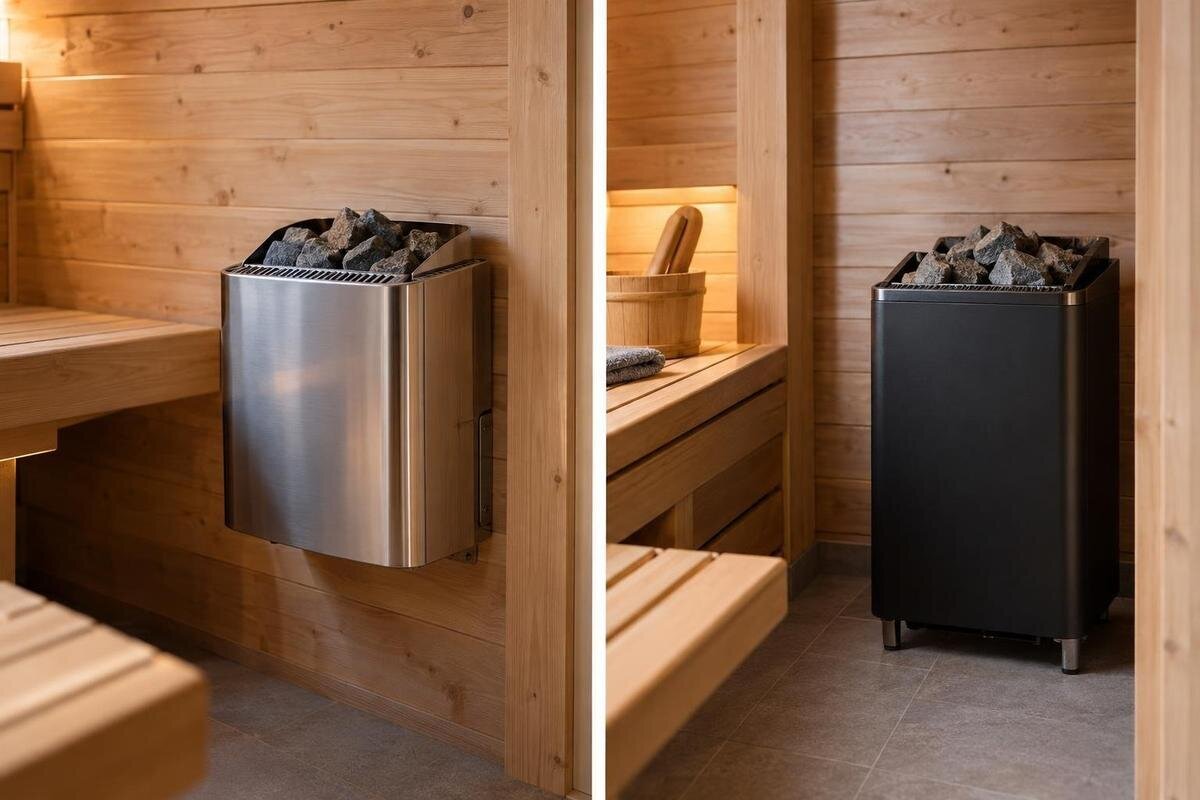
Choosing between a wall-mounted sauna heater and a floor-standing model changes where the heater sits, but not necessarily how much floor is usable. A wall-mounted unit can keep its base off the floor while occupying a wall and projecting into the room. A floor-standing unit uses floor area and may alter the route between the entry and benches. Compare the exact heater, cabin and manufacturer drawings before treating either format as a space-saver.
Wall-mounted and floor-standing heaters use space differently
Wall-mounted and floor-standing describe how a particular heater is supported; they do not tell you how much of the cabin becomes usable. A wall-mounted model attaches at a specified wall position and projects into the room, while a floor-standing model sits on the floor in its specified position. Both have a heater body, a mounting or support arrangement and manufacturer-defined clearances. The casing, bracket or base and surrounding clearance all matter to the space comparison. The two formats are not necessarily alternative installations for the same heater, and a floor model should not be treated as something to lift onto a wall. Compare the approved heater-and-cabin combination using exact drawings and instructions, not a product photograph or a generic category label.
Begin with the cabin plan, not the appliance image. Mark internal walls, the entry and fixed benches, then add the heater dimensions, specified clearances and any access area in the manufacturer’s information. This shows what remains for movement and seating. For example, the Sauna S-140 listing gives an area of 1.93 m², but the layout comparison needs internal dimensions and the positions of fixed features as well. Check whether plan dimensions are internal or external before placing components: the outer cabin measurement cannot stand in for the interior set-out. Request any missing model-specific dimensions before comparing the two formats.
Count the clearance envelope, not just the heater base
A heater’s base or casing is not the same as the space the layout must reserve. A floor-standing unit covers the floor beneath it, but its required clearance can extend beyond that outline. A wall-mounted unit may leave its base area open, yet its casing still projects into the cabin and its clearance may overlap a bench or walking route. The usable-floor comparison should include each unit’s complete permitted envelope, not just the number of square metres in contact with the floor. A clearance zone can reserve apparently empty floor even though no part of the heater rests there. Where the manufacturer specifies access for operation or service, mark that separately; it still affects how the cabin works.
Place both candidates on the same cabin plan at the same scale. Use dimensions and reference points from each drawing, add the required clearance, then inspect the remaining floor in relation to the entry, benches and circulation. The Sauna HC-150 product page gives an area of 2.97 m²; use the cabin’s detailed plan to see how much of that space remains available around each heater. Distinguish the heater outline from the clearance boundary so that apparently empty floor is not mistaken for a usable path. If the model allows more than one position, test each separately, and rotate it only if the approved set-out allows that orientation.
A wall-mounted heater depends on the wall behind it
A wall-mounted choice depends on the wall as well as the room dimensions. The exact mounting point and support need to suit the cabin construction and the heater manufacturer’s instructions. A decorative lining or apparently solid surface is not proof that it can support the specified arrangement. Backing, framing or another structural detail may need to be assessed by the cabin supplier and a qualified installer. Check whether the manufacturer specifies a particular mounting face or surface. A curved, panelled or interrupted wall makes assumptions from a generic diagram especially unreliable; only the actual cabin design can settle what mounting is possible. Do not design a fixing arrangement yourself or assume that a surface suitable for a bench is suitable for a heater.
Once a suitable mounting position is confirmed, test what it does to the rest of the layout. It may preserve floor area, but the heater still projects into the room and can compete with a bench, doorway or service access. Check every clearance shown, including any side or overhead dimension, instead of looking only from above. When considering the Sauna HC-225 listing, with its listed area of 4.4 m², establish which wall could accommodate the proposed heater and how that position relates to the seating. Confirm the wall construction and intended appliance position before finalising bench positions; a late change may affect both seating and access.
A floor-standing heater uses more than its base area
A floor-standing heater uses a visible patch of floor, so its position can directly affect open space and the route through the cabin. Depending on the approved plan, locating it in a permitted position may leave a preferred wall available for seating or another cabin feature. That is an option to test, not an automatic advantage: the manufacturer’s clearances can also reserve nearby floor or wall space, and a unit beside the entry may make circulation awkward. Mark the complete outline and allowed position from the heater drawing before deciding where benches go. Avoid an assumed rectangle if the model’s supplied dimensions show a different shape, and do not assume a corner or angled position is permitted unless the documentation allows it.
Check the route from the doorway, bench access and any operation or service area specified for that model. A floor-standing format does not guarantee that no separate support or cabin requirement applies; the manual and a qualified installer determine the approved arrangement. The Sauna N-210 page lists an area of 4.43 m². When comparing cabins of similar area, look at their proportions and fixed features to assess where a heater could fit. Ask whether the cabin floor and support arrangement suit the proposed location. If that position leaves a narrow passage, compare another permitted layout rather than relying on total area alone.
Use the clearance drawing for the exact heater
Clearance is a model-specific planning dimension, not a spare margin to borrow from another heater’s drawing. Read the exact manual for the heater being considered and note the distances and reference points specified. Requirements can vary by model and approved configuration; a diagram for a visually similar unit, a retailer’s generic sketch or an old plan is not a substitute. Do not combine measurements from different configurations. If you are considering the Sauna LC-260 product page, its listed area of 5.12 m² is a cabin detail, not a heater clearance specification. Obtain the drawing for the proposed heater and identify where each clearance measurement begins and ends.
Show the clearance envelope alongside the heater body on the layout. If the manufacturer’s material includes vertical or overhead relationships, consider them as well; a top-down sketch cannot answer every placement question. Keep benches and other cabin features outside stated boundaries unless the exact documentation allows that arrangement. Where a guard or accessory is part of the described configuration, use the clearances for that configuration rather than borrowing details from another setup. If the drawing is hard to interpret, ask the manufacturer or installer to explain it. Never shorten a specified clearance to gain a bench or walkway; change the candidate layout or equipment instead.
Fit benches, entry and circulation around the heater
The heater has to fit around how people enter and use the cabin. Mark the bench fronts, steps and other fixed features from the plan, then trace the approach from the door to the seating. Include the door opening area and a route to the benches that does not conflict with the heater’s required clearance. Include fixed projections rather than marking only the seat edges. If benches face each other, check whether a floor-standing model narrows the space between them; with a wall-mounted unit, check whether its position uses a wall needed for seating. A neat-looking plan can still feel pinched if the heater sits on the main route or makes a bench awkward to reach. Consider the complete movement path, not each item in isolation.
Check that route with the full heater and clearance envelope in place, not just a small rectangle for the body. Consider the relationship to bench position and height wherever the manufacturer’s layout specifies one; do not infer a suitable arrangement from a general cabin photograph. The Sauna N-250 listing records 5.27 m². To assess movement within that space, use the exact cabin plan to locate the entry, bench ends and proposed heater position. Trace the whole route from the doorway to each seating area, checking where a projection or fixed feature could make access awkward.
Keep operation and service access in the plan
Space is needed for more than fitting the heater into the room. Depending on the approved model, the manufacturer may specify access for controls, operation, inspection or service; related components may also be located away from the main heater body. Check the selected unit’s manual and configuration for such areas, and identify where controls and other components are intended to sit. Do not assume their type, position or inclusion from the mounting format. Some service access may be outside the hot room, so look beyond the floor plan if the supplied information identifies external components. These details can decide whether a wall, bench end or corner is genuinely available.
Mark any stated access areas on the plan and check whether they remain reachable without shifting a bench or obstructing the entry. If the manufacturer specifies a route or working area for service, include it in the comparison as well. When two layouts meet their stated requirements, compare ease of normal operation and future service alongside the floor left open. For the Sauna HCF-300 page, which gives a listed area of 6.89 m², assess access using the proposed heater configuration rather than the area figure. Resolve any uncertainty about control locations or service access before treating a bench end or corner as available space.
Match the heater to the cabin configuration
Mounting format is only one part of compatibility. Check that the exact heater is intended for the exact cabin and proposed arrangement, including the mounting position, relevant clearances and manufacturer-specified relationships to benches or other features. Where heater selection depends on cabin volume, construction or other stated inputs, follow the manufacturer’s method and have the intended combination confirmed rather than deriving a match from floor area alone. Confirm that the documentation applies to the heater version being considered, not merely to a similar model in the same range. Controls and required services also need to suit the design, and their arrangement should be confirmed from current documents. A unit that appears to fit in a picture may still be unsuitable for the cabin configuration.
The Sauna LCF-300 product page lists 6.89 m², the same listed area as the HCF-300. That shared figure does not make their heater configurations interchangeable. Check the exact cabin and heater model identifiers together, then establish which mounting arrangements are compatible with that pairing. If more than one configuration is offered, confirm which one the drawings describe and whether it matches what you intend to buy. This distinguishes a heater that merely appears to fit from one intended for the proposed arrangement, including its support, clearances and relationship to the cabin’s fixed features.
Compare two layouts on the same cabin plan
To compare fairly, use one cabin plan and create two versions: one for the specific wall-mounted model and one for the specific floor-standing model. In each, include the cabin boundaries, fixed benches, entry, heater outline, stated clearances and any access or service areas. Use supplied dimensions and reference points, rather than scaling a promotional image or assuming different heater models share a footprint. Keep fixed openings and cabin features in the same place in both versions. If you do not have enough information to place a component accurately, mark the missing detail and request the drawing instead of filling it with a guess. A top-down view may need an accompanying elevation when the manufacturer specifies vertical relationships.
Judge each version on several outcomes: floor left free, continuity of the entry-to-bench route, wall space available for seating, and access to operate or service the unit. A wall-mounted format may do better on floor area but worse on wall use; a floor-standing option can reverse that balance. Cabin shape and bench arrangement change the result, so there is no universal winner for usable space. Keep specified clearances fixed while comparing convenience; they are not variables to reduce to make a preferred design fit. Record unresolved support or compatibility questions as open items, not as assumed blank space.
What to confirm before choosing a heater
Note the exact cabin and heater model identifiers and obtain the relevant manufacturer drawings and manuals for both. Confirm the intended mounting format, full dimensions, clearance reference points, any support requirements, cabin compatibility and access provisions. Ask whether the drawings show the precise configuration you intend to order, including the planned bench or guard arrangement where relevant. If several versions of a document are available, check which one applies to that configuration. Where cabin wall or floor construction affects the layout, have the cabin supplier and a suitably qualified installer assess it. Have the installer confirm any required services and control position; this is a planning checklist, not a DIY installation procedure.
If floor space is the main constraint, compare the wall unit’s projection, clearance envelope and mounting position against the full floor-standing footprint and its own clearances. If useful wall space is scarce, test whether a floor unit can fit without disrupting the route or bench access. If neither version works with specified clearances and access, revisit the heater, cabin or bench arrangement instead of squeezing the layout. When drawings and product pictures seem to disagree, seek clarification from the manufacturer or installer rather than treating an image as a set-out. Choose the approved configuration that makes the cabin usable as planned, not simply the unit with the smallest outline.
Frequently asked questions
Does wall mounting always save usable floor space?
It can leave the area beneath the heater clear, but the body still projects into the cabin and manufacturer clearances or service access may reserve nearby floor. The wall position may also compete with benches. Compare the full approved layout rather than the heater’s base or contact area.
Do floor-standing heaters have smaller clearances?
Not necessarily. Clearance distances and their reference points depend on the exact heater and approved configuration, not simply on whether it stands on the floor. Use the model-specific manual and drawing; a similar-looking unit’s figures are not a substitute.
Can any sauna wall support a wall-mounted heater?
No. The wall construction and the manufacturer’s specified mounting arrangement must be compatible. A surface that looks solid is not enough to confirm support. Ask the cabin supplier and a qualified installer to assess the actual wall and the exact heater before finalising the layout.
Is a cabin’s listed area enough to choose a heater?
No. Area alone does not show the cabin’s detailed geometry, bench positions, clearances or an approved heater pairing. Use the exact cabin plan and heater documents, and follow the manufacturer’s selection information for any volume or construction inputs.
Can I swap from a floor-standing heater to a wall-mounted one later?
Do not assume so. A different model or format can change the clearance envelope, support, access and compatibility requirements. Confirm the replacement against the cabin and have a qualified installer assess it before changing the plan; an open patch of floor is not proof that a wall position is suitable.
Neither format wins on floor area alone. A wall-mounted heater leaves the floor beneath it clear but requires a suitable wall position, support and space for its projection; a floor-standing heater occupies floor space but may leave other walls available for benches. The useful comparison is the complete, model-specific layout: heater body, manufacturer clearances, entry route, seating and any service access. Once those elements are considered together and the support requirements are confirmed by a qualified installer, you can judge which format makes better use of the cabin.
