
How to Prevent Seedlings Becoming Root-Bound Before Planting
Greenhouse growing guide
Root-bound seedlings are usually a timing-and-capacity problem: roots have outgrown the cell while the plant is still waiting for a suitable place outdoors or a larger pot. Preventing that bottleneck means working back from the planting-out window, choosing a cell volume for the expected holding period and reserving room for the next stage. The aim is not to keep every plant in its first tray until conditions suit, but to plan a transition before roots become tightly crowded. This guide explains how to read the roots, schedule sowing and potting on, and check that a greenhouse nursery area can hold each batch.

Greenhouse nursery space to check 1
How to recognise a root-bound seedling
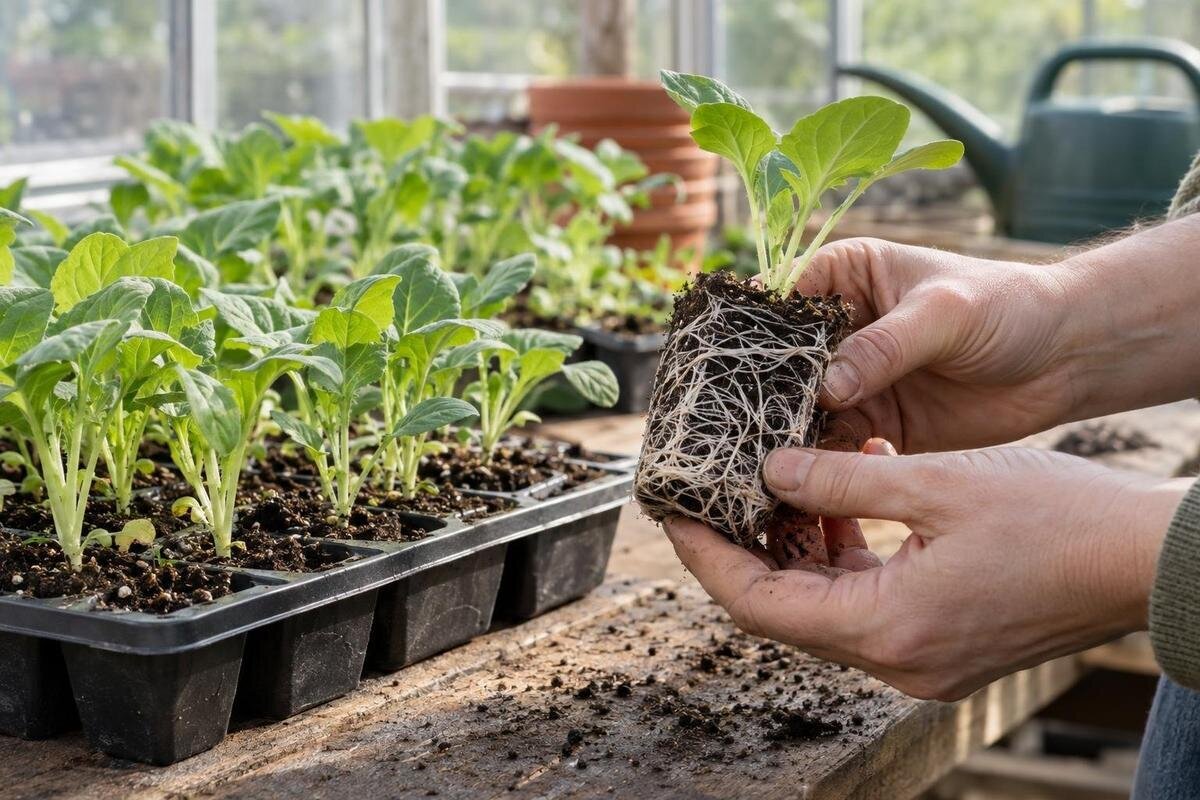
A root-bound seedling is not simply one with a root visible at the base of its cell. Young roots naturally reach the cell walls as they develop; the concern is a dense, congested root ball with little free growing medium and roots circling the outside or pressing into a mat. Slide one representative plug from its tray and look at the whole root ball, rather than judging by a single root at a drainage hole. A plug that holds together with an even web of fine roots may be ready for its next move, depending on the crop and stage. A tightly wrapped mass, distorted shape or roots tangled with neighbouring plugs points to a lack of room.
Above-ground growth can give supporting clues, but it is not a diagnosis on its own. A seedling that stalls, wilts between waterings or dries unusually quickly may have roots filling the available space in a small cell; poor light, uneven watering and other stresses can cause similar signs. Check the root ball of one plant from a batch and consider its age and care alongside those of the other seedlings. There is no need to disturb every seedling, and roots at the base alone are not a reason to pot on. A dated sample check helps you act before severe congestion without mistaking normal root growth for trouble.
Work back from planting-out readiness
Begin with the point when a crop should be ready to leave the greenhouse, not with the earliest convenient sowing date. Work out when its bed, container or final growing space is likely to be ready, then use crop-specific seed guidance to estimate germination and growing-on time. Include time for producing a sturdy transplant and for hardening off where appropriate. Planting readiness depends on the crop and current conditions, so a date from last year is only a planning reference. If the outdoor site is not ready or conditions are unsuitable, seedlings may need to stay in the nursery longer than planned.
Write down a target planting window, a sowing date range and a date to check the first batch’s roots. Allow for delays, but make the buffer an available potting-on stage and spare nursery space—not simply an earlier sowing. Starting too far ahead can leave plants outgrowing their cells while outdoor planting is still unwise. If you need a run of plants rather than one large batch, sow smaller amounts at intervals guided by crop information and actual demand. Staggering spreads the work and reduces the chance that every tray needs a larger pot on the same day. Keep the plan flexible enough to revise when growth is faster or slower than expected.
Greenhouse nursery space to check 2
Choose cell size for the expected nursery stay
Cell volume determines how much compost and root space a seedling has before it needs a larger container or planting out. A small cell can make better use of bench space for a short nursery stay, but the plant may reach its limit sooner and the smaller volume can need closer attention to watering. A larger cell offers more room, yet takes more area and compost and still cannot hold a plant indefinitely. Use the crop’s sowing guidance, expected time in the greenhouse and likely growth rate to choose a suitable starting size; there is no one cell size that suits every crop or sowing date.
Count the footprint of the whole tray, then consider what container will follow it if planting is delayed. A tray may fit neatly at germination but use much more room once seedlings are separated or potted on. For a greenhouse size comparison, the Aluminium Classic Greenhouse listing spans 3.77 m² to 28.08 m² across variants. Treat that as a published area range, not a tray or bench capacity: compare the exact variant’s dimensions with your trays, planned work area and other uses before assigning space to the nursery.
When to pot seedlings on
Set a simple potting-on check rather than waiting for seedlings to look distressed. When roots have spread through the plug and the compost holds together as you lift it, the cell may be approaching its limit; check whether roots are beginning to circle or form a dense layer at the bottom. Sample a few plants at sensible intervals, especially if the planting-out date may slip. If roots are still sparse and the seedling is growing steadily, moving it too soon can add work without solving a real constraint. The right trigger combines root development, crop guidance and how much longer the plant must wait.
When potting on is needed, choose a container that gives the root ball room for the remaining nursery period, rather than jumping automatically to the largest pot available. Handle the plug gently, supporting the root ball or leaves rather than squeezing the stem, and follow crop-specific advice if a plant is sensitive to root disturbance or has a particular planting depth. Larger pots change the bench space required, so estimate that area before the batch reaches this stage. The Limited Edition Aluminium Greenhouses listing covers variants from 3.77 m² to 28.08 m²; check the selected footprint against both cell trays and the later pots.

Greenhouse nursery space to check 3
Calculate the peak number of trays and pots
Count the number of plants you actually intend to put out, then decide what modest spare number is useful for failed germination or damaged seedlings. There is little benefit in keeping every extra seedling if doing so would crowd the nursery or leave you with more plants than beds or containers. Convert your target into the number of cells and trays at sowing, then repeat the calculation for the number of pots needed if one or more batches must be held longer. Record the totals by sowing date. That makes the peak space requirement visible instead of relying on a guess made while filling the first tray.
Add the footprints of trays and pots that will occupy the greenhouse at the same time, then include an area for checking and moving them. The T-Shaped Orangery Greenhouse listing shows area options from 16.52 m² to 30 m². Those figures can help you compare greenhouse footprints, but they do not say how many nursery trays will fit or what working layout a particular option allows. Use the exact product dimensions and your own tray measurements, and allow for any planned greenhouse use that shares the space. The useful figure is the area you can actually set aside during peak propagation, not the full floor area on paper.
Map the nursery area inside the greenhouse
Draw the nursery arrangement before buying benches or allocating an existing greenhouse. Mark the growing surfaces you can use and divide them between newly sown trays, established seedlings and plants waiting to be potted on. Keep sowing batches together and identify them clearly; if trays are placed wherever a gap appears, older plants are easily missed and a new batch may fill space needed for the next stage. Use the dimensions for the exact greenhouse option to make a simple plan, then check it against the trays you already use. If you plan to use a particular bench, confirm that it fits rather than assuming the advertised floor area will take it.
The Pyramid Greenhouse listing spans 5.53 m² to 18.9 m², but its stated area alone cannot tell you how much nursery bench space your layout will provide. Draw the proposed growing surfaces within the selected greenhouse’s dimensions, rather than treating its entire floor as space for trays. If the greenhouse also has a role beyond propagation, mark those areas on the same plan so they are not allocated to seedlings as well. Recheck the arrangement when cells give way to larger pots: keeping a batch together may then require a different distribution of plants across the available surfaces.
Greenhouse nursery space to check 4
Make room for potting on and storage
Potting on needs more than a row of empty pots: allow time and a clear place to handle compost, labels, watering and the plants waiting to be moved. Keep the working surface distinct from trays that are actively growing, and put supplies where you can reach them without crowding seedlings or blocking the route through the greenhouse. If you use a separate storage area, count it honestly rather than counting that space twice as nursery capacity. Planning these jobs together makes it easier to pot on a batch promptly instead of delaying because the only clear bench is already full.
Storage can be part of the greenhouse comparison, but the product name alone does not show how it affects the usable growing area. The Limited-Edition Aluminium Greenhouses with Storage listing gives area options from 5.52 m² to 28.08 m². For the exact variant, identify which parts of your proposed layout would hold supplies and which would remain available for growing and potting work. Include the empty pots needed for the next batch, not just the supplies used at sowing. This separates storage needs from nursery capacity and helps you see whether a clear working surface will still be available when several trays need potting on.
Include access in your capacity calculation
Access is part of capacity. A bench completely filled with trays may look efficient, but if you cannot reach the back, lift a pot without knocking its neighbour or inspect a root ball, practical working space is missing. Include a clear route for the jobs you actually do, such as watering, separating seedlings and carrying pots to the door. Allow somewhere to set down a tray while you examine a sample plant, rather than relying on a gap that another batch may soon occupy. If the nursery shares space with established plants, show their permanent footprint too. Plan for the moment when trays and recently potted-on plants overlap, since that is usually the busiest stage.
The Bloomcabin Prestige Greenhouse is listed in area variants from 3.77 m² to 28.08 m². Once you have shortlisted a footprint, use the selected option’s dimensions to check how you would reach each growing surface and carry a full tray through the proposed arrangement. Include the space needed to lift trays off the bench, not just the route between benches. A larger floor area does not automatically make these tasks convenient if surfaces are arranged poorly. Test the access route on your sketch before deciding how many cells to sow, so your capacity estimate reflects daily handling as well as the space occupied by plants.

Greenhouse nursery space to check 5
Match greenhouse space to the sowing plan
Size the nursery for its peak requirement, not for an average week and not for the largest number of seeds you could possibly sow. Peak demand often comes when one batch has not yet left and the next is ready to grow on, or when a delay forces two stages to overlap. Compare that temporary need with the greenhouse area available for seedlings after permanent crops, storage and working access have been accounted for. If the figures do not fit, reduce or stagger the sowings, or arrange another suitable nursery area. Where delayed planting may require potting on, reserve enough space for the larger containers. Increasing the greenhouse footprint is only one way to resolve a space mismatch.
The Spacious Greenhouse listing gives an area range from 47 m² to 70 m², but that does not set a sensible seedling target. Start with the number of plants needed for each final bed or container, then compare the space required by overlapping batches with the part of the greenhouse allocated to propagation. A large structure may have several planned uses, so assess the nursery as one part of the overall layout rather than assigning every unoccupied patch to seedlings. Spare space is not a reason to sow plants you have no place or plan to grow; the nursery allocation should follow your planting list and schedule.
Check seedlings again before planting out
Revisit each batch as the target planting window approaches. If roots are filling the cell but planting must wait, pot on before the root mass becomes tightly congested; if there is still room and the plant is not at that stage, keep monitoring rather than moving it by calendar alone. When outdoor planting is appropriate for the crop and conditions, harden seedlings off as advised and move them to their final place without letting an avoidable delay extend their nursery stay. A brief dated note of the root check, the action and the next review date helps you keep a large batch from being forgotten at the back.
Allow for this final holding period when comparing nursery layouts. The Lean-to Greenhouses listing ranges from 3.69 m² to 14.34 m²; use the exact variant’s dimensions to map where the last trays awaiting planting would remain while newly potted plants take their places. Mark the route for removing each departing batch, rather than assuming all seedlings will leave together on the target date. The product category and area range alone do not establish bench capacity. Keeping space available for plants whose planting date slips makes it easier to inspect them and pot them on promptly, instead of leaving them crowded while you wait for suitable conditions.
Frequently asked questions
Are roots at the drainage holes a problem?
Not on their own. They show that roots have reached the bottom of the cell, but they do not prove the seedling is badly root-bound. Slide out one representative plug and look for roots that tightly circle the outside or form a dense mat with little compost visible.
How can I tell when a seedling needs potting on?
Check whether roots have spread through the plug and whether it is becoming difficult to keep the seedling growing steadily in that cell. Pot on before the roots form a tight, congested mass, taking the crop’s growth rate and the likely wait until planting out into account.
Will a larger cell stop seedlings becoming root-bound?
A larger cell can give roots more room and may extend the time before the next move, but it cannot hold a growing plant indefinitely. It also takes more compost and nursery space. Choose a size to suit the crop and planned growing-on period, then check the roots as the planting date approaches.
Can I leave seedlings in trays until the weather improves?
Only if the plants still have enough room and remain healthy in their cells. There is no single safe holding period for every crop: cell size, growth and conditions all matter. If planting must be delayed and the roots are filling the cell, plan a potting-on stage rather than leaving the tray crowded.
Should every seedling be potted on before planting out?
No. If the plant is at the right stage, the planting space is ready and conditions suit that crop, another potting stage may add unnecessary handling. If planting is not yet appropriate and roots are running short of room, potting on can provide a planned bridge. Follow crop-specific guidance.
Preventing root-bound seedlings means matching each growing stage to the time and room available. Use the intended planting window to set the sowing schedule, choose cells for the expected nursery stay and check a sample before roots form tight circles or a dense mat. Then make sure the next pot or planting space is ready when needed. When timing changes, adjust the nursery plan through potting on, staggered sowing or a smaller batch, rather than leaving seedlings to wait indefinitely in crowded cells.
