
Greenhouse Floors: Gravel, Brick or Paving Inside?
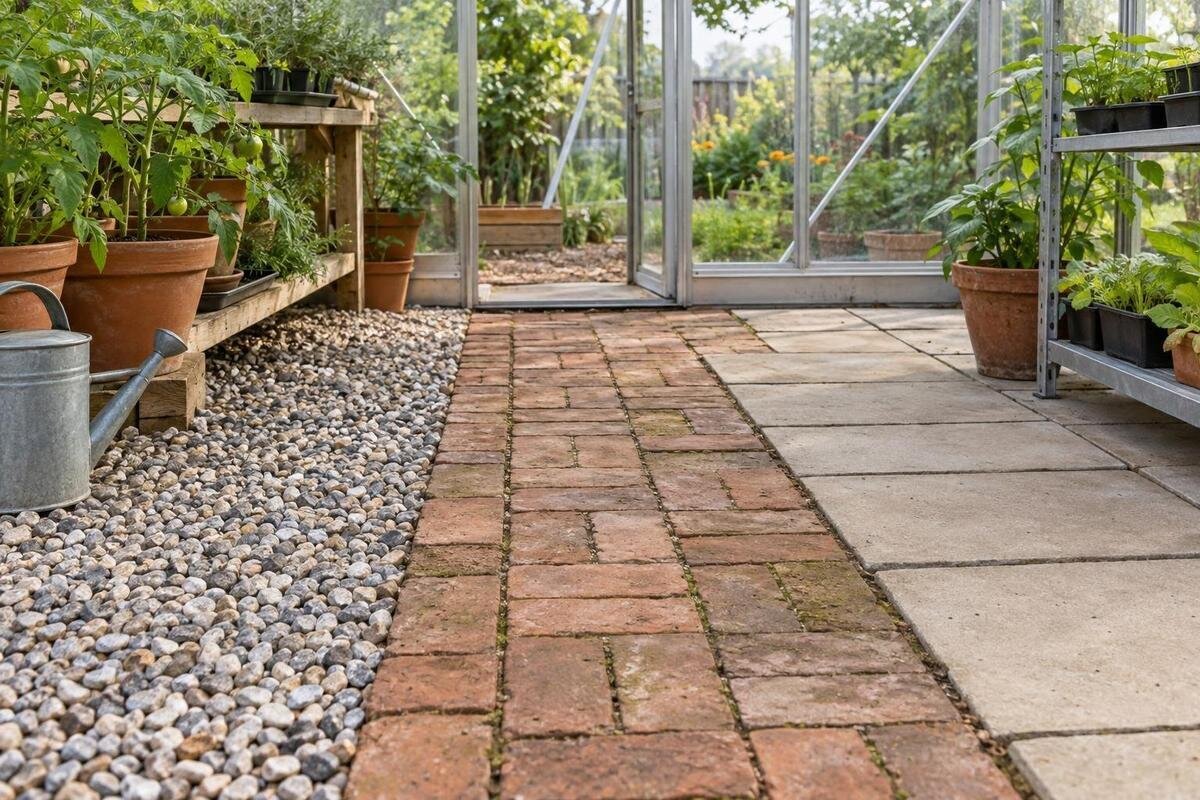
Greenhouse flooring guide
An internal greenhouse floor affects more than appearance: it shapes how steady the route feels underfoot, how easily you can move pots and tools, and where watering or cleaning water goes. Gravel, brick and paving can all work as finishes, but each behaves differently when damp and dirty. None should be treated as a substitute for the greenhouse's structural base. The useful choice is the one that suits your growing layout and cleaning routine while keeping the frame's specified support and fixing points accessible.

Before choosing a floor 1
The foundation and walking surface have different jobs
Treat the greenhouse foundation and the interior walking surface as separate parts of the plan. The foundation is the support and fixing arrangement specified for the frame; the floor finish is what lies underfoot within the greenhouse. A concrete base or paved area can serve more than one practical role only if it has been designed for both. Loose gravel, brick or paving added inside does not, by itself, give the frame a sound, correctly positioned base. Support and fixing points may sit at particular edges, so a neat-looking finish must not obscure the parts that locate or secure the greenhouse. Some projects use one prepared base as both support and floor; others use separate layers. Establish which arrangement the selected model calls for before choosing materials or setting finished levels.
Identify the exact greenhouse before deciding how the floor is to meet it. For a Bloomcabin Prestige Greenhouse, as for any model you shortlist, match the manufacturer's base drawing to the frame and foundation arrangement. Check where supports, fixings and the entrance sit, and how much finished depth the inside surface will add. A floor installer or qualified groundwork professional can review levels, ground conditions and water routes if these are uncertain. Do not substitute assumed dimensions or a generic floor build-up for the manufacturer's drawings; a product's name or overall footprint is not a foundation specification. The visible surface alone cannot tell you how the frame is meant to be supported.
Gravel and the drainage below it
Gravel gives a loose, textured route and can allow water to pass between stones, but it is not a drainage system on its own. What happens depends on the particle mix, how the layer is placed and, above all, the material below it and the route water can take away. If the ground is compacted, already wet or slow to drain, water may still collect under the stones. Fine material can mix with soil and organic debris, while larger loose stones can shift underfoot or spread into beds. Treat permeability as a possible advantage, not a promise of a dry floor. The appearance of the top layer does not show whether water can escape from underneath.
Gravel is easier to manage when its limits are clear: define the route or work area so loose stone does not creep into beds, door tracks or under shelving. An edge can contain the material, but it creates a junction that also needs to stay clear and level. If the Spacious Greenhouse is on your shortlist, sketch the walking route and planting areas on its plan before deciding how much floor should be gravel. Consider how you will rake or top up disturbed patches, and how you will remove leaves and spilled compost from between the stones. More gravel means more area to maintain, not just a different appearance.
Before choosing a floor 2
Brick paths and their joints
Brick gives a firmer, more defined route than loose gravel and can make a narrow path feel like a finished part of the greenhouse. Its performance depends on the units and their laying method, not on the word brick alone. Units intended for paving are different from miscellaneous wall bricks or salvaged pieces; check the supplier's stated use and the condition of the material before choosing it for a walking surface. A brick path also has many joints. Soil, compost and small leaves can lodge there, and the surface may become uneven if units or joints move. Brick types differ in how much moisture they absorb, so the material name by itself does not predict how quickly the surface will dry.
Texture and water absorption matter when comparing samples. Rough or porous units may hold more dirt or damp than a smoother, less absorbent finish, while a very smooth surface may feel less secure when wet. Look at a sample in damp conditions if possible and ask how its joints are intended to be finished and maintained. If the Aluminium Classic Greenhouse is on your list, plan the brick path around its interior layout and your proposed benches, rather than using the outside outline to decide how much to pave. This helps you reserve space for planting while keeping the route clear. Whether units can be replaced individually also depends on how the path is laid.
Paving slabs, cleaning and level changes
Paving slabs usually create a continuous surface with fewer joints than a brick path, so dry leaves and spilled compost are generally easier to sweep away. A stable, even route can also make carrying pots or moving a barrow less awkward than loose gravel. That advantage depends on the paving remaining sound and level: a raised edge, cracked slab or settled corner can catch a foot or wheel. Larger slabs are not automatically easier to fit around every greenhouse layout, and their joints still collect soil. Consider the finished surface and how you will maintain it, rather than assuming that larger units always make a better floor.
Check how the paving feels when wet, not just how it looks when dry. Texture and any soil or algae on the surface can affect grip; no material is guaranteed to stay slip-resistant in every condition. Paving may pass water through its joints, carry it across the surface or leave it in a low spot, depending on how it is laid. When planning a route for a lean-to greenhouse, use the exact model's drawing to locate the doorway and frame before paving. The finish should not conceal required fixing points. Ask a groundwork professional to confirm the supporting build-up and edge details for the site rather than assuming slabs provide the structural base.

Before choosing a floor 3
How water moves across and below the floor
Think of water in three stages: where it lands, whether the finish lets it through or carries it across, and where it can go afterwards. Gravel can allow water through its gaps; brick joints may pass some water depending on their construction; paving can carry water towards joints or edges, or leave it in a low spot. None of these behaviours guarantees that the ground below will take the water away. If the finish sits over a poorly draining or already saturated layer, water may remain beneath it. A surface that looks porous can therefore still leave damp or muddy ground, while appearance alone cannot show where water will end up.
Include routine watering, pot spills, cleaning water and any rain that enters through a door or opening in your plan. Consider whether water crosses the walking route, where it collects and how it leaves the greenhouse area. For a limited-edition aluminium greenhouse, the exact model's base drawing shows the frame and foundation positions; the water route still needs to be considered in relation to the site. Avoid creating a low point beside the frame or directing runoff somewhere it will cause another problem. If the ground or proposed route raises questions, ask a qualified groundwork professional to review the site and intended surface together before work begins.
Cleaning gravel, brick and paving
Cleanability is about what can be removed, not just whether a surface can be rinsed. On gravel, fine compost and leaf fragments fall between stones, so brushing them out completely may disturb the surface; a potting-mix spill can take longer to clear. Brick joints also catch debris, with the amount depending on the joint finish. Paving with a sound, relatively smooth surface is usually simpler to sweep or wipe, although its joints, texture and uneven patches still need attention. A rinse will not remove dirt trapped in crevices, and the water used then needs somewhere to go.
Think through an ordinary clean-up: where will leaves collect, where might spilled compost land, and can you reach behind benches without moving everything? Leave enough access for the cleaning tools you use, and decide whether you want a surface beneath staging or only along the path. If a T-shaped orangery greenhouse is under consideration, mark the areas you will walk through on the plan rather than assuming one straight route will reach every work area. Removing debris regularly is easier than letting it build up. If a damp patch persists, review the water route instead of simply covering it with another layer.
Before choosing a floor 4
Grip and movement inside the greenhouse
Underfoot, the relevant comparison is not simply hard versus soft. Loose gravel can shift and may be awkward under a narrow wheel or when carrying trays; brick and paving form firmer routes when laid soundly, but raised joints, movement or broken edges can catch footwear or wheels. A surface that feels comfortable when dry can feel different once wet or covered with soil. Consider the jobs you do most often: carrying full pots, shifting a barrow, kneeling beside a bed or turning at the end of a path. If practical, examine samples when damp as well as dry; texture and finish matter more than the material name alone.
Grip and route layout are separate considerations. A textured finish cannot compensate for a route with too little turning space, a sudden change in level or pots blocking the way. Even a firm, level path needs to connect the entrance with the areas where you work. Sketch the entrance, turning points and space needed to pass around benches before settling on gravel or a hard surface. If a pyramid greenhouse is on your shortlist, check the exact plan and door position rather than assuming the shape determines the route or amount of usable floor. Allow space for visitors to pass and for any wheelbarrow you intend to use.
Plan paths around beds, benches and storage
You do not have to cover every square metre with one material. A firm path through a growing area can keep the main route clearer, while open ground or a separate bed can remain available for planting. Paving might suit an area where you set down pots or mix compost, while another part of the greenhouse stays as a growing surface. The right split depends on whether you grow in the ground, in containers or on benches. Mark the paths first, then place beds, staging and storage around them. Keep the junctions between finishes obvious and stable: a loose-gravel edge beside a raised brick or slab can be an awkward transition if it is not planned.
Before work begins, mark the entrance route, working space and any area that must stay accessible on the ground. Include how you will carry water and pots, and whether a bench leg or storage door will sit over the chosen finish. If you are considering a greenhouse with built-in storage, show its access area on the same plan as the paths and planting areas; the model name alone does not set clearance or finished levels. A temporary outline lets you reconsider the layout before materials are in place. It can also reveal when a permanent path would take space needed for planting or regular access.

Before choosing a floor 5
Finished levels at the doorway and frame
The finished height is easy to overlook because gravel, brick and paving do not all add the same depth. A new surface may alter the relationship between the path and the door threshold, the bottom of the frame, existing fixings or the ground outside. If the material comes up too high, it could obstruct a part that must remain clear; if it finishes too low, the entrance may have an awkward step or collect water. These are not details to settle by estimating from a photograph. Use the actual greenhouse drawing and the proposed floor build-up to agree the intended finished level before materials are laid.
During installation planning, distinguish the base footprint shown by the manufacturer from the area you want to finish inside it. Confirm who is preparing the base, laying the walking surface and checking the final transition at the entrance, as these may be separate tasks. For a retrofit, record the existing base and floor levels rather than assuming the frame can be adjusted to suit new paving. Where the drawing, ground or water route raises questions, give the information to a qualified groundwork professional for review before committing to work. A generic depth or universal foundation dimension cannot replace a site-specific check.
Choosing a surface for your routine
Gravel is worth considering if you want a loose, textured surface and can accept regular raking and debris removal, provided the layer below and its drainage are suitable. Brick offers a defined, firm route and a traditional appearance, with more joints to clean and a need to choose units intended for the use. Paving is often easiest to sweep across when sound and even, but its grip, joint treatment and water movement still depend on the finish and installation. These are tendencies, not guarantees; the exact material and site conditions can change the result.
Compare the options against the same daily tasks rather than choosing by appearance alone. If you frequently spill compost while potting, ease of sweeping may matter more than the look of the surface. If you move pots by barrow, consider the firmness of the route, its joints and any changes in level. For areas beside open beds, weigh the work of containing loose stones against cleaning a hard surface. Then compare the upkeep each option needs: raking and topping up gravel, clearing brick joints or keeping paving even and free of debris. A mixed layout can accommodate different tasks, provided its transitions remain stable and easy to maintain.
Frequently asked questions
Does gravel guarantee good drainage inside a greenhouse?
No. Water can pass between gravel stones, but the layer beneath, the condition of the ground and a route for water to leave all matter. If the ground is compacted, wet or slow to drain, water may still collect below the gravel.
Can I lay paving slabs directly over the greenhouse foundation?
Do not assume that is suitable. Interior paving needs an appropriate supporting surface, and it does not automatically serve as the structural foundation for the frame. Check the selected model's base drawing, keep required fixing points accessible and confirm the finished level at the entrance before work begins.
Which greenhouse floor is easiest to keep clean?
A sound, relatively smooth paved route is usually easiest to sweep, though joints and textured surfaces can still collect dirt. Brick has more joints to maintain, while compost and leaves can be harder to remove from between gravel stones.
Do I need to pave the whole greenhouse floor?
No. You can finish just the paths or work areas that need a firmer surface and leave planting areas open if that suits how you grow. Plan the transitions between materials and consider where water from watering will go.
Can a new floor affect the greenhouse frame?
It can affect access to fixings, the frame edge and the level at the entrance, even when it is only an interior finish. It cannot replace the base specified for the greenhouse. Check the model drawing and seek a qualified review if the proposed build-up is uncertain.
Choose the floor around the work you do most often and the upkeep you are willing to take on. You may need a firm, easily swept main path without covering the planting areas, or a more extensive hard surface for container growing. Whichever combination you choose, allow water a suitable route away and coordinate the finished levels with the greenhouse entrance and frame. The walking surface should make everyday growing easier without being mistaken for the structural foundation.
