
Mulch for Greenhouse Beds: Moisture, Materials and Slug Risk
Greenhouse growing guide
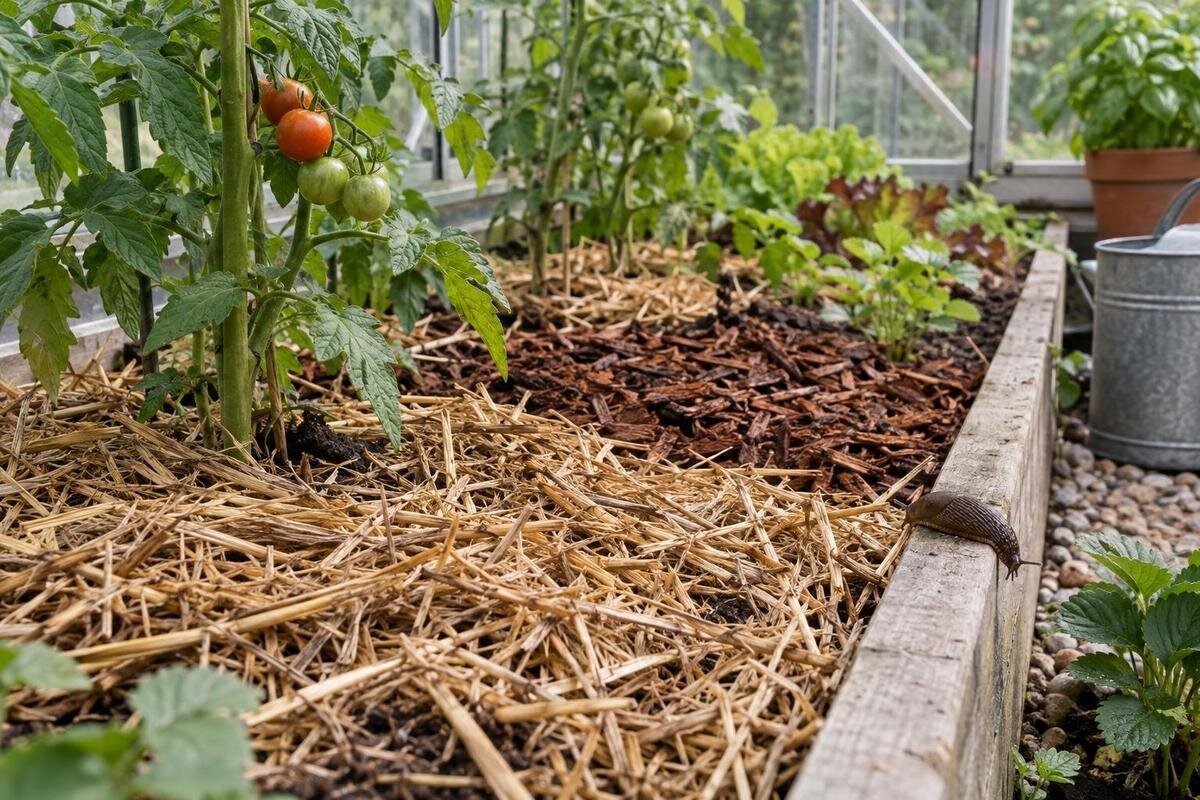
Mulch can slow water loss from greenhouse beds, but watering under cover differs from watering outdoors: rain usually does not reach the soil, while sunlight can still warm the growing space. The material may hold moisture or make it harder to see what is happening beneath the surface, and a damp layer can offer slugs shelter. Choose it for the crop, irrigation method and bed layout, then check its effect. In a greenhouse, mulch works best as a layer you can monitor and adjust, not as a substitute for watering or ventilation.

Before choosing a mulch 1
Why greenhouse beds need a different mulch plan
Outdoor beds are topped up by rainfall; a covered bed usually is not. Water comes from a watering can, hose or irrigation line, so mulch cannot be assumed to receive rain or stay evenly damp. It slows evaporation at the soil surface, but crop roots keep taking up water and a bright spell can raise demand even when the greenhouse air feels humid. Condensation on the cover and moisture in the air are not a dependable substitute for watering the root zone. A line that wets one section can also leave an edge drier. Build the plan around actual water delivery rather than copying an outdoor routine.
Before spreading anything, map which beds need a cover, where sowing rows will stay open and how you will reach the soil to check it. Try a short strip first if you are unsure whether material will mat, shift or make watering awkward; observe it through several watering cycles. A route for inspection matters too: a bed you cannot reach is harder to check for both moisture and pests. Where crops need different watering, separate strips can be easier to manage than one continuous layer. The Lean-to Greenhouses range is listed from 3.69 m² to 14.34 m². Use the selected model’s measurements to separate bed area from paths and access; do not treat the whole listed area as planting space.
What mulch changes at the soil surface
A cover limits how much moving air and direct light reach bare soil, so less water may be lost from the surface between irrigations. Organic mulch also buffers the top layer against quick temperature changes, but it can slow spring warming; dark, thin, pale, coarse and damp materials will not behave identically. A greenhouse can receive strong sunlight while covered soil stays cooler than exposed soil. Mulch also shields soil from some splashing and can suppress weeds by blocking light, provided weeds are removed first. It will not remove weeds already rooted through or beneath a cover, and it cannot correct poor drainage.
Decide what you want the layer to do before selecting a material: hold surface moisture, reduce splashing, limit weed germination or keep a cleaner bed surface. Those goals can conflict: a thick cover may hold dampness and hide seedlings, while a loose one may not shade weeds reliably. A cover intended to suppress weeds must block enough light, while irrigation still needs to reach the soil. When planning beds for the Limited Edition aluminium greenhouses, listed from 3.77 m² to 28.08 m², consider which areas need each benefit. You need not use the same material throughout: sowing rows may stay bare while established plants have a cover between them.
Before choosing a mulch 2
How to check moisture below the mulch
Do not judge the bed by the feel of mulch alone. Part it in several places and check the soil at the depth used by the crop’s roots; a finger, narrow trowel or suitable moisture meter can give a clearer reading. Sample near the water outlet and at the far end, then compare the middle with the margins. If the surface is dark and damp but the underlying soil is dry, water may be reaching the cover without soaking the root zone. If both upper and lower soil remain wet, more watering may simply prolong saturation. The right sampling depth depends on the crop and bed, so avoid a fixed centimetre rule.
Check again after watering, and repeat at a similar point in your normal routine so you can learn how quickly each bed dries. Note the material, crop stage and whether the soil beneath it is dry, moist or wet; a short record is more useful than reacting to a dry-looking surface. Avoid sampling only at the entrance or at one convenient spot. Repeat the comparison after a bright spell or a change of material, as the drying pattern may change. If you are comparing models in the Classic aluminium greenhouse range, listed from 3.77 m² to 28.08 m², plan access to several sampling points along the beds. This lets you compare wetter and drier areas rather than relying on the easiest patch to reach.
Organic mulches: compost, leaf mould, straw and grass
Finished compost can work as a surface layer, but it is not inert: as it breaks down it adds organic matter and nutrients, and its nutrient content varies. Do not keep applying it just to restore a uniform look without considering what is already in the bed or how much compost is used during planting. Use material that is mature and appropriate for the crop, and avoid burying young stems beneath a rich, wet heap. Leaf mould is usually lighter and more fibrous; it can cover soil gently, then settle and decompose. Check it after watering, because a loose layer can shift and its apparent depth can decrease over time.
Straw has larger gaps and is easy to lift for inspection, but it can move around and create sheltered pockets if it stays damp. It may also carry seeds, so check the source and remove any growth rather than letting it establish. Grass clippings are best used sparingly and in thin, partly dried layers; a thick fresh pile can heat, mat together and restrict air at the surface. Neither straw nor clippings should be pressed against plant stems or crowns. If pest pressure is high, choose a layer you can lift and inspect often, rather than selecting material only because it looks tidy.

Before choosing a mulch 3
Wood, fabric and mineral covers
Bark and wood chips last longer than soft green materials, but on a vegetable bed they need a different role from compost. Keep coarse woody matter on the surface unless you have a reason and suitable guidance to mix it in: as carbon-rich material decomposes within soil, it can temporarily reduce nitrogen available nearby. Check what the material is made from and avoid treated or unknown timber around edible crops. Fine bark may settle or mat differently from coarse chips, so check whether water passes evenly through it. If the bed is due for digging, planting or adding soil amendments, a persistent layer may need to be moved aside first.
Weed-control fabric or a sheet cover can block light, yet it changes how water reaches the bed. Water may need to be delivered through openings or below the sheet, and hidden damp edges can shelter slugs; follow the product instructions and keep access for lifting and cleaning. Gravel or other mineral cover does not break down like organic matter and will not add organic material; it may also complicate soil work. If you are considering a Prestige greenhouse, listed from 3.77 m² to 28.08 m², include space to lift or move a persistent cover when planning the beds and aisles. A small test patch can show whether water runs off or collects before the full bed is covered.
Mulch depth and quantities for different crops
Seeded beds and established transplants need different treatment. Leave the sowing line uncovered until seedlings are up and large enough for the material not to bury or shade them; mulch can go between rows if it stays clear of emerging plants. Around a transplant, keep a small open space around the stem or crown so damp material is not pressed against it. Fine seed, shallow sowing and crops that need warm soil may need a bare surface at first. Follow crop-specific growing directions, and use a lighter layer if you are uncertain rather than assuming a deep blanket is better. Reassess after seedlings are established instead of covering the whole bed in one pass.
Measure the bed, not the greenhouse: length multiplied by width gives surface area, then multiply by the planned depth to estimate volume. For example, a bed 1.2 m by 3 m measures 3.6 m². An illustrative 3 cm layer is 0.03 m deep, so 3.6 × 0.03 = 0.108 m³, or 108 litres, before settling. For several beds, calculate each separately and leave out paths and sowing strips that will stay bare. This is a calculation, not a recommended depth; material and crop instructions determine the layer. The T-shaped orangery greenhouse is listed from 16.52 m² to 30 m², but a mulch order should be based on the measured beds within the chosen layout, not that overall figure.
Before choosing a mulch 4
Watering a mulched greenhouse bed
With hand watering, part the cover and aim for soil near the active root zone rather than soaking the mulch alone. Some water can be held by a dry organic layer or diverted over a compacted surface; a wet patch on top does not confirm even wetting below. Apply water gradually if the soil takes it in slowly, then check under the cover at more than one point. If a bed stays wet for longer than the crop requires, reduce or space out watering only after checking the root zone; do not use a calendar alone. Mulch may change how often you need to water, but it does not remove the need to check the soil.
Where drip or seep lines are used, decide whether they belong above or below the cover from the system instructions and the crop layout. A line below loose mulch may be protected but harder to inspect; one above may be displaced or wet the cover more than the bed. Check distribution and leaks before hiding tubing, and keep joints accessible. When comparing the Pyramid greenhouse range, listed from 5.53 m² to 18.9 m², sketch how water will reach each bed and where you will need access to the lines. Recheck after changing the line or mulch, because the wetting pattern can change even when the watering time does not.
Slug risk under greenhouse mulch
Slug risk is a trade-off, not a reason to rule out every mulch. Slugs favour damp, sheltered places, and thick organic layers, fabric edges, clumps of grass or debris can provide hiding spots in a covered bed. That does not mean mulch creates a slug problem: pests can enter a greenhouse and use pots, boards or gaps as shelter even when soil is bare. The relevant questions are whether the chosen material stays wet and whether you can inspect it. Young seedlings and low foliage are easy to miss under a dense cover, so watch both the crop and the underside of the mulch.
Lift a few sections at bed edges and around plant bases during routine checks, especially after watering; look for slugs, fresh feeding damage and material that has become a persistently wet clump. If daytime checks show little, inspecting at first light or after dusk may make activity easier to spot. Keep the layer back from stems, clear fallen leaves and do not stack new mulch over a damp, pest-filled patch. If the crop permits, avoiding unnecessary late-day wetting of the surface can give it time to dry before night, but never withhold water from a plant that needs it. When planning beds for the Limited-Edition aluminium greenhouses with storage, listed from 5.52 m² to 28.08 m², leave room to lift the cover at the edges as well as around plants.

Before choosing a mulch 5
Ventilation and access around mulched beds
Mulch affects the soil surface; it is not a ventilation system. Ventilation through suitable openings helps manage warm, humid air, but opening a greenhouse does not tell you whether roots need water. Likewise, a covered bed may stay moist even when the air seems dry. Keep vents, doorways, drains and walking routes clear of loose material, and avoid piling it against stems or bed edges where it can spill into paths. A clear route also makes it easier to inspect plant bases, water evenly and spot slugs. Treat airflow and root-zone moisture as separate checks.
Place beds and materials so you can work without brushing against crops or stepping on cultivated soil. The Spacious Greenhouse models are listed from 47 to 70 m², but a larger growing space still needs a practical arrangement of beds and paths. Check the selected model’s measurements and leave room for watering, carrying material and moving it aside during soil work. In a compact layout, a clear working route may be more useful than adding another narrow strip of mulched bed. Keep loose cover within the beds so it does not obstruct the paths you use for these tasks.
Adjust the layer as conditions change
Review the layer after its first few watering cycles and whenever the crop changes. A cover that remains soggy, packs into a dense mat or keeps soil wet beyond the crop’s needs may be too deep, poorly matched to the irrigation method or simply in the wrong place. Lift or thin it and check the underlying soil before changing watering. If a loose mulch has blown away or separated, replace only what is missing and consider whether its texture suits the bed; adding more of a material that already mats will not solve the cause. Do not top up by habit, because repeated layers can bury crowns and reduce room for soil work.
At a seasonal change, remove material where you need to sow, transplant, inspect the soil or make amendments, and keep any pest-affected cover separate from clean material. Organic layers shrink as they break down; that is a reason to reassess, not an instruction to replace them on a fixed date. Use mulch only where its effect is useful, leaving exposed strips for sowing or checks when needed. After one growing period, compare how the bed dried, how much watering it needed and whether you found slugs underneath. Review again after a change of crop or watering method. That record gives you a better basis for choosing the next material and layer than a greenhouse-wide rule.
Frequently asked questions
Should I water a greenhouse bed before applying mulch?
If the root zone is dry, water it first and let excess water drain. Mulch placed over dry soil can hide that dry starting point. Do not saturate the bed just to prepare for mulching; check the soil beneath the finished layer and water according to the crop’s needs.
How deep should mulch be in a greenhouse bed?
There is no single depth for every material and crop. Follow crop-specific guidance, use an even layer and be cautious around seedlings. Keep sowing rows, stems and crowns clear. A volume calculation helps estimate how much material you need; it does not set the right depth.
Does mulch cause slug problems?
Not by itself, but damp, thick or undisturbed mulch can give slugs somewhere to shelter. Check under the layer and around plant bases, particularly after watering. If one area stays wet or hides pests, thin or remove the cover there.
Can I use grass clippings as greenhouse mulch?
You can use them sparingly in thin, partly dried layers. A thick pile of fresh clippings can mat together and restrict air at the surface. Keep clippings away from plant stems, and remove any that stay persistently wet.
Can I mulch a bed used for direct sowing?
Leave the sowing line clear until seedlings are established, so the cover does not bury or shade them. You can mulch between rows if the material stays away from emerging plants. Check the crop’s sowing guidance before covering the bed.
Mulch earns its place when it solves a real problem, such as a surface that dries quickly, soil splash or weeds between established plants. In a covered bed, choose a material and layer that suit the crop, water the root zone deliberately and keep enough access to inspect the cover. If soil stays wet or slugs gather underneath, thin, move or remove the mulch in that area; leaving a strip bare is a useful adjustment. The aim is a bed whose moisture you can read and manage, not a blanket you forget about.
