
Planning a Greenhouse for a Sloping Garden
GREENHOUSE SITE PLANNING
A sloping garden does not automatically rule out a greenhouse, but the site cannot be judged reliably from a glance. Changes in level across the proposed footprint affect how a level platform could be formed, where rainwater travels and how easily you can reach the door. A short site survey helps you compare possible positions before choosing a model: record levels at several points, map seasonal shade, follow water after rain and draw the access route. You can then assess whether moving the greenhouse, forming a terrace or commissioning a purpose-designed support is worth exploring. The right solution depends on the actual ground and greenhouse system; no general guide can specify a retaining structure.

Site checks 1
What the slope means for a greenhouse
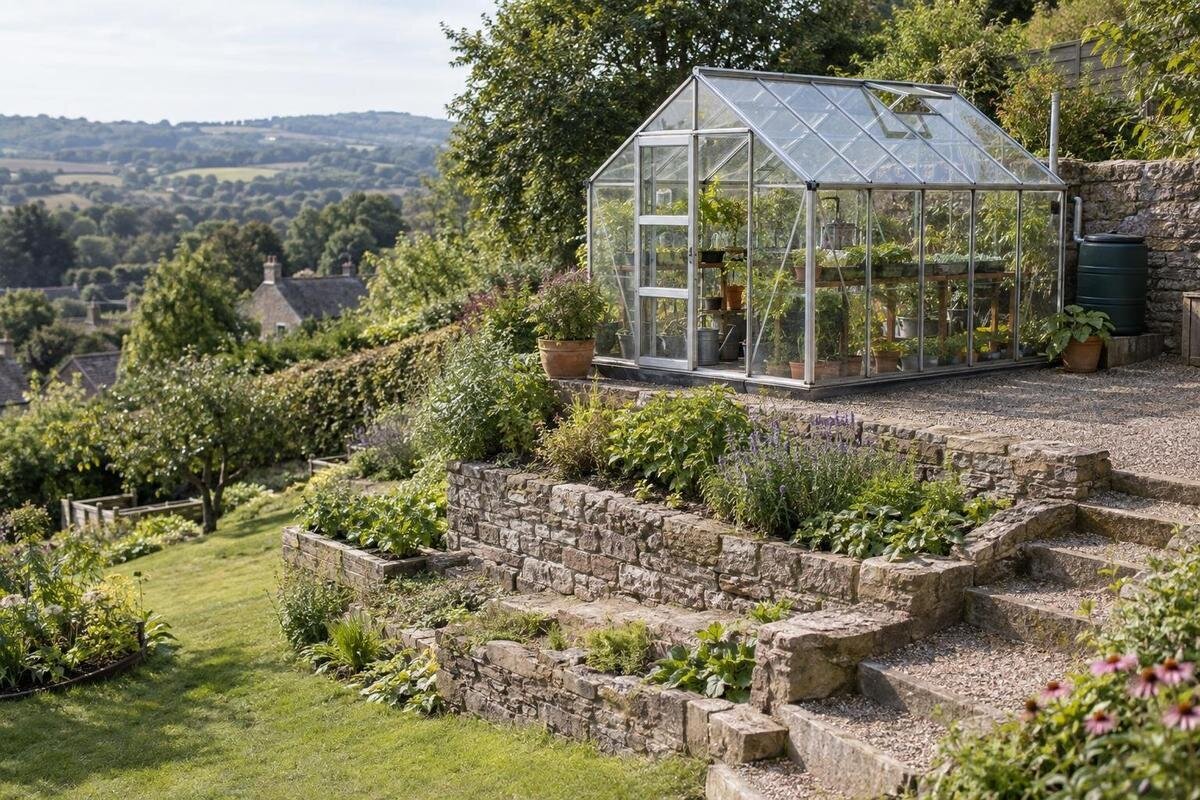
A greenhouse on a slope is not automatically impractical, but the ground needs closer assessment than a level lawn. The base occupies a defined footprint while the ground may rise, fall or dip at different points within it. A location that looks nearly flat from the house can have a marked difference in level between its corners; a single reading from the top of the garden will not reveal that. A gradual fall across a long area and a sharp change inside the proposed footprint can create different preparation problems, even if the total height change is similar.
The aim of a survey is to compare real options, not to calculate a foundation at home. It helps show whether another part of the garden has a more suitable level area, whether a platform might require retaining work and how the entrance would meet the path. A lower patch could be convenient but receive runoff; a higher patch might be drier but more exposed. Treat these as possibilities to investigate rather than fixed rules. If the slope is abrupt, the ground appears unstable or the plan involves holding back soil, seek site-specific advice before committing to a layout.
Measure the levels and mark the footprint
For a first survey, outline each possible site and record relative ground levels at all four intended corners, adding points wherever the surface visibly changes. Use a consistent reference line and note which way the ground rises or falls. Measuring only from one end of the garden to the other can conceal a hollow or a cross-slope beneath the proposed base. A tape and level can help with a preliminary sketch, while a complex site may call for a professional survey. Treat your sketch as a planning record, not a construction drawing or a basis for designing a retaining wall.
Draw the greenhouse as a measured outline at a consistent scale, with the entrance on the correct side. Add the path, fences, buildings, trees, steps, drains and boundaries that could limit the level area. Area alone cannot show whether a particular shape fits. The Limited Edition Aluminium Greenhouses listing covers options from 3.77 m² to 28.08 m²; use the exact selected model’s outline rather than treating that range as a footprint. Also note the ground level where the door approach would sit: a level base does not make the surrounding route level.
Site checks 2
Watch where rainwater goes
Inspect the proposed area after rain, not only when the ground is dry. On your sketch, mark where water arrives from higher ground, crosses the site, collects or leaves along a path or drain. Note damp strips, soft patches, channels and puddles, and add nearby downpipes or paved surfaces that may contribute runoff. Photographs from the same viewpoint can help you compare conditions over time. Include adjoining slopes and roofs in your observations: water reaching the greenhouse site may have started well beyond its footprint.
Consider how earthworks could alter those routes. Cutting into an uphill bank, adding material on the lower side or creating a retaining edge can intercept or redirect water; a flat platform does not by itself resolve drainage. Do not assume a low point is suitable for a base, or that water can simply be sent elsewhere in the garden. Mark existing gullies and outlets so they are not overlooked. If you find persistent pooling, wet ground or drains whose route is unclear, seek appropriate site or drainage advice. Include the greenhouse roof’s eventual rainwater discharge in the plan.
Record sunlight and exposure
Map sunlight across the proposed platform at different times and through the seasons. Trees, hedges and buildings cast shadows that move and lengthen, so a note that the garden is sunny is less useful than a simple shadow diagram. Mark when each part of the intended footprint is shaded and take dated photographs from the same viewpoint. A slope’s aspect can affect its exposure, but a south-facing patch is not automatically the best position if it is overshadowed, difficult to reach or exposed to wind. Compare light records with levels, access and drainage rather than choosing on one factor alone.
Record likely wind exposure too, including open ridges, gaps between buildings and shelter from nearby features. A fence or hedge can change local conditions but should not be treated as a guarantee of protection; check the manufacturer’s installation requirements and seek site-specific advice if exposure is a concern. The Pyramid Greenhouse range is listed from 5.53 m² to 18.9 m². To compare a selected model with your light records, draw its exact outline on the seasonal sketch. This lets you see which parts of the proposed growing space would fall within the shadows you have recorded.

Site checks 3
Plan access to the door and working space
Trace the route from the gate or the point where materials arrive to the greenhouse door. Mark narrow turns, steps, changes in level, soft ground and obstacles, not just the straight-line distance. A sloping path that is manageable in dry weather may be awkward with a wheelbarrow or when carrying long components. Plan for assembly access as well as the everyday walk to water plants. Check the door swing against the route, nearby walls and planting. Draw the path at its measured width and compare it with the selected installation instructions rather than relying on a universal access measurement.
Inside, sketch the uses you expect: beds, benches, pots, storage and a clear route from the entrance to the growing area. Consider how you will reach glazing, vents and the ground beside the structure for routine maintenance, following the manufacturer’s guidance. If built-in storage is part of the design, include the full structure in your site outline. The Limited-Edition Aluminium Greenhouses with Storage listing includes options from 5.52 m² to 28.08 m²; that range cannot show how a particular layout meets a sloping path. Work from the exact selected plan and show the platform, threshold and approach together.
Compare ways to make a level platform
Before considering earthworks, check whether another part of the garden offers a naturally more level area with workable light, drainage and access. Moving the footprint may avoid major ground preparation, but only if the alternative position suits growing and daily use. If it does not, forming a terrace cut into higher ground or creating a platform on the lower side may be possibilities to explore. These are broad approaches, not interchangeable do-it-yourself instructions: the slope, soil, water routes and chosen greenhouse all affect what could work. For each option, sketch the level surface and the surrounding edge or bank.
Cutting into a slope removes ground from the higher side; building up the lower side requires a stable, purpose-designed platform and supporting edge. A retaining wall may form part of a terrace, while another designed support arrangement may reduce excavation. Each changes how soil is held and where water can move, so any retaining or support work should be specified for the site. Do not compensate for a fall by setting one side of an ordinary base higher unless the greenhouse instructions explicitly allow it. The Bloomcabin Prestige Greenhouse with Metal Base listing identifies a model with a metal base, but that name alone does not show whether it suits sloping ground or how its platform should be built.
Site checks 4
Retaining work needs a site-specific design
A retaining structure is a separate design task from buying a greenhouse. If a proposal involves a significant cut or raised edge, an abrupt or irregular fall, unknown ground conditions, persistent wetness or earthworks near a building or boundary, get advice from a suitably qualified professional before committing to excavation. The right expertise depends on the issue and may involve structural, ground or drainage knowledge. A greenhouse product name cannot establish soil strength or provide a retaining design. Nor should a wall, sleeper edge or ordinary greenhouse base be assumed to hold the slope simply because it fits the intended outline.
A retaining wall holds back soil; a platform provides a level area; the greenhouse base connects the structure to its prepared support. A site-designed scheme may coordinate these parts, but they are not automatically the same element. Give the professional your measured levels, photographs, marked water routes, proposed platform and the chosen greenhouse’s base details. The T-Shaped Orangery Greenhouse listing covers options from 16.52 m² to 30 m². Include the selected model’s exact dimensions in that brief so the proposed support arrangement can be considered alongside its footprint. If the model or position changes, confirm that any proposed design still applies.
Size the platform for the complete greenhouse
Set out the platform from the selected greenhouse’s installation information, not from its advertised floor area or a rough garden measurement. Mark the external footprint, base lines and any clearance the manufacturer specifies for assembly or maintenance. A door needs a workable approach, and a non-rectangular design may occupy a different outline from a simple rectangle of the same area. Do not add arbitrary dimensions or assume that every platform needs the same margin: the base and installation space depend on the model’s instructions and the site plan.
Compare the complete platform with the space needed to get in and work around the structure, as well as any edge or retaining area required by the chosen approach. A larger greenhouse may turn a modest-looking fall into a broader groundworks project. The Spacious Greenhouse range is listed from 47 m² to 70 m²; use the exact selected dimensions when marking its position. Keep the internal growing layout on a separate layer of the sketch. Distinguish the greenhouse footprint from the approach, maintenance access and space needed for site work, so the growing area is not mistaken for the total area the project needs.

Site checks 5
Compare freestanding and lean-to positions
A freestanding greenhouse gives you more choice about where its footprint sits, but it still needs a base arranged to the manufacturer’s requirements. It is not automatically a solution to sloping ground. A lean-to may be worth considering when a suitable existing wall and a workable strip of ground line up, but the wall must meet the relevant attachment requirements and the ground still needs level support. On a slope, the gap between wall and ground may change along the length. Check doors, windows, access to the wall and the movement of rainwater before treating the position as workable.
The Lean-to Greenhouses listing covers options from 3.69 m² to 14.34 m², but the area range does not establish whether a particular wall, base or slope is suitable. Compare the selected model’s installation information with the wall and ground survey; do not assume a lean-to can bridge an uneven strip or that a freestanding frame can be stepped to follow the land. In either format, account for rain from nearby roofs and keep maintenance access in view. If neither can sit on a properly prepared level area without unresolved retaining or drainage work, reconsider the position or obtain site-specific advice before buying.
Turn the survey into a buying brief
Bring the records together in a short site brief: a scaled plan with the proposed outline and measured levels, photographs from useful viewpoints, a rainwater-flow sketch, seasonal shadow notes and the route from the gate to the door. Note existing drains, wet or unstable patches, trees, walls and other features that could limit the position. Once you have shortlisted a greenhouse, add the exact model and its published base or installation information; a product family name is not enough for a groundworks assessment. The Aluminium Greenhouses range is listed from 3.77 m² to 28.08 m², so identify one precise model before final platform decisions.
Use the brief to ask two separate questions: what base and clearances does the greenhouse manufacturer specify, and what platform, earthworks, retaining or drainage arrangement is appropriate for this plot? Have a suitably qualified professional address the site design where needed, and keep the survey, selected model and design aligned if anything changes. Ask that the proposal identifies its assumptions about levels and water, and confirm that the final layout matches the site plan before work proceeds. This helps you compare models by their actual footprint, access and growing layout rather than by a guess about the slope.
Frequently asked questions
Can a greenhouse be installed on a sloping garden?
Often, but the chosen greenhouse generally needs a prepared base that follows its installation requirements. Do not assume an ordinary frame can sit on uneven ground or follow the slope. Survey the proposed footprint and decide how to create a level platform before planning the installation.
What is the best way to make a level greenhouse platform?
There is no single best approach for every site. Moving the greenhouse to a naturally level area may avoid earthworks; other possibilities include forming a terrace or commissioning a purpose-designed raised support. Ground conditions, water flow, the footprint and any retaining work all affect the choice.
How can I tell where water will collect?
Observe the site after rain and note where water arrives, crosses, pools and leaves. Mark damp patches, channels, drains and nearby roof downpipes on a sketch. One visit may not show every pattern, so record conditions over time and seek suitable advice if drainage is unclear.
Should I choose a freestanding or lean-to greenhouse?
Choose based on the actual site and the selected model’s requirements. A freestanding greenhouse still needs a suitable level platform. A lean-to also depends on an appropriate wall and an arrangement that works with the slope, access and rainwater. Neither format automatically solves uneven ground.
Do I need a professional for a greenhouse on a slope?
Not every slight fall needs the same level of advice, but retaining work, substantial earthworks, uncertain ground or persistent wetness call for site-specific assessment. Ask a suitably qualified professional to advise on the ground and platform; use the greenhouse manufacturer’s instructions for its base and installation requirements.
A greenhouse on a slope is best planned from the ground up: measure the full footprint, note where rainwater moves, and check light and access before choosing a model. Compare a naturally level position with any platform or retaining work under consideration, and keep the final greenhouse dimensions aligned with site-specific advice. That gives you a clearer basis for deciding whether the position is practical and what needs to be resolved before installation.
