
When and How to Prick Out Greenhouse Seedlings
Propagation and seedling care
Seedlings do not all become ready for a new pot at the same speed, so the date on the calendar is only a rough prompt. The most useful clues are the true leaves, how roots are filling the tray and whether neighbouring plants are beginning to compete. This guide explains how to weigh those signs and move suitable seedlings with as little root disturbance as possible.

01
What pricking out means
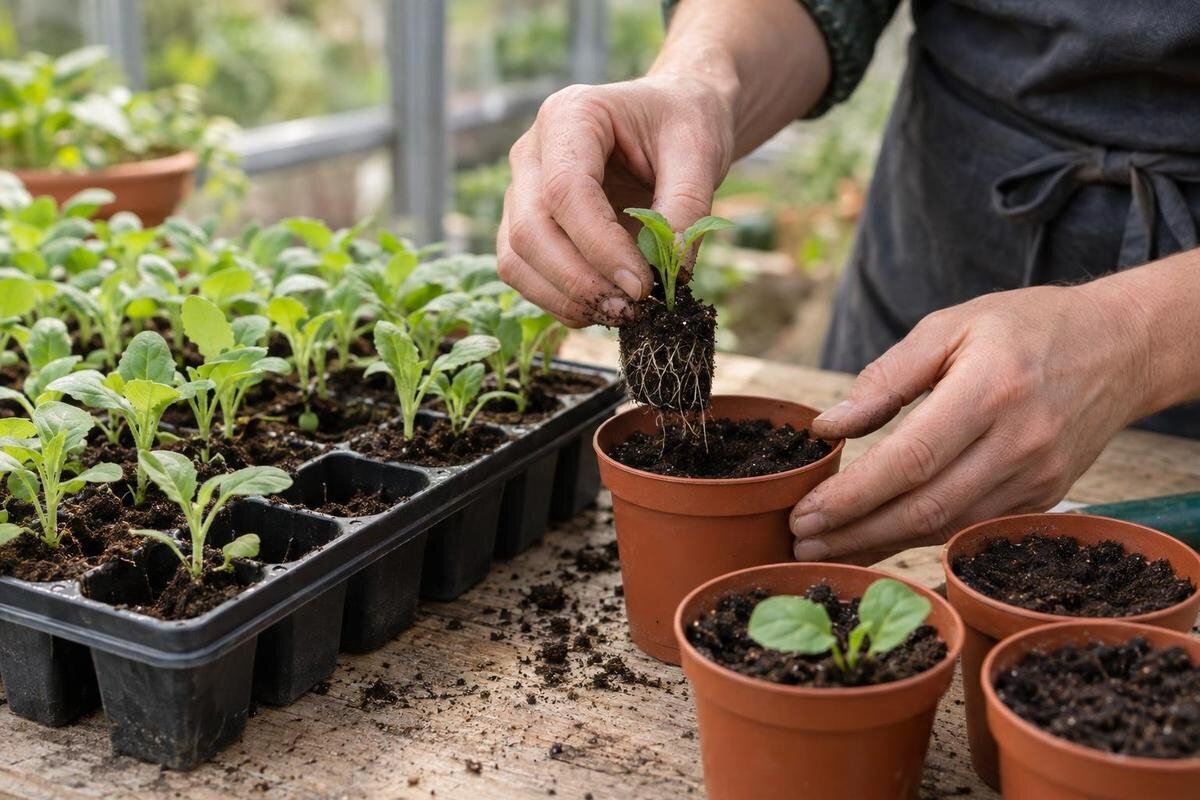
Pricking out means moving young plants from a shared seed tray or shallow box into separate cells or small pots. It gives each seedling room for its own roots and reduces competition for light, water and nutrients as the plants grow. The move normally comes before the seedling is ready for its final bed or container. A plant already growing alone in a roomy module may not need pricking out at all; it can stay there until its roots and size make potting on appropriate. Unlike sowing, this is a job for seedlings that have already emerged. Before choosing larger pots, identify which job the batch actually needs. Are you separating several plants from shared compost, or moving an individual plant with its root ball intact? That distinction helps you prepare the containers and decide how much handling is necessary, rather than treating every young plant in the greenhouse alike.
It is useful to distinguish pricking out from potting on. Pricking out separates seedlings that shared a tray; potting on usually shifts an established plant that already has its own root ball into a larger pot. The jobs can overlap in casual speech, but the handling differs: a freshly emerged seedling has a small, easily disturbed root system. Moving every plant as soon as it appears adds unnecessary work, while leaving a crowded tray until its roots are inseparable can make the job harder. Aim for a workable stage, not a fixed date or a mandatory extra step.
Look for true leaves, not a calendar date
The first leaves are cotyledons, or seed leaves, and often look plain or rounded. They are not true leaves. True leaves appear from the growing point and begin to show the outline associated with the crop. Look at several seedlings in the tray, not just one unusually early plant, and count only these later leaves. For many crops, the first true leaves are a useful point to assess the seedlings, but a particular crop may be moved before or after that stage according to its growing guidance. Use the leaves to judge development, rather than assuming that every seedling of the same age is equally ready.
Leaf stage is only one cue. Choose plants that stand upright, have an intact growing point and can be handled without gripping a very thin stem; they need not be the largest in the tray. Seedlings can emerge unevenly, and greenhouse conditions affect how quickly they develop, so a date measured from sowing is only a rough prompt. If a few are ready while others lag, move the ready group and leave the rest to develop rather than lifting tiny plants simply to finish the job at once. Label the groups so they are not confused later.
02
Check the roots and the space between seedlings
Roots provide a second check, but do not pull a seedling out repeatedly just to inspect it. In a cell or module, roots appearing at a drainage opening or lightly holding the compost together suggest that the plant is using its space. A dense coil or firmly crowded plug means it has been there longer. In a shared tray, roots from neighbouring plants may begin to cross. Some healthy seedlings show few roots at the edge, so treat this as evidence alongside leaf stage and spacing, not as a pass-or-fail test. Interpret what you see according to the container: a root at the bottom of an individual cell does not tell you whether plants in a shared tray can be separated easily. When you begin lifting a ready seedling, assess how readily the surrounding compost and roots come apart before continuing through the batch.
Above the compost, overlapping leaves, seedlings leaning into one another or a patch that is becoming difficult to water evenly can point to a shortage of room. A little leaf contact is not automatically an emergency, but crowding makes careful handling more difficult. Move the ready seedlings first and leave smaller plants to develop under suitable conditions. For a large batch, count the new pots as well as the sowing trays. The Spacious Greenhouse is listed from 47 to 70 m², but overall area does not tell you how much accessible bench space is available. Allow for both the seedlings still waiting in their original trays and the pots already filled.
Account for the crop’s root behaviour
Crop type changes the balance between sturdiness and root sensitivity. Tomatoes, many brassicas and numerous annual flowers are commonly moved from a shared tray once they have true leaves and can be handled without gripping the stem. Some leafy crops can also be pricked out while young, provided their roots remain intact and the species guidance supports it. These are patterns rather than fixed rules: use the seed packet or a reliable crop guide if it gives a different stage, especially for varieties raised in unusual conditions or intended for a particular planting method.
Some plants are better sown where they will grow or started in separate modules. Carrots and other taproot crops are usually sown in their final growing place, since disturbing the root can affect its shape. Peas, beans and cucurbits are often started individually to avoid teasing apart a delicate root system. If you sowed one of these in a shared tray, move it only if the roots separate readily; do not tug until the whole clump comes free. Keep crop groups identifiable when their handling needs differ. The Classic aluminium greenhouse range is listed from 3.77 to 28.08 m². When planning batches within the available space, distinguish plants that need separating from those that can remain in their existing modules.

03
Set up pots and a work area first
Prepare everything before loosening the seed tray, so exposed roots are not left waiting while you look for a pot. Choose clean pots or modules with drainage openings and fill them with suitable, lightly moist potting compost. Have a dibber, narrow plant label and pencil or similar tool to hand. If reusing containers, remove old compost and clean them before the session. Labels are more than a convenience: once seedlings are separated, the leaves may not identify a variety reliably, and several batches can easily be mixed on a busy bench. Write the crop and variety names before you start, then keep each set of labels beside its original tray. If you divide one batch between pots and modules, label both groups rather than relying on their position to remember which is which.
Arrange the tray, fresh pots and completed plants in an order that avoids reaching over tiny stems. A clear surface lets you finish and label one batch before starting the next. For greenhouse planning, the Lean-to Greenhouses listing spans 3.69 to 14.34 m²; consider door access and the position of your work surface within the chosen layout. Put empty containers within reach and leave a separate place for finished pots, so they do not gradually block the working area. Whatever the structure, keep newly lifted roots away from drying air and direct sun while you work. Preparing the labels and planting holes in advance helps you complete each transfer without interruption.
Lift and separate each seedling gently
If the tray compost is dry, water it lightly ahead of time so it holds together when lifted; do not turn it into a saturated mass. Make the planting holes in the prepared pots before lifting seedlings. Slide a dibber, pencil or small label underneath each plant and raise it from below, supporting the root zone. Hold the plant by a cotyledon or true leaf, not by the stem. The narrow stem is easily bruised, and a pinch can damage it. The tool should loosen and support the compost around the roots; the leaf gives you a way to steady the plant, not a handle for pulling it free. Work in small groups so roots are not exposed for long, and transfer each separated seedling promptly into its prepared hole.
When several seedlings share a plug of compost, support it and ease the roots apart gradually with the tool or your fingertips. Tease from the root ends rather than pulling stems in opposite directions, and keep as much fine root material as possible. If roots are tightly interwoven, pause rather than wrenching the plants apart; only leave seedlings together if that suits the crop’s usual growing method. Keep the group supported while you separate one plant at a time, instead of leaving the remaining seedlings dangling. A busy session also needs a temporary place for trays beside the working surface. The Limited Edition Aluminium Greenhouses are listed from 3.77 to 28.08 m²; include that temporary working space when considering the layout, rather than filling every available surface with finished pots.
04
Place the roots carefully in the new pot
Make a hole deep enough for the roots to hang down naturally, without doubling them back or forcing them into a shallow pocket. Holding the seedling by a leaf and supporting the roots as needed, lower them into the hole and bring compost around them. If the roots will not fit, widen or deepen the hole rather than pushing the plant down by its stem. For most plants, keep it at roughly the depth at which it was growing; the cotyledons and growing point should remain above the compost. Check the position before firming, while it is still easy to adjust. Some crops tolerate or benefit from a different planting depth, so follow crop-specific advice rather than burying every long stem on the same principle.
Firm the compost gently so the roots make contact without crushing the stem or packing the surface hard. Usually, one seedling goes into each new cell or pot, but crops grown as clumps or in groups are an exception; follow the planting method and spacing you intend to use. Choose a container large enough to hold the roots without folding them. Pricking out does not necessarily mean moving straight into the final container: the immediate aim is to separate the plants and give their roots usable room. When arranging the finished pots, allow access for watering without reaching across delicate leaves. The T-Shaped Orangery Greenhouse is listed from 16.52 to 30 m²; factor that access into your proposed bench arrangement.
Water gently and give seedlings time to settle
Water after setting the seedlings in, using a gentle flow around the compost rather than a forceful stream against each stem. The aim is to settle the compost and moisten the root zone, not leave pots standing in water. Let excess drain and check again before watering; the surface can dry faster than the roots, particularly in a warm greenhouse. Keeping the compost evenly moist while roots re-establish is more helpful than repeated heavy watering. Adjust to the compost, container and crop instead of following a rigid daily schedule.
Place the fresh pots in bright conditions that suit the crop, while shielding them briefly from harsh direct sun or drying airflow if the move has left them wilting. Do not leave them in deep shade for a long spell: seedlings still need good light to continue growing. Greenhouse temperatures can change quickly, so check the actual conditions rather than assuming the space is mild because it is covered. Keep newly moved plants identifiable, so you can observe their recovery separately from undisturbed batches. The Pyramid Greenhouse range is listed from 5.53 to 18.9 m². Its catalogue area alone does not describe the light or conditions at the position where you intend to keep the pots.

05
Plan greenhouse bench space for the new pots
Pricked-out seedlings may occupy more bench area than the original sowing tray because each pot needs room, and several sowing dates can overlap. Estimate the peak number of pots you will have at once, not just the batch you are moving today. Include room to reach and water plants, separate groups with different needs and keep trays off the floor or path. A greenhouse can have ample total area yet little convenient bench surface, so measure the benches and check the layout before buying trays or a structure.
Storage is another part of the working layout: compost, labels and hand tools need a place, but their position affects how you move trays between the door and bench. The Limited-Edition Aluminium Greenhouse with Built-In Storage is listed from 5.52 to 28.08 m². Check the dimensions and arrangement for the individual option, then sketch in the trays, bench positions and access route. This avoids treating a storage feature or a greenhouse name as evidence of a particular amount of free propagation surface.
Checking recovery and deciding when to pot on
Some seedlings droop for a short time after handling. Check compost moisture and the conditions around them before adding more water or moving them again. Dry roots, stems pinched during separation, roots bent in too-small pots or planting too deeply can all slow recovery. If a plant was lifted before it could be handled safely, leave the remaining seedlings in the tray until they are stronger. A lost seedling is disappointing, but repeated attempts to rescue it through further potting can cause more disturbance.
Once plants have settled, look for fresh growth and roots using the new pot; do not set a second transplant date in advance. If roots begin to fill the container or growth stalls because space is genuinely limited, consider potting on according to crop guidance. This later move usually involves keeping the individual root ball together, rather than repeating the separation involved in pricking out. As batches progress, distinguish pots ready to move on from seedlings still recovering. The Prestige Greenhouse with Metal Base is listed from 3.77 to 28.08 m²; its catalogue area is a starting point for comparing structures, not a measure of how many pots your benches can hold.
Frequently asked questions
Do seedlings need true leaves before you prick them out?
For many seedlings, true leaves are a useful sign that they are large enough to handle, but there is no universal leaf count. Follow crop-specific guidance and check that you can lift each plant without gripping or crushing its stem.
What should you do if the roots are tangled?
Moisten dry compost, lift the group from underneath and tease the roots apart gently. Avoid pulling the stems in opposite directions. If the roots will not separate without force, do not wrench them apart; follow the crop’s advice on whether it can be grown in a small group.
Should each seedling go into its own pot?
Usually, seedlings intended to grow as individual plants go into separate cells or pots. Some crops are grown in clumps or groups, so check the planting method you plan to use before separating every seedling.
Should you water before or after pricking out?
If the seed tray is dry, water it lightly beforehand so the compost holds together as you lift it. After planting, water gently to settle the compost around the roots, then let excess drain rather than leaving the pots standing in water.
How soon can seedlings return to full greenhouse light?
There is no fixed recovery period. Keep newly moved plants in bright conditions suited to the crop, but protect them briefly from harsh direct sun or drying airflow if they are wilting. Check actual light, temperature and compost moisture rather than relying on the greenhouse alone.
Judge each batch by its leaves, roots, spacing and crop needs together. When those signs line up, prepared pots and careful handling matter more than speed; when they do not, waiting can be the right choice. Keep newly moved seedlings labelled and give them a suitable place to recover. Successful pricking out separates plants with as little root disturbance as possible, giving each seedling room to develop before its next move.
