
Root Barriers Between Greenhouse Beds and Established Planting
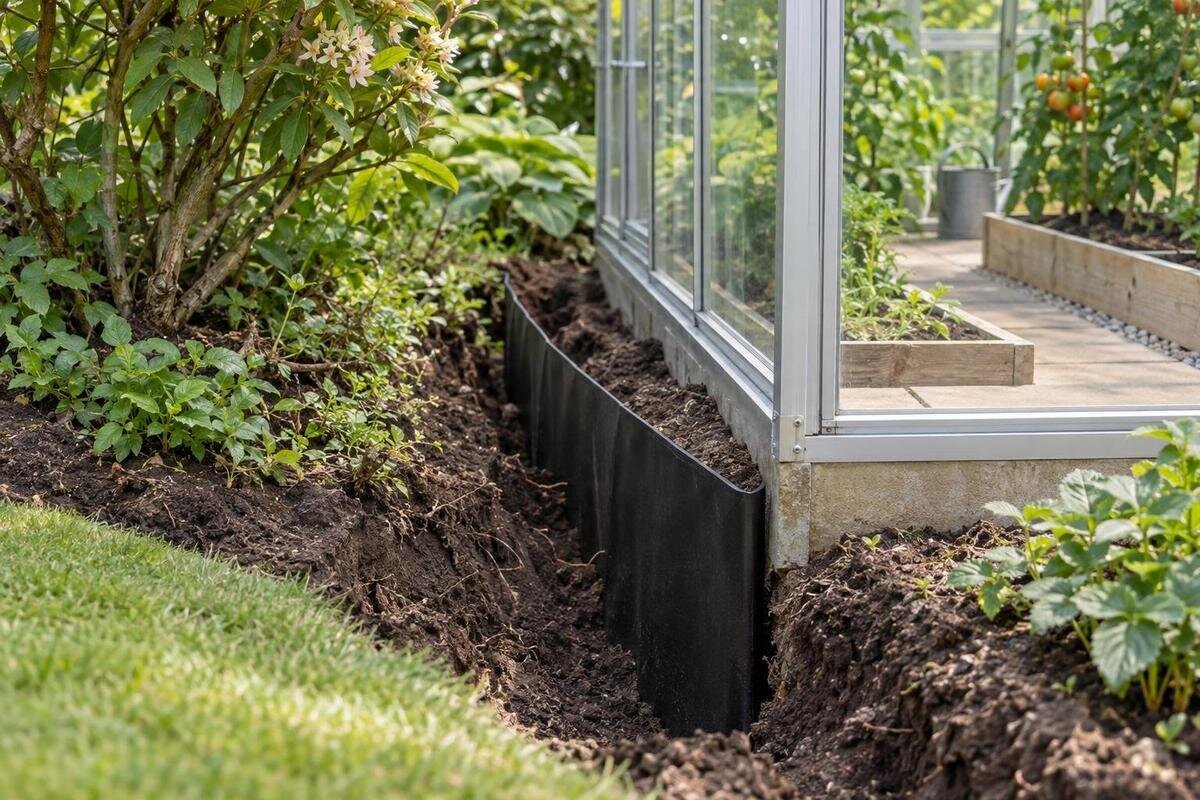
GREENHOUSE BED PLANNING
Roots from nearby trees, shrubs or hedging can enter greenhouse beds, but poor growth or a dry patch does not prove that they have. First establish where roots are coming from and whether a proposed barrier route would disturb important roots. Ordinary edging may hold growing medium without stopping roots, while an unplanned trench can create a greater problem than the intrusion. This guide explains how to investigate, compare less disruptive options and check what a suitable boundary requires before any excavation.

01
Confirm that roots are entering from outside the bed
A bed that contains roots is not, by itself, evidence of intrusion from a tree or shrub. They may belong to last season’s crops, weeds or volunteer seedlings, and fine roots can look similar once mixed through soil. Look for a pattern rather than a single strand: roots repeatedly appearing from the same edge, continuing into the bed beyond crop roots, or forming a mat that seems to run in from adjoining ground. Note the position and direction before clearing anything. A dry patch, weak growth or plants wilting sooner than others can prompt an investigation, but none of those signs identifies the cause; watering, light, pests, disease and soil conditions can produce similar effects.
Check when the bed is clear of crops if possible. Photograph the surface, note which side faces the established planting, and compare the affected strip with a section farther away. If you need to expose roots for a closer look, disturb only a small amount of growing medium inside the bed with a hand tool; do not extend a test trench into adjoining soil. Stop if you meet a substantial or woody root rather than cutting it to see where it goes. Mark the greenhouse edge, bed boundaries and nearest tree or shrub on a sketch, and record what you observed separately from what you assume. Repeating the observation later in the growing cycle can help distinguish persistent intrusion from old crop roots or a one-off patch.
Map the planting around the greenhouse
Map every plausible source, not just the nearest tree. Draw trunks, hedges, shrubs and other established planting around the greenhouse, then mark the affected bed edge and any other areas where roots appear. Roots can extend beyond the visible canopy, and their spread depends on the plant and site; the canopy line is not a reliable underground boundary. Distance from a trunk alone cannot confirm or rule out intrusion. A mixed hedge or a row of trees may put more than one root system near a bed. Mark paths and paved areas too, but do not assume that a surface stops roots from growing beneath it.
Add known watering points, drainage routes, the greenhouse base and bed boundaries to the sketch. Note whether root growth seems denser towards one edge and whether that area differs in moisture, but treat these details as clues rather than proof of origin. A root’s colour, thickness or texture is not a dependable way to identify a species or judge its role. Do not pull or sever a strand to follow it back. If knowing which plant a root belongs to will determine whether you excavate, ask an arborist to inspect the site. The map is there to guide that assessment and compare options, not to expose an entire root system.
02
Measure the greenhouse and bed layout
Treat the greenhouse, its base, the growing beds and the paths as separate lines on a plan. Measure the outside footprint and mark doors, working space, bed edges and any known drainage or services. Do not plan from growing area alone: a barrier needs a route, and that route may use soil that currently looks spare. If the greenhouse is not yet installed, draw its proposed position beside the planting and identify where excavation for the base, beds or boundary may be needed. A structure fitting on the ground does not make the position suitable; light, access, drainage and the route of any bed boundary matter as well. Include room to reach the ends of the barrier for later inspection.
If you are considering a different greenhouse, compare its actual dimensions with the sketch rather than choosing by floor area alone. The Limited Edition Aluminium Greenhouses listing gives a stated area range from 3.77 m² to 28.08 m²; that range does not show the length, width or room left for beds. Check the plan for the exact size under consideration and mark the space the bed and barrier would occupy. For an existing structure, use measured dimensions rather than a catalogue area. A small change in bed position can affect whether an excavation line crosses roots, so plan that change before work begins.
Protect structural roots before excavation
Roots do not all have the same significance. Fine feeder roots take up water and nutrients; larger woody roots can be important to a tree’s support and health. Their role cannot be judged safely from a universal diameter rule or from one exposed section. Root arrangements vary with the plant and the conditions in the soil. The root flare and ground close to a mature trunk deserve particular caution, but apparent distance from the trunk is not a guarantee that excavation is harmless. A root that crosses the proposed barrier line is a reason to review the plan, not an invitation to cut it to keep the line straight.
Before trenching, cutting or substantial soil removal beside established planting, have a qualified arborist assess the proposed route if roots may be involved. Share the sketch, the type and age of the planting if known, and the intended greenhouse and bed positions. Ask whether the barrier line can move, whether the bed should be repositioned, or whether a separate growing arrangement would avoid excavation. Include any alternative greenhouse position in that assessment. For example, the T-Shaped Orangery Greenhouse is listed in areas from 16.52 m² to 30 m². Its proposed footprint belongs on the site sketch alongside the excavation route: choosing a different shape does not establish that the work will avoid important roots.

03
Consider bed changes before adding a barrier
A physical barrier is only one way to manage confirmed intrusion. Consider whether the bed can move farther from the established planting, whether the greenhouse can be placed differently, or whether the affected crops can be grown in separate containers. These options can avoid cutting through roots, although moving a greenhouse may involve separate site and base decisions. Raising a bed by itself is not a dependable root barrier if its underside remains open. A closed-bottom container changes drainage and the space available for roots, so it needs to suit the crops rather than being treated as a straightforward replacement for an in-ground bed.
A barrier may be worth considering when the intrusion is confirmed, the bed position is important and a suitable boundary can be installed without unacceptable damage to established planting. It can limit roots entering through the section it protects, but it will not remove roots from surrounding soil or prevent every route if they can pass around an end or below it. Compare that option with a revised bed arrangement before committing to either. If the comparison includes the Pyramid Greenhouse, listed in areas from 5.53 m² to 18.9 m², draw the intended beds or containers within the selected footprint. This lets you compare the growing arrangements themselves, rather than treating a change of greenhouse as the solution to root intrusion.
Choose a root-resistant boundary material
A raised-bed side, paving edge or ordinary divider can keep growing mix in place without preventing roots from passing underneath or through joins. Do not assume that a product described as a liner, membrane or landscape fabric will resist roots. Ask the manufacturer for information confirming that the specific product is intended for underground root control, and check its stated conditions of use and instructions for joining sections. Confirm its suitability for edible crops with the supplier; appearance or a general label such as heavy-duty is not enough to establish that.
Check how the chosen material is intended to meet corners and connect to the bed edge, and whether the manufacturer specifies a depth or orientation. Do not copy an installation detail from a different product or assume a strip at the bed edge creates a continuous boundary. Requirements vary by product and site, so there is no single thickness or depth that suits every root and bed. Consider where the boundary meets the greenhouse base and how water will drain, asking a competent professional about any concern. With the Limited-Edition Aluminium Greenhouses with Storage, listed in areas from 5.52 m² to 28.08 m², distinguish the storage section from the growing beds on the plan. The total area alone does not show those internal boundaries or where the root-resistant material would need to run.
04
Plan for ends, joins and routes around the barrier
Draw the proposed boundary around the part of the bed that needs protection, not just across the spot where a root first appeared. Mark each corner, end and join to an existing edge. Roots may find an open end or pass below a boundary that is too shallow for the site, so protection depends on a continuous route and an appropriate product arrangement. Do not decide on a depth by guesswork. Root routes vary, and the material manufacturer’s instructions may set conditions for how the barrier is positioned and joined. Ask an arborist or competent installer to resolve any conflict between that route and important roots.
Check for possible routes under paths, around the greenhouse base or through gaps between beds. A barrier can redirect root growth rather than remove it, so consider where roots might go if one route is blocked; avoid shifting the problem into another bed or towards vulnerable planting. On the layout for a Bloomcabin Prestige Greenhouse, listed in areas from 3.77 m² to 28.08 m², mark each barrier end separately from the bed corners. That distinction makes it easier to spot an unprotected route around an end or a gap where two boundaries meet. Resolve these details before ordering material, rather than relying on the greenhouse's total area to estimate the boundary.
Protect roots and the greenhouse base during installation
Installing a buried barrier usually means disturbing soil, so a sound plan can still become harmful if the work follows the wrong route. Before work begins, agree the intended line, the product instructions and the points at which work should stop. Identify the greenhouse base, known drainage and any existing services with the appropriate professional. Do not assume a barrier can be excavated beside a greenhouse base without checking the site, or allow work to undermine it. If the proposed route runs close to established planting, use an arborist’s assessment rather than relying on a general distance from the trunk.
Stop if a substantial woody root appears, the root flare is close or the soil differs from what was expected. Do not cut, notch or cover an exposed root just to keep the planned line; ask the arborist and installer to revise it. A poorly placed boundary can also interrupt or redirect local water movement, so consider drainage before fixing the layout. For a larger project such as the Spacious Greenhouse, listed in areas from 47 m² to 70 m², keep the excavation for the base distinct from the work on the beds and barrier. The area range does not describe ground conditions or base requirements. The installation plan needs to account for each part of the work, including where an unexpected root would require it to stop.

05
Check for recurrence without repeated digging
After a barrier is installed, monitor it rather than assuming it has solved the problem. During normal bed maintenance, inspect accessible ends, joins, the bed edge and nearby soil surface for new roots. Note the date and take photographs so you can compare locations over time. A root appearing near the boundary does not prove that the barrier failed where it was placed: it may be a crop root, a weed or growth that has come around the end. Avoid routine digging just to check underground conditions, especially beside established planting.
Keep moisture and plant growth as separate observations, not as a diagnosis of root intrusion. If roots reappear at an apparent join, exposed edge or beyond an end, review the product guidance and ask a suitable professional to assess the route before considering repair. Repeated excavation can create more disturbance than adjusting the bed plan. Keep a record of which boundary detail was used and where the new roots appeared, so any revision addresses the observed problem. If you are already comparing the Aluminium Greenhouses, listed in areas from 3.77 m² to 28.08 m², use that record when considering the bed arrangement. A replacement structure alone would leave the underlying question of root access unresolved.
Compare the complete bed and barrier arrangements
Before ordering materials or committing to a greenhouse position, compare the workable arrangements on one measured plan. Include the confirmed root source, bed dimensions, proposed barrier route, access, greenhouse base and established planting, and mark any details that remain uncertain. For each option, distinguish the space available for crops from the space occupied by doors, paths and access to the barrier ends. This gives a more useful comparison than greenhouse floor area alone. A layout that preserves more bed space may still require a disruptive excavation route; another may reduce the growing area but avoid that work. Consider those trade-offs together rather than selecting the structure first and fitting the boundary around it afterwards.
Choose the least disruptive workable arrangement, whether that retains the existing bed, moves it or changes the greenhouse position. For the Lean-to Greenhouses, listed in areas from 3.69 m² to 14.34 m², include the proposed wall position in the comparison rather than assuming the model name establishes suitability for a particular site. Use the exact model drawing and siting information to see how the beds, working space and boundary would fit together. Keep any unresolved root conflict visible on the plan instead of drawing a barrier straight through it. The preferred arrangement should provide usable growing space and an accessible boundary without treating established planting as something to cut through.
Frequently asked questions
How can I tell whether roots came from a nearby tree?
Appearance alone rarely identifies a root’s source. Look for repeated entry from the same bed edge, compare it with old crop roots and weeds, and map nearby planting. If the source matters to an excavation decision, ask an arborist to assess it rather than pulling or cutting the root.
Does ordinary raised-bed edging keep tree roots out?
Not necessarily. Edging can hold growing medium in place without blocking roots underneath or at joins. Check the manufacturer’s information to confirm that the particular material is intended for underground root control and is suitable for the way you plan to use it.
Can I cut a root that has reached a greenhouse bed?
Do not cut it just to remove it from the bed. Its importance cannot be judged reliably from appearance or a simple size rule. If excavation or cutting may affect established planting, stop and ask a qualified arborist to assess the route and possible alternatives.
How deep should a greenhouse root barrier be?
There is no single depth that suits every root, site and barrier. Rooting patterns and product requirements vary. Use the chosen manufacturer’s instructions and get professional advice where established planting may be affected; do not dig to an assumed depth beside a tree.
Will a root barrier stop every root?
No barrier should be treated as a guarantee against all root growth. Roots may pass around an end, through a gap or below the boundary, depending on the installation and site. Plan for a continuous route, then monitor accessible edges and joins for signs of recurrence.
A root barrier is only part of the decision: diagnosis, material, route and the surrounding planting all matter. If an established tree or shrub’s important roots lie in the proposed excavation line, do not cut them to preserve a bed layout. A measured plan, clear product information and an arborist’s assessment can help you choose a less disruptive option, whether that means moving a bed, changing the greenhouse position or using another growing arrangement. Monitor the accessible boundary after installation rather than assuming it will block every route.
