
Why Greenhouse Seedlings Collapse: Damping Off
GREENHOUSE GROWING GUIDE
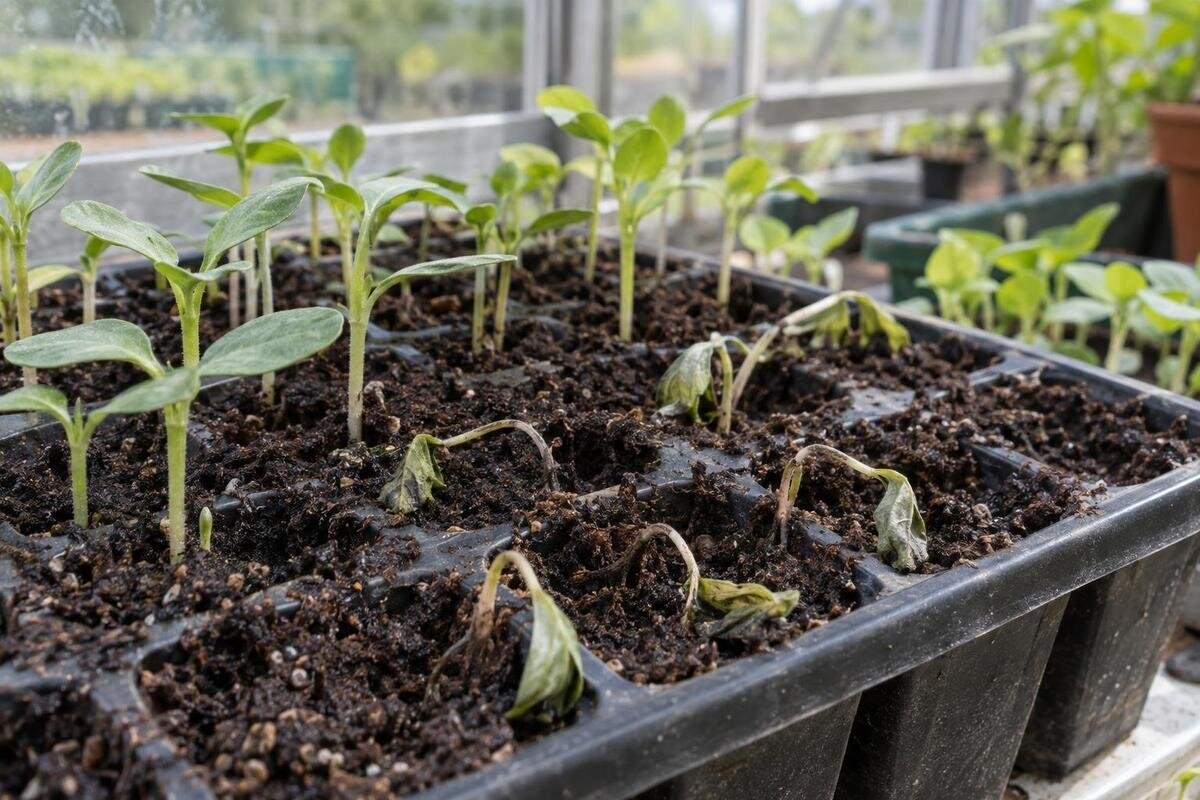
Seedlings collapsing at compost level can be a sign of damping-off, a group of diseases caused by soil-borne organisms. A soft, dark or narrowed stem where it meets the compost is a warning sign, and young plants may also fail before emerging. But a fallen seedling alone is not a diagnosis. Overwatering, poor drainage, physical damage, pests and temperature stress can look similar. Compare several symptoms and conditions, act promptly on a suspect tray, and seek expert confirmation if losses recur or the cause remains unclear.

Planning propagation space 1
What damping-off looks like
Damping-off can affect seeds before they emerge as well as very young seedlings. Before emergence, seeds or newly germinated plants may decay in the compost, leaving gaps where germination was expected. After emergence, a seedling may lose firmness at the base of its stem. The tissue can look water-soaked, darkened or pinched at the compost line; the top may then wilt and fold over. Roots may be brown or soft rather than pale and firm. Affected plants may appear singly or in small patches, and more seedlings can become involved over time.
Check the stem where it meets the compost, not just the leaves. A narrow, softened section at that point is a characteristic warning sign, and several nearby seedlings collapsing over a short period makes an infectious problem more plausible. These signs do not identify a particular organism: different pathogens can cause similar damage, and symptoms vary with crop and seedling age. Photograph the whole tray and a close view of affected stems before clearing them. Include a healthy-looking seedling for comparison, and note whether the compost is wet at the surface or below it; visible symptoms are only part of the evidence.
Why a seedling can collapse for other reasons
A seedling can wilt and fall when its roots cannot take up water, even when disease is not the cause. A dry root ball, waterlogged compost with poor drainage, heat stress, a sudden cold spell or damage during handling can all leave young growth limp. Low light can make a stem elongated and weak, but a long, intact stem leaning over differs from a soft, constricted lesion at compost level. A pest that has chewed through the base may leave a cut or signs of feeding. Check the plant and its recent conditions, not just the fact that it has fallen.
Compare affected and unaffected seedlings. Are the roots damaged? Is the compost very dry, saturated or sitting in water? Are stems snapped or chewed, or do they narrow and darken at the base? Did seedlings in one part of the greenhouse suffer after a change in conditions while others remained healthy? A plant's response to careful watering can be a clue, but not a diagnosis. Root rots and other seedling disorders overlap in appearance, so avoid naming a pathogen from a photograph or applying a guessed remedy.
Planning propagation space 2
Patterns of collapse across trays
Record when each seedling collapsed, when the seeds were sown and which batch they belonged to. Note the tray, cell or row, crop, compost bag, watering session and greenhouse position. A failure confined to one tray may direct attention to its medium, container or handling history; losses across several trays watered together may suggest a shared route. Spread from cell to cell can be consistent with an infectious problem, but patterns are clues rather than proof. Include when the first signs appeared, not only the date you noticed the tray had gaps.
Keep a simple sketch of trays and nearby work areas, using labels that match your sowing records. Mark affected cells and add dates so that you can distinguish new losses from gaps already recorded. Include healthy batches in the sketch: their position and handling history provide a useful comparison. When planning a propagation area, you can use the Bloomcabin Prestige Greenhouse listing, with sizes from 3.77 to 28.08 m², as a starting point for comparing floor areas. Draw benches, tray positions and access separately; overall area does not tell you how many trays fit comfortably. Keep the sketch usable once sowing begins, with enough detail to identify each batch without making it difficult to update. The aim is to see where and when collapse occurs, rather than to produce an elaborate greenhouse plan.
Check moisture, drainage and greenhouse conditions
Check the compost as well as the air. Persistently wet, compacted medium, blocked drainage or trays left in standing water can stress roots and favour problems in the root zone. Dense sowing and crowded foliage make seedlings harder to inspect and can leave the air around them still. High humidity or condensation alone does not confirm damping-off, just as a dry-looking greenhouse does not prove the compost is healthy. The surface can dry while the compost below remains wet, so check beneath the top layer gently.
Review what changed in the days before the collapse: watering, a cover or propagator, ventilation, weather and tray position. Note which vents or doors were used and whether watering was shared across batches. Record what you actually observed, such as water remaining beneath a tray or condensation under a cover, rather than describing everything simply as damp. Ventilate when conditions call for it, but avoid a cold draught that stresses young plants; do not dry seedlings by neglecting their water needs. If you are comparing larger growing spaces, the Spacious Greenhouse is listed from 47 to 70 m². Consider where trays would sit and how you would check their compost and drainage during routine watering. More floor space does not itself provide ventilation or prevent wet compost, so keep those questions separate when comparing layouts.

Planning propagation space 3
What to do with an affected tray
Move a suspect tray away from healthy batches if you can do so without spilling compost or brushing wet plants against other seedlings. Photograph it first, label the crop and sowing date, then lift collapsed plants and obvious debris carefully. Do not pour its drainage water into another tray or share a water bath between affected and clean batches. Check neighbouring trays, especially those that shared compost, a watering session or tools, but do not assume every nearby plant is infected. Keep healthy-looking plants under observation; widespread collapse calls for extra care when handling the remaining seedlings.
Dispose of affected plants and suspect compost without reusing it for seed sowing or spreading it around the propagation area; follow local garden-waste guidance. Decide where the material will go before lifting the plants, so that you do not carry loose compost past clean trays or leave it on the bench. Wash your hands and clean the surface after handling. If you are reviewing space for separate batches, the Aluminium Classic Greenhouse is listed across 3.77–28.08 m². Mark a place for suspect trays on your proposed layout, along with a route for removing them. In an existing greenhouse, use an available clear spot away from clean trays and label the batch clearly. Keep its watering and handling separate while you watch for further collapse.
Clean reusable trays and tools thoroughly
Reusable trays and tools can carry contaminated compost into the next sowing if soil remains in corners, joints or cell bases. Empty them, brush off debris and wash with detergent and water, then rinse and allow them to dry before reuse. Clean benches, labels, watering-can spouts and the outside of covers if they contacted dirty material. Cleaning removes organic matter; a suitable garden disinfectant may also be useful on washable items, but follow its label and do not mix cleaning products. A tray with compost still stuck to it is not ready to use just because it has been treated.
Keep clean equipment apart from used trays, and do not return leftover compost from a suspect sowing to the bag. Organise cleaning in a clear sequence: put used items in one place, remove compost, wash and rinse them, then leave them to dry away from dirty equipment. Include somewhere to put cleaned labels and tools so that they do not end up back on the unwashed bench. If washing or storage is awkward, review this routine before buying more trays or increasing the number of sowings. The Lean-to Greenhouses listing spans 3.69–14.34 m²; compare the available area with your bench, cleaning and access plan. The listing does not specify a washing station or separate clean and used zones. Leave room to handle trays without dragging them across a soiled surface.
Planning propagation space 4
Review compost, sowing density and watering
Use fresh seed compost suited to the crop and keep it covered and dry in storage; avoid garden soil or old compost from a previous sowing for seed trays. Fresh compost is not necessarily sterile, but reusing material from a failed tray adds avoidable uncertainty. Clean hands and tools before sowing, and use containers that drain freely. Sow at the spacing advised for the crop instead of packing extra seeds into each cell. A thick canopy is harder to ventilate and makes early stem damage difficult to spot; thin seedlings only when they are suitable to handle.
Water according to the medium's condition and the crop's needs, not by a fixed calendar. Keep the compost evenly moist rather than saturated, empty excess water from trays and avoid splashing compost between pots. Watering from below can reduce splashing, but shared standing water can also link containers, so do not leave trays soaking together. Make sure you can reach each batch to check its compost before watering; a tray hidden behind others should not receive water simply because the front row needs it. When comparing the Limited Edition Aluminium Greenhouses range, listed from 3.77 to 28.08 m², use a measured tray-and-walkway plan to assess working space. Include the room needed to lift a tray and empty excess water without having to move several neighbouring batches first.
Make propagation batches easy to inspect
A propagation bench is easier to manage when batches have clear labels and room for inspection. Keep new sowings, established seedlings and any suspect tray identifiable, and avoid stacking trays where water can drip from one into another. Grouping by sowing date and crop makes patterns easier to spot and helps you water according to need. A clear route for carrying trays and cleaning tools reduces accidental contact with affected compost. Leave access around the trays and keep vents or doors clear in line with the greenhouse layout; air movement alone cannot compensate for overcrowding or wet compost.
Before adding more sowings, measure tray footprints, bench depth, the space needed to reach the back row and the route for moving trays. Try the arrangement with your actual containers before filling every available position. Check whether you can read labels, see stems at compost level and lift a tray without brushing the seedlings beside it. The T-Shaped Orangery Greenhouse is listed from 16.52 to 30 m², but its name and headline area do not establish a suitable bench arrangement. Sketch the clean-sowing area, growing trays and a place to set aside anything suspect. Identify which trays would need moving during an inspection and revise awkward positions. A workable layout makes observation and cleaning simpler, though it cannot guarantee against disease.

Planning propagation space 5
When to ask for a specialist diagnosis
Ask for specialist help if losses keep returning despite clean containers and sensible watering, if many batches are affected, or if the stem and root signs do not match an obvious environmental problem. A horticultural adviser or plant-disease diagnostic service can help distinguish damping-off from other root or stem disorders; different causes may call for different responses. Do not rely on a treatment chosen from a symptom photograph. When a diagnosis could change how you manage valuable or unusual plants, confirmation is more useful than repeating a guessed remedy.
Before seeking help, record the crop and variety, sowing date, compost type or batch, watering and ventilation changes, when collapse began and how it spread. Distinguish observations from assumptions: describe a softened stem or wet compost rather than recording damping-off as an established diagnosis. Take photographs of the whole tray and close views of stems at compost level and roots, if they can be lifted without losing useful evidence. Keep the photographs linked to the correct batch and date. Contact the service before sending live plants or compost, as sample requirements vary. If you are also considering the Pyramid Greenhouse, listed from 5.53 to 18.9 m², treat that as a separate space-planning decision. A different growing space is not a substitute for identifying why the current seedlings are collapsing.
Reduce risk in the next sowing
For the next batch, use a clean container and fresh suitable compost, label the sowing, avoid overcrowding, check drainage and water only as needed. Inspect newly emerged seedlings at the compost line and note unusual wilting or collapse early. After germination, manage covers and ventilation according to crop guidance rather than leaving a humid cover in place automatically. If one batch develops a problem, keep it apart and trace shared compost, water, tools and handling before deciding what to change. Where practical, adjust one or two controllable factors at a time so you can tell what helped.
If you are planning a new or revised growing space, decide how clean containers, unopened compost, used trays and watering equipment will be kept and moved. List what you need to store, including the containers used during the busiest sowing period, rather than judging storage by appearance alone. The Limited-Edition Aluminium Greenhouses with Storage range is listed from 5.52 to 28.08 m²; check the layout and storage details against your equipment rather than inferring capacity from the name. Give clean supplies a defined place and keep used items separate until they have been cleaned. Retain the labels and notes from each sowing so that a recurrence can be compared with earlier losses. A tidy, traceable routine helps you notice problems early and limits avoidable transfer, though it cannot rule out every pathogen.
Frequently asked questions
How can I tell whether damping-off is likely?
A soft, dark or pinched stem at compost level, followed by collapse, is a warning sign. Rotting roots or several affected seedlings in a tray add to the concern. These clues do not confirm the cause, so also check moisture, drainage, pests and damage.
Is damping-off caused only by overwatering?
No. Persistently wet compost and poor drainage can favour problems around roots, but wet compost alone does not prove damping-off. Soil-borne organisms, crowded sowing and handling or hygiene can also be relevant. Check the whole pattern rather than blaming one watering session.
Should I discard a whole seed tray?
Not automatically. Remove collapsed seedlings and keep healthy-looking plants under observation, while separating the suspect tray from other batches. If collapse is widespread, avoid spreading its compost through the growing area and seek advice about whether anything can be salvaged.
Can I reuse the compost and containers?
Do not reuse compost from a suspect tray for sowing. Reusable containers can be washed after all compost and debris have been removed, then rinsed and dried. Clean tools and surfaces that touched the affected material before using them for another batch.
When is specialist diagnosis worthwhile?
Ask for help when losses recur, affect several batches, spread quickly or have signs that do not match an obvious watering or handling problem. Take clear photographs and note the crop, sowing date and conditions. Contact the service before sending a plant or compost sample.
Treat a damaged stem at compost level as a reason to investigate, then weigh it against the roots, tray pattern, compost moisture and recent conditions. Prompt isolation and careful cleaning limit avoidable spread, while records and specialist advice can help resolve recurring or ambiguous cases. Each new sowing is an opportunity to improve the parts of the routine you can control: clean containers, fresh compost, sensible spacing and good drainage. Not every fallen seedling has the same cause.
