
Straight-Sided or Curved-Wall Greenhouse: Comparing Usable Space
Greenhouse space guide
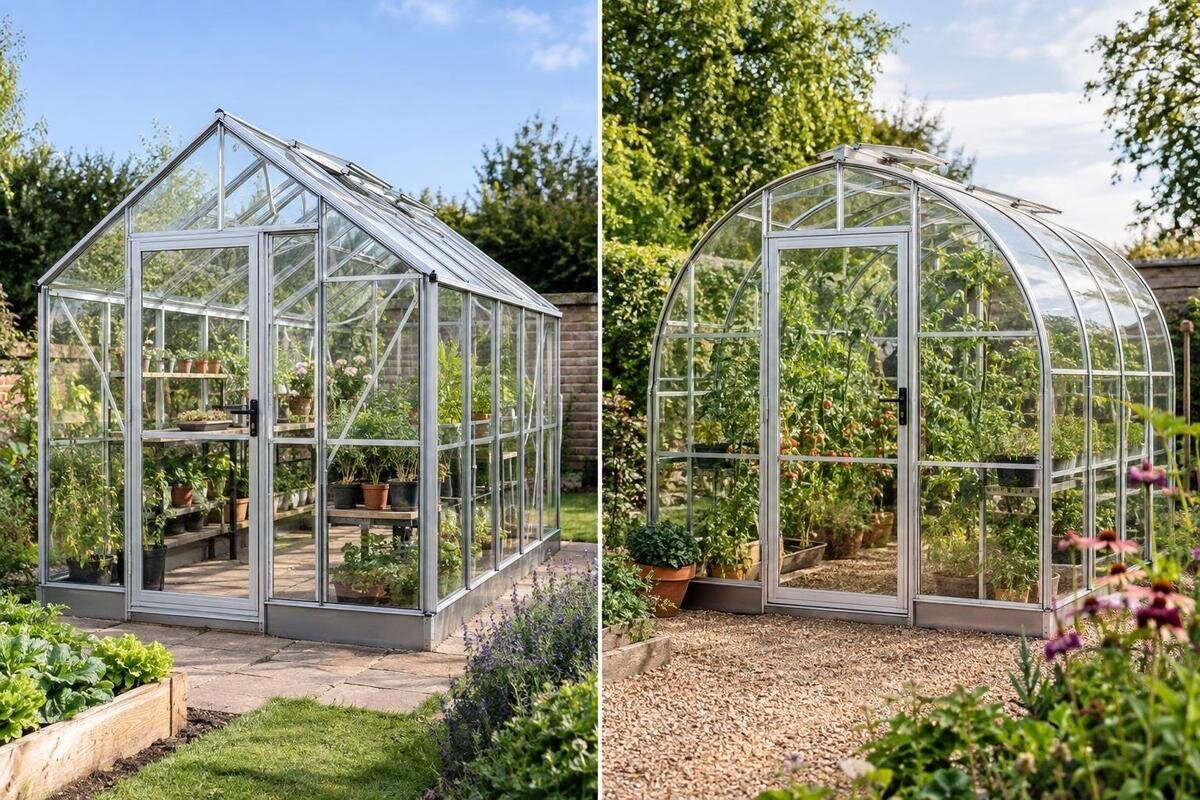
Two greenhouses with similar floor areas can offer quite different places for benches, shelves and plants. The difference often appears at the perimeter: a vertical lower wall maintains the same clearance up to the start of the roof, while a wall that curves inward may bring the roof profile down over a bench or crop. Neither shape wins by default. The exact cross-section, internal width, eaves height and point where the profile changes determine what fits. Compare dimensioned drawings and map those heights to your intended layout, rather than judging from floor area or an exterior photograph alone.

Floor area does not show usable height
Floor area tells you how much ground the greenhouse covers, but not how much of it works for a particular task. A low strip beside a wall may suit pots or trays at floor level yet lack the clearance for a bench and its contents, an upper shelf or a tall plant. On the other hand, that strip may matter little if you plan to grow in beds and keep the perimeter clear. Define usable space in terms of your routine—standing, reaching, propagating, storing or growing—before comparing shapes. The right test is whether the task fits without furniture, foliage or the wall profile crowding it, not simply how much ground is covered. Two areas shown in square metres can look alike on paper while supporting quite different layouts.
Separate the floor plan from the vertical section. The plan shows length, width, door position and the intended aisle; the cross-section shows how height changes from side to side. Placing a bench, shelf or crop outline on both views is more informative than comparing area alone. The Aluminium Classic Greenhouse is one option to include in that comparison, using the dimensions for the precise size and configuration you are considering. A drawing for one size or option may not represent another. A bench only counts as workable if you can reach its contents and keep the aisle beside it clear.
What a greenhouse cross-section should show
A cross-section is a vertical slice through the width, not an exterior photograph. It should show the profile from one side of the base to the other, including the side-wall height, where the roof line changes, the ridge and the clear internal width. Check whether dimensions are internal or external: measurements to the outside of a frame do not necessarily describe the space available inside it. Read the drawing’s scale and dimension lines rather than estimating the curve by eye. A photograph is useful for appearance, but perspective can make a wall look steeper or flatter than its measured profile. Look for a drawing of the model and size you intend to compare.
For a candidate such as the Prestige greenhouse with metal base, check that any drawing you use refers to the exact size and configuration under consideration. Record the internal width, height at the perimeter and distance from the wall to points where the profile reaches relevant heights; note eaves and ridge height separately. If a section is not available, ask for one rather than using a similar-looking model as a proxy. The drawing need not be complex: it must make the dimensions and inside profile clear enough to test a bench, shelf or plant position. Keep the figures beside the product details so you can compare candidates using the same measurements.
How straight sides affect perimeter space
With a straight-sided section, the lower wall stays vertical for a defined height before the roof slopes or turns. That can create a predictable band beside the wall: a bench or shelf can be assessed against the same wall height along a run, rather than against a profile that moves inward at once. If the clear side height suits your furniture, it may be simpler to plan continuous perimeter work surfaces. The height that matters is the space inside the structure, however, not the overall building height. A high ridge does not replace a suitable side wall when the work happens at the edge, and the roof may still slope over the space farther in.
Nor does a vertical wall make every part of its edge usable. A base, frame members, vents, door openings and the depth of a bench can interrupt the run, and the clear wall height may be lower than the overall roof height suggests. Do not assume that glazing or a frame is an approved fixing point for shelves; check the manufacturer’s specified supports and instructions. If the Limited-Edition greenhouse with built-in storage is on your shortlist, distinguish the storage area from the growing area when marking out the layout. Measure each separately, then check how much uninterrupted wall space remains for the benches or plants you intend to place there.
Where a curved wall reduces clearance
When a wall profile curves inward from close to the floor, clearance changes as you move towards the centre. The floor may remain accessible at ground level, while the space directly above it is too low for a bench and its contents, a shelf or a plant canopy. A narrow pot or tray might fit there even when a deep bench does not; the bench’s inner edge may reach taller space while its outer edge sits under the curve. If the curve begins above a vertical lower wall, a useful bench-height strip may remain. Curved walls are not all the same: the position and shape of the curve determine where useful height begins.
Use the cross-section to find how far in from the wall you need to move before the required height is available. Plot the bench depth, pot and plant together, then compare their full outline with the profile at that position; do the same on the other side if the section is not symmetrical. The same method applies when comparing a different roof shape, such as the Oasis Pyramid Greenhouse. Keep it distinct from a curved-wall design and judge its own drawn profile against the height and depth you need. This lets you compare the space available at the edge without treating different shapes as interchangeable.

Check shelf height and depth against the profile
Shelving converts wall height into growing or storage levels, but each shelf occupies both vertical and horizontal space. Set out the proposed shelf height and depth on the section, including the pots sitting on it, and see whether the roof or curved wall cuts across the usable area. A shelf may fit at the wall yet project into the route or shade a bench below; a second level needs room for the plants and for your hand to reach them. Compare a shelf line with the full bench arrangement, rather than deciding from a blank cross-section. Also check the gap between levels if you intend to lift trays or pots in and out.
Check the shelf system’s intended support points and the greenhouse maker’s guidance before planning a wall-mounted run; the cross-section shows clearance, not whether the structure can support a shelf. When considering a Limited Edition Aluminium Greenhouse, compare its exact profile with the dimensions of the shelving you already own or expect to use. Freestanding benches or racks can avoid dependence on the wall, but still reduce aisle width and may sit partly beneath a slope. Measure their working height, depth and contents, not just the frame, and check that you can reach the items without blocking another part of the layout.
Place plants by mature height and spread
Plant placement calls for height above the pot or bed, not just headroom at the ridge. Use the expected mature height and spread of each crop, including its container and any support or tie, then check the section at the location where it will grow. A tall plant beside an inward-curving wall may meet the slope even though its pot fits comfortably on the floor. The same plant could sit nearer the centre if the aisle and other plants allow it. Shorter crops, trays or compact containers may make better use of low perimeter zones, provided you can reach them without leaning across a bench.
Plan for the plant’s full growing space, not its size when first planted. Leaves, stems and supports can extend beyond the pot and occupy the height that a shelf or a person needs; an upright line on the drawing is only a starting point. If you intend to change crops or move containers seasonally, mark more than one possible position and see which arrangement preserves a clear route. For the T-Shaped Orangery Greenhouse, plot those positions on the exact plan and check the relevant cross-section at each location. Include any bench or storage unit in the same layout so that its space is not also allocated to a growing plant.
Keep the aisle and entrance in the comparison
Headroom at the centre is only one part of working space. On the floor plan, mark the door, the full route to each bed and bench, and the space occupied by anything you carry or set down. Bench depth on both sides can leave less aisle than the external width suggests. Think through ordinary tasks: bringing in a tray, turning with a watering can, kneeling at a bed or reaching a plant without blocking the entrance. These checks are personal, so use the equipment you actually handle. A nominal aisle width or a generous ridge height cannot guarantee that the layout will feel workable for your usual tasks.
Read the plan with the side section and any door detail; a section alone cannot show where you enter or how the route bends. When considering an Aluminium Lean-to Greenhouse, check the entrance position and opening dimensions for your chosen configuration, then make sure shelves, bench ends and plants do not obstruct the approach. If the layout works only with a route too narrow for a task you do often, revise the furniture position or choose a different internal arrangement before judging the greenhouse by its floor area. Check the door in its open position as well as the clear space through the entrance.
Compare like with like
For a fair shape comparison, hold the footprint as close as practical and compare the same definition of width and length. An external base measurement and a clear internal width are not interchangeable; check what each drawing measures. Two models with similar floor area may have different proportions, and a long, narrow layout does not work like a wider one even if the totals match. If you cannot compare identical dimensions, write down the differences instead of attributing every change in usable space to the wall profile. This keeps the question clear: what does the profile change in the layout you need?
Use the same check sheet for each candidate: clear internal width, vertical wall height, profile at the planned shelf or bench edge, ridge height, door position and aisle width. Compare dimensions for the exact size you would buy, not a general photograph or the largest size in a range. Include the Bloomcabin Orangerie on that sheet if it is among your options, recording any differences in size before comparing wall profiles. Note which edges meet your requirements, then compare the remaining clear floor area and access. Total area is useful context, but it cannot show whether a particular bench or plant fits.

Map the intended layout on plan and section
Turn the plan into a simple layout before buying. Draw the internal footprint to scale if dimensions are available, or mark the measured outline on the ground with tape. Add the door opening, bench and shelf depths, pot or bed edges, and the route between them. Cardboard outlines can make bulky benches easier to visualise. Keep the scale honest: a sketch that is too small may make an aisle or turning space appear more generous than it is. This exercise does not replace a manufacturer’s drawing; it helps you see which measurements matter and where a small loss of width would affect your routine.
Then transfer the planned furniture and plants to the cross-section. At several positions from each side wall, note the clear height and check it against the top of the shelf, mature canopy or person working there. You do not need a complicated calculation; a marked profile and a few measured heights can reveal whether a curved section intrudes on the intended use. Save the drawing with the selected model, size and options, and ask for clarification if a key dimension is missing. Avoid scaling an online photograph, because it may not be a technical drawing or show the exact configuration. Check the shelf, bench and headroom lines separately.
Choose the shape around your fixed features
The best fit depends on what must stay in place. If you want a long, fixed bench or shelves at a consistent height along the perimeter, a section with a sufficiently tall vertical wall may make that line easier to plan. If your main use is beds, low trays or moveable pots, some curved profiles can still use the edge effectively, even where a tall shelf would not fit. For tall crops, compare the canopy zone with the full profile rather than assuming that the highest point is the relevant one. Check both sides if your layout uses them differently, and treat each option as a floor plan paired with a section, not just a silhouette.
Think about changes as well as the first arrangement. Fixed benches, wall-mounted shelves and permanent supports lock in a particular height and position; moveable containers allow more flexibility but still need clear access. Decide which item has the least tolerance—perhaps the deepest bench, highest crop or essential aisle—and test that first. If the profile meets that requirement, check the other uses against the same drawing. A greenhouse with a smaller nominal area can be more useful for your routine if its perimeter and centre suit the way you intend to work; a larger footprint is valuable only when it provides space you can actually use.
Frequently asked questions
Which greenhouse shape gives more usable space?
Neither shape always gives more. A straight vertical wall can preserve a useful strip of height beside the perimeter, while a curved profile may reduce clearance where it turns inward. The result depends on the exact internal width, wall height and point where the profile changes. Compare dimensioned cross-sections for the sizes you are considering.
Is the ridge height the most important measurement?
Not for every layout. Ridge height tells you about clearance near the centre, but it does not show how tall the wall is beside a bench or shelf. Check the internal height at the perimeter and at the points where your furniture or plants will sit, as well as the ridge.
Can I put shelves against a curved wall?
Sometimes, depending on the shelf height, depth and wall profile. Check that the shelf and its contents clear the curve and do not intrude into your aisle. For a wall-mounted shelf, follow the manufacturer’s guidance on suitable support points rather than assuming the frame or glazing can take a fixing.
Does the same floor area mean the same growing capacity?
No. Floor area does not show how much room there is for tall plants, shelves or benches around the perimeter, or how wide the clear aisle will be. Two greenhouses with similar areas can have different proportions and internal heights, so compare the plan and cross-section as well.
What should I ask for if I cannot find a cross-section?
Ask for a dimensioned cross-section for the exact model, size and configuration you are considering. It should make the internal profile and key heights clear. Also check the plan for internal width, entrance position and door clearance; those details affect the layout but cannot all be read from a cross-section.
Do not choose between straight sides and curved walls by silhouette or nominal area alone. Put your preferred bench, shelf, tallest crop and aisle against the section for the exact greenhouse size. A straight wall can provide a predictable perimeter band if its height suits the layout; a curved profile may still work well for lower planting or where its curve begins above a vertical section. Keep the floor plan beside the cross-section: one shows where things can go, and the other whether they will fit in height.
