
Why Does My Automatic Greenhouse Vent Opener Stay Closed?
Greenhouse troubleshooting
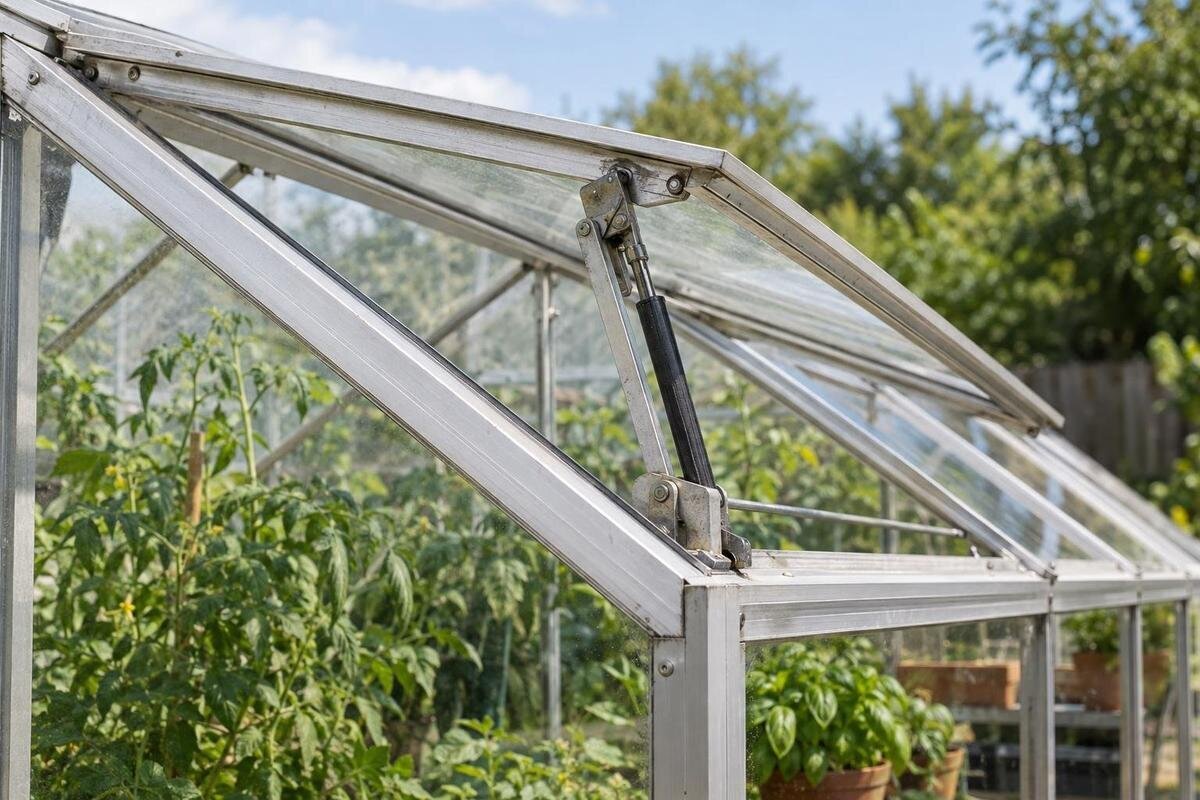
An automatic greenhouse vent opener that stays shut may simply not have reached its opening temperature. A wrong setting, an engaged latch, friction in the vent, excess load or an installation mismatch can produce the same symptom. Diagnose in order: compare a thermometer beside the actuator with the exact opener manual, then inspect the window and linkage without forcing them. Record readings and changes, and stop if the vent or its supports look unstable.
A closed vent is not always a fault
A vent that is shut at one moment is not automatically faulty. Many non-electric openers use a temperature-responsive actuator that starts moving only after it reaches a model-specific opening threshold, then returns as it cools. It may stay closed on a cool morning, in cloudy weather or where the actuator sits in a cooler pocket, even if the middle of the greenhouse feels warm. Powered controllers can have settings or override modes of their own, so do not apply a mechanical-opener procedure to an electrical system. A short delay or partial opening is normal only if the maker’s instructions describe it; compare more than one observation before deciding.
Before changing anything, describe the symptom: write down the time, whether the vent is fully shut or partly open, whether it moves later as the greenhouse warms, and whether it was recently adjusted. Record the greenhouse model separately from the opener’s make and model. For a Classic aluminium greenhouse, for example, ask for the greenhouse’s vent instructions and identify the installed opener separately, including any replacement fitted since installation. Photograph its label and the whole vent from a safe position if the identity is uncertain. A later opening is useful evidence, but does not prove the unit completes its intended travel.
Measure the temperature beside the opener
Measure the air temperature close to the actuator rather than relying on a reading from the middle of the greenhouse. Follow the manual’s advice about sensor placement. If it gives none, position a thermometer or logger nearby without touching the actuator, glazing or metal frame; keep the instrument out of direct sun and away from heaters or other warm surfaces. Do not move or shade the actuator to make a test easier. The nearby air reading is a useful reference, not a direct measurement of the actuator’s temperature: sunlight and the time needed for it to warm can affect the comparison. If the manual identifies a separate sensor, check that point instead.
Take readings through a warming period at regular intervals, logging the time, vent position, cloud or sunshine, and whether shading is in place. A min/max thermometer records extremes, but cannot tell you when a peak occurred or how long it lasted; a time-stamped logger gives a clearer sequence. Humidity adds context, but does not establish a temperature trigger unless the instructions say so. When considering vent positions for a Lean-To Greenhouse, compare the proposed actuator location with the position where you took your readings. Note nearby shade or heat sources rather than assuming the conditions will be identical. Compare the recorded pattern with the manual’s expected response, not just the warmest value.
Check the setting before adjusting it
Find the opening threshold and any permitted adjustment in the manual for your exact opener, not a general guide for a similar-looking unit. One design may let the user alter the temperature at which it opens; on another, a screw or clip may control travel, and some models have no user calibration. Do not assume a direction to turn, a number of turns or a universal trigger temperature. Check the stated operating range as well. If the manual is missing, identify the part from its label or paperwork and ask the manufacturer or supplier for matching instructions before altering anything.
If an adjustment is explicitly authorised, photograph its original position and record it before making one small change exactly as directed. Then repeat the same temperature observations and allow any response or reset time specified by the maker. Changing several settings at once, or turning a screw repeatedly because the vent did not move immediately, makes the result hard to interpret. Note the temperature when movement begins and how far the vent opens. For a new configuration, such as a Limited Edition aluminium greenhouse, ask which opener would be supplied and whether its opening threshold is adjustable. That lets you compare the available controls with your requirements before ordering, rather than assuming every opener offers the same adjustment.
Inspect the installation and any locks
Check whether anything is deliberately holding the vent shut. Depending on the installation, that could be a manual catch, bolt, travel stop, retaining clip, transport restraint or powered controller set to an override. Use the instructions to identify what is part of normal operation; do not remove a clip or stop simply because it looks temporary. From a safe position, check that the actuator and connecting arm are attached at the specified points and that the mounting bracket has not shifted. If the opener was recently fitted, revisit the stated orientation and any initial setup or commissioning directions rather than forcing its first movement.
An installation mismatch can prevent full movement even when the temperature and setting are correct. Compare the opener’s instructions with the vent type, approved mounting positions and the greenhouse maker’s guidance. Do not drill new holes, bend a bracket or change the attachment point to gain leverage. When reviewing a T-Shaped Orangery Greenhouse, request the vent layout and mounting details for the exact configuration under consideration. Establish which brackets and fixing points are approved, whether any adapters are required, and who will confirm compatibility with the chosen opener. These are installation questions to settle before ordering hardware. If the documentation leaves the attachment arrangement unclear, ask the supplier or a competent installer.
Compare the opener with the vent’s load
The temperature can be right while the opening force is not. A vent may be too heavy for the selected opener, or it may have become harder to move after an attachment was added. Look for a screen, clip, plant tie, replacement panel or other extra load where applicable, and check whether anything is bearing on the moving window. Compare the actual vent type and mounting arrangement with the opener’s stated capacity or approved combination, if the maker provides that information. Do not judge capacity by the size of the actuator or by how easily the vent moved when it was new.
Check the linkage position against the original instructions as well as the vent itself; an arm attached at an unapproved point may not travel as intended. Do not add a second opener, counterweight or stronger bracket by guesswork, as that changes how the mechanism moves. Before selecting an opener for a Pyramid-type greenhouse, obtain the details of the particular vent it must operate, including its weight where required by the opener manufacturer. Ask whether the stated capacity applies to that vent orientation and mounting arrangement, and whether any planned accessories affect compatibility. Do not estimate a maximum load or borrow a figure from another model. Keep the confirmed vent–opener combination with your installation records.
Look for a physical obstruction
Inspect the vent’s path with it closed, preferably from a safe position on the ground. Look for leaves, twigs, plant ties, loose clips, a screen caught in the moving edge or ice physically preventing movement. Check visible hinge points and the frame for dirt, paint bridging a joint, corrosion, a bent arm, loose fittings or a seal pinched out of place. These signs can explain resistance, but do not by themselves prove the opener is defective. Do not climb onto the greenhouse or reach beneath a vent that could move unexpectedly.
Clear only loose material you can reach without putting your hands into a joint or beneath an unsupported window. Do not pry the vent open, or apply oil, solvent or force, unless the greenhouse or opener maker specifies a safe method and suitable product. Photograph any bent or damaged part rather than trying to straighten it. If a harmless obstruction is removed, observe the vent again under the same conditions. Clearance also matters when planning accessories: for an aluminium greenhouse with built-in storage, request the vent layout before positioning shelving, screens or shade fittings. Check the whole movement path of the window and linkage, not just the space around the closed vent.
Work out whether the vent or opener is stuck
If the threshold has been reached and locks or obstructions have been ruled out, observe the mechanism without touching it. From the side, check whether the actuator’s rod or arm moves while the vent stays closed; some models make this difficult to see, so use the manual’s diagram to identify the moving parts. If the linkage moves but the vent does not, the connection, hinge or window may be binding. If there is no movement, the actuator or its control may be at fault, but first confirm the temperature and setting. A short video from a safe position can help show what happens and when.
Some manuals describe disconnecting the opener to check whether a vent moves freely by hand. Do not use that test unless the exact manual explains it and gives safe support and reconnection steps. A roof vent may swing or drop; keep clear of its path and never remove a loaded pin or stand underneath it. If it feels heavy, unstable or difficult to control, stop and ask an installer. When discussing opener options for a Prestige greenhouse, ask how the selected mechanism is safely released for servicing and whether the vent needs separate support. Access to the release point matters too: a procedure that cannot be carried out safely from your available working position needs professional assistance.
Test the opener only as its manual directs
Use only the maker’s stated test for your model. Some instructions may describe particular conditions or a controlled warming test; follow their exact temperature, timing and reset directions rather than improvising. Do not use a flame, heat gun, hairdryer or boiling water to force the actuator to react, and do not dismantle a sealed component. Concentrated heat can damage parts and will not show how the opener behaves in the greenhouse. If the manual gives no test procedure, ask the manufacturer or supplier for a safe way to check it. Keep people and hands clear of the vent’s movement throughout.
Record the temperature when movement begins, how far the opener travels and whether it returns as the unit cools, then compare those observations with the maker’s stated behaviour. If the opener has a powered controller, do not open its housing or alter wiring; use a qualified person for electrical inspection. When specifying ventilation for a Spacious Greenhouse, ask for a commissioning record that identifies each installed opener and its corresponding vent. Record any approved settings separately, so a later fault can be traced to the correct unit. Where several openers are fitted, compare their behaviour only after accounting for differences in model, setting and local exposure; one moving vent does not prove another is faulty.

Stop if parts look damaged or unsafe
Stop testing if you find a bent rod or bracket, loose support, cracked fitting, serious corrosion, fluid around a sealed actuator or a vent that cannot be controlled safely. Do not try to straighten, open or refill a sealed mechanism, and do not keep cycling a window whose hinge or frame appears damaged. If the vent is high, unstable or could swing unexpectedly, keep people clear and have an appropriate installer inspect it. Take a photograph from a safe position if useful, but do not remove a part just to get a closer view.
If a part needs replacing, identify the opener’s make and model and the exact greenhouse vent first. Match the operating temperature, travel, mounting arrangement and stated load capacity with the manufacturer’s approved information; appearance or a broad product category is not enough. Use photographs of the label, brackets and full vent when asking for advice. If the maker cannot confirm a compatible part or fitting, ask the greenhouse supplier or a competent installer before ordering. Replace only the part they identify as suitable.
If the opener works, assess the wider ventilation setup
If the opener behaves as its instructions describe but greenhouse temperatures remain higher than you want, repeated calibration is not necessarily the answer. Check whether other vents in the greenhouse are free to open and whether the fitted ventilation arrangement matches the structure’s instructions. Look at actual window travel and conditions at more than one point. An actuator moving as intended does not show that the overall ventilation arrangement is adequate, and adjusting one opener cannot compensate for another blocked or unavailable vent.
Keep observations from before and after any approved change, including whether shading is in place, because it can alter the temperature around the actuator and when it reaches its trigger. If performance remains insufficient after the vent and opener have been confirmed as compatible and unobstructed, ask the greenhouse manufacturer or a competent installer to review the wider configuration. Treat shading or additional ventilation as separate design choices, not repairs for a stuck hinge or damaged actuator. This keeps the diagnosis focused on the part that is actually failing.
Frequently asked questions
What temperature should the opener reach before it opens?
There is no universal opening temperature: it depends on the exact opener. Find its specified threshold and response conditions in the manual, then compare them with readings taken as directed. Air temperature beside an actuator is a useful reference, but sunlight and warming time can make its own temperature different. Do not adjust it using a temperature quoted for another model.
Can I turn the adjustment screw to make it open sooner?
Only if the manual for your exact opener says that the screw adjusts the opening temperature and explains how to change it. On another model, a screw or clip may control travel, or there may be no user adjustment. Record the original position and follow the stated procedure; do not guess at the direction or number of turns.
How can I tell whether the vent is jammed?
Look for a latch left engaged, debris in the travel path, a caught screen, a stiff hinge or visible damage. If the manual allows it, observe whether the actuator moves when its threshold is reached. Do not force the vent or disconnect a loaded opener to test it; use the manual's release and support procedure, if provided.
Could cool weather or shade keep the opener closed?
Yes. The temperature beside the actuator may be below its opening threshold even when another part of the greenhouse feels warm. Record the local temperature and whether the actuator is in sun or shade. A change in shade can alter when the threshold is reached, but it will not clear a jam or repair a damaged part.
Should I replace the opener if it stays shut?
Not before checking the temperature, setting, controls, vent movement, load and installation against the correct manuals. If the threshold has been reached and the vent is free but the opener still does not respond, or you see damage or leakage, stop testing and ask the manufacturer, supplier or a competent installer which part is suitable.
The most useful diagnosis is a comparison between a local temperature log and what the exact manual says the opener should do. If the trigger is reached but the vent stays still, work through the latch, installation, load, linkage and hinge before changing settings. Make one approved change at a time, keep photographs and records, and stop if parts are damaged or the vent cannot be controlled safely. That gives a manufacturer or installer specific evidence if repair or replacement is needed.
