
Does Bubble Insulation Help a Glass Greenhouse?
Greenhouse heating and winter energy
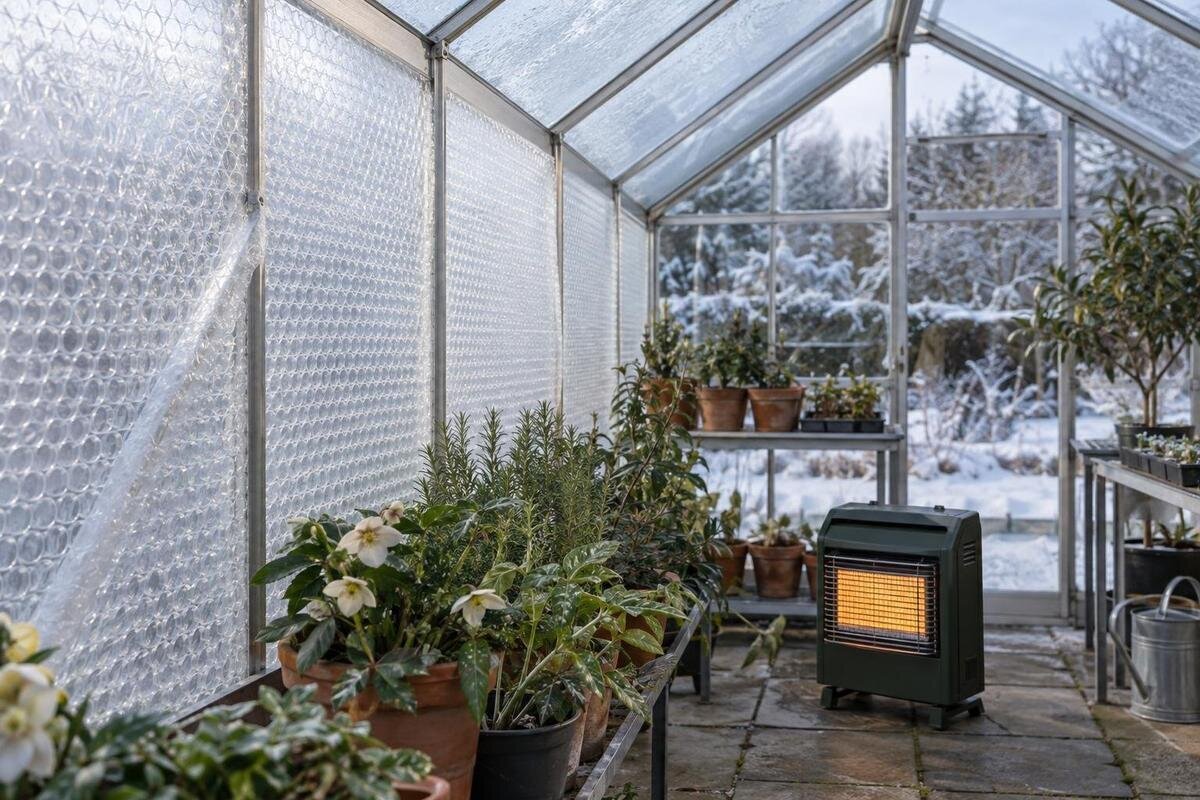
Bubble insulation can reduce heat passing through the glass it covers, but a change in heater use is not a fixed percentage off a bill. Results depend on the film and glazing together, the area covered, the greenhouse’s other heat-loss routes, local weather and how the heater is used. The extra layer can also affect daylight and condensation. A useful decision therefore compares measured energy use with light, moisture and maintenance effects rather than assuming that every sheet suits every glass greenhouse.
What bubble insulation changes in a glass greenhouse
Bubble insulation generally consists of a sheet with enclosed air cells. The still air in those cells and the extra layer add resistance to heat moving through a covered pane, so less heat passes through that part of the glazing under the same conditions. The effect is limited to what the film covers; exposed glass, frames and openings remain unchanged. The sheet does not generate warmth or guarantee a minimum temperature overnight. Its performance depends on the film’s construction, how it is fitted and the complete glazing assembly, not just the phrase bubble wrap on a packet.
Heat also leaves through frame joints, doors, vents and the base of a greenhouse. Air exchange through an open vent or a draughty doorway is a different loss route from heat passing through glass, and bubble insulation does not correct it. A lining may also reduce the solar energy entering during daylight, so lower heat loss overnight is not the whole seasonal picture. Ask for information that applies to the glazing and proposed film together. A listing such as Bloomcabin Prestige Greenhouse identifies a model, but does not by itself give the thermal performance of a retrofit.
Estimate the glazing area before estimating savings
Start with glazed surface area, not floor area or internal volume. Work from a model drawing or careful measurements of each pane; distinguish roof slopes, side walls, end walls and any glazed door, and record what you plan to cover. Bare openings and uncovered strips remain uninsulated. Keep areas with different glazing or coverage separate rather than applying one figure to every face. When assessing a T-shaped orangery greenhouse, use the drawing for the exact model: its name and footprint do not tell you how much glass will be covered.
For a theoretical heat-loss estimate, ask for the covered area, the U-value of the existing glazing and the value for the complete glass-and-film arrangement. The estimate should state the indoor and outdoor temperatures and the time period it assumes. It should also say whether it excludes frames, joints, ventilation, the ground and solar gain. A value for a loose roll or its thickness alone is not necessarily a value for the installed assembly. Without data that matches your setup, do not turn an estimate for the glass into a predicted whole-greenhouse or bill saving.
Measure heater use rather than relying on a temperature snapshot
To assess the effect, record heater energy use before and after fitting and note the indoor and outdoor conditions during each period. Keep the heating routine and thermostat setting as consistent as possible. Take indoor readings where plants are kept, rather than against the glass or in direct sunshine. Compare several representative cold periods with similar weather instead of relying on one night. Record wind, sunshine, watering, and when doors or vents are opened; these can explain a change that might otherwise be wrongly credited to the insulation. Keep a simple log with dates, meter readings, minimum indoor temperatures and notes about unusual events. Separate overnight observations from daytime ones, because sunshine can reduce heater demand while also warming an unlined greenhouse. If the lined greenhouse uses less energy but remains colder, that is not evidence of the same conditions being maintained more efficiently. Compare both energy use and the temperatures achieved, and retain the original readings rather than just a calculated percentage.
Use a suitable meter to measure the heater’s actual energy use; involve a qualified electrician if professional metering is needed for the appliance or circuit. A temperature logger records conditions, not energy saved. Heater runtime is only a rough guide when the appliance’s input is fixed and its running time is recorded reliably. Thermostatic cycling and variable output make hours-on a poor substitute for metered energy. For fuel heaters, record fuel use and consult documented consumption or efficiency information. If weather and operating conditions differ substantially, repeat the comparison rather than claiming a percentage.
Turn measured energy use into a running-cost estimate
Once you have a credible change in energy use, apply the unit rate actually charged for that energy. For electricity, multiply the measured difference in kilowatt-hours by the relevant rate; with a time-of-use tariff, match usage to the rate for those hours. If the price is shown in pence per kilowatt-hour, convert pence to pounds in the calculation. For illustration only, a measured reduction of 10 kWh at an assumed rate of 25p per kWh would be £2.50 for that test period. Neither figure is a current tariff or an expected saving: substitute your own readings and bill rate. Standing charges usually remain payable when consumption falls, so do not count them as a saving from insulation. For gas or another fuel, use the bill’s fuel units and the heater’s documented information consistently; rated heat output is not the same as energy purchased. Date your calculation so that a later tariff change does not get confused with a change in the insulation’s performance.
A short test does not establish an annual saving unless its weather and heating demand are representative. Record the indoor conditions being maintained, outside weather, heater controls and any unheated periods, and be cautious about extrapolating. For a model described as a limited-edition greenhouse with built-in storage, check whether the storage area actually shares the heated air before including it in the space being considered. Do not assume from a listing that the compartment is heated or forms part of the greenhouse’s working volume.
Check how much daylight the sheet removes
Heat is not the only thing a lining can change. An extra sheet may absorb or scatter light, and the effect varies with the film, glazing condition, number of layers and area covered. Ask for a measured light-transmission figure and how it was tested; a description such as clear does not tell you how much light reaches the greenhouse. If light levels matter to your plants, a photosynthetically active radiation (PAR) reading at crop height is more useful than an ordinary lux reading. A small sample may not represent a fully lined roof and walls.
For a practical comparison, use the same sensor at the same crop positions before and after fitting, and note the time and sky conditions. A second outdoor sensor taking simultaneous readings can help distinguish changing daylight from the effect of the lining; without one, repeat the comparison under similar conditions and treat small differences cautiously. Include positions near the sides and towards the centre, since a reading at one bench may miss uneven shading. Keep the sensor level and clear of your own shadow, and follow its measurement instructions. Assess the exact coverage you plan: nearby structures and trees also affect light, while overlapping sheets create areas with extra layers. When comparing the pyramid-type greenhouse, include crop-height light measurements in your assessment of the proposed lining. Record whether the sheet is clean, wet or visibly marked so that later readings can reveal changes associated with its condition, not just its initial installation.
Plan for condensation and cleaning
Condensation depends on moisture in the air and the temperatures of nearby surfaces. Plants, damp compost and watering add moisture; it can condense when humid air reaches a sufficiently cool surface. With an inner lining, the glass behind it may be colder than the room-facing film. Water can then collect out of sight between the two, or around frame edges where moist air reaches the gap. The outcome depends on fitting, air movement and weather. Bubble insulation does not remove moisture, and it does not inevitably cause condensation, so check what happens in your own greenhouse after fitting.
Choose a product and fixing arrangement that can be inspected and cleaned, and follow its care instructions. Clean the glass before installation and avoid trapping dirt or existing water. After cold, damp spells, inspect accessible areas and edges behind the sheet; persistent droplets can obscure the glass, leave deposits and make maintenance harder. Continue suitable ventilation and watering practices. Follow the specified edge treatment rather than improvising a sealed cavity or leaving gaps without considering the fitting guidance. If the manufacturer gives no guidance about internal greenhouse use, cleaning or inspection, ask before fitting.
Match the fixing method to the glazing and frame
Compatibility covers more than the width of a roll. Confirm that the sheet is intended for greenhouse glazing and check the maker’s performance and fixing guidance for the way you plan to use it. Consider the existing glazing seals, coatings and frame material. An adhesive may leave residue or be unsuitable for a surface, while a generic clip may not fit the frame channel. Do not use an unapproved adhesive on glass or put fasteners through a glazed panel. Keep drainage paths, joints and any access points specified by the greenhouse manufacturer unobstructed.
Use a fixing method approved for both the film and the frame, and check whether the product is meant to be clipped, held in another way or fitted with a particular amount of tension. For a Classic aluminium greenhouse, ask the supplier to identify the relevant frame profile and compatible fixing from the model-specific instructions. Useful questions include whether clips can be removed without disturbing the glazing and whether the lining can be released for cleaning. Do not assume a fixing from another greenhouse will fit. Check the film’s instructions alongside those for any heater: its position must respect the appliance’s stated clearances and must not obstruct air inlets or outlets. Resolve conflicting instructions with the suppliers before buying.
Keep ventilation and access clear
Insulation must not disable the greenhouse’s normal openings. Keep roof vents, louvres, doors and sliding panels free to move and open fully; permanent covering is not a reason to stop ventilating. Film can catch in a hinge, foul a track or hide a latch if its edges are poorly planned. Before ordering, mark the opening panels on a drawing and work out where the sheets will stop, how they will be held back and how you will secure them again after ventilation.
Also maintain access to handles, watering points, gutters and cleaning areas. Avoid loose edges that obstruct a walkway or inspection, and make sure regular use of the openings will not tear the lining or leave it hanging into the growing space. If considering a lean-to greenhouse, check the specific drawing and ventilation details rather than assuming that every model in that category has the same openings. Bubble insulation cannot compensate for a vent or door left open while heating is running.
Decide whether a trial is worth the effort
A trial is most useful where the greenhouse is heated regularly, glazing is a meaningful part of the heat-loss route and a suitable sheet can be fixed without blocking access. It is less likely to make a noticeable difference to total energy use if doors are often left open, significant gaps dominate or the heater already uses little energy. Consider the plants’ light requirements and the time needed to fit, remove and store the lining. Removable coverage may allow more daylight when taken down, but the extra handling becomes part of the decision.
Include the sheet, approved fixings, installation time, cleaning and any replacement in a payback estimate. Base that estimate on credible measured savings and documented product information rather than an assumed lifespan. A simple comparison divides the initial cost by the estimated seasonal saving, but the result is only meaningful if both figures are well supported. If the expected saving is small, replacement costs or a change in tariff may substantially alter the result. You can also calculate a break-even requirement: how much energy would need to be saved at your tariff to recover the purchase cost? This is a purchasing benchmark, not a prediction. If comparing a larger structure, request the panel drawing for the Spacious Greenhouse listing to establish the area you would actually line. Keep uncertain measurements clearly labelled rather than presenting a definite return.
Compare a retrofit with a greenhouse replacement
Sometimes the useful comparison is a retrofit against a change of greenhouse or glazing. For the retrofit, obtain information about the existing panes and the proposed film; for a replacement, obtain the specification of the glazing being offered. Compare documented thermal performance, light transmission, ventilation arrangements and replacement-panel details. Keep the heated area and operating conditions comparable. Better insulation on paper may not resolve a draught, while a different glazing specification may also change how much daylight enters. The relevant evidence is for the complete arrangement, not one material considered on its own. Separate the benefit sought from insulation from other reasons for replacement, such as damaged glazing or inadequate access. A replacement may address several problems, but attributing all its benefits to reduced heat loss would make the financial comparison misleading.
When shortlisting the limited-edition aluminium greenhouse, organise the comparison around the exact glazing option, panel drawing, ventilation details and manufacturer-approved fixing information. Keep the same headings for the existing greenhouse so that missing evidence is easy to spot. An image or model name cannot establish a thermal rating or bubble-film compatibility. Where information is unavailable, leave that part of the comparison unquantified rather than assigning an assumed saving. A monitored trial of a compatible lining can help answer questions about the existing greenhouse, but it does not establish how an untested replacement would perform. Weigh heat use alongside light, moisture and maintenance.
Frequently asked questions
Does bubble insulation guarantee a frost-free greenhouse?
No. It can slow heat loss through the panes it covers, but outdoor conditions, frames, air leaks, ventilation and heater performance still affect the temperature reached. Monitor conditions in your own greenhouse rather than treating insulation as a frost-protection guarantee.
How much energy will it save?
There is no universal percentage. Look for test data that applies to your glazing and the installed film, or compare actual heater energy use before and after under similar conditions. A single cold night cannot establish a typical winter saving.
Will bubble insulation reduce daylight?
It can reduce or alter incoming light, but the effect depends on the sheet, glazing and coverage. Ask for measured light-transmission information and, if light levels matter to your plants, compare readings at crop height with the same sensor.
Can condensation form behind the insulation?
Yes. Moist air can reach cooler glass behind an inner lining, where water may collect out of sight. The risk depends on the fit and conditions. Follow the product’s guidance, keep the lining inspectable and continue suitable ventilation and moisture management.
Can I use ordinary parcel bubble wrap?
Do not assume it is suitable. Its thermal and light performance, durability in greenhouse conditions and fixing method may not be documented for this use. Choose a sheet with greenhouse-specific guidance and check that its recommended fixings suit your glazing and frame.
Bubble insulation can help where covered glazing is a meaningful route for heat loss and the chosen sheet fits the greenhouse. Its value is not established by appearance or a generic saving claim: check the full glazing data, measure heater use under comparable conditions, and consider the local tariff. Then weigh any energy reduction against altered daylight, possible hidden condensation and the work of keeping the lining clean and compatible. The result depends on the greenhouse and how it is used.
