
Is a Central Island Bed Practical in a Greenhouse?
Greenhouse layout guide
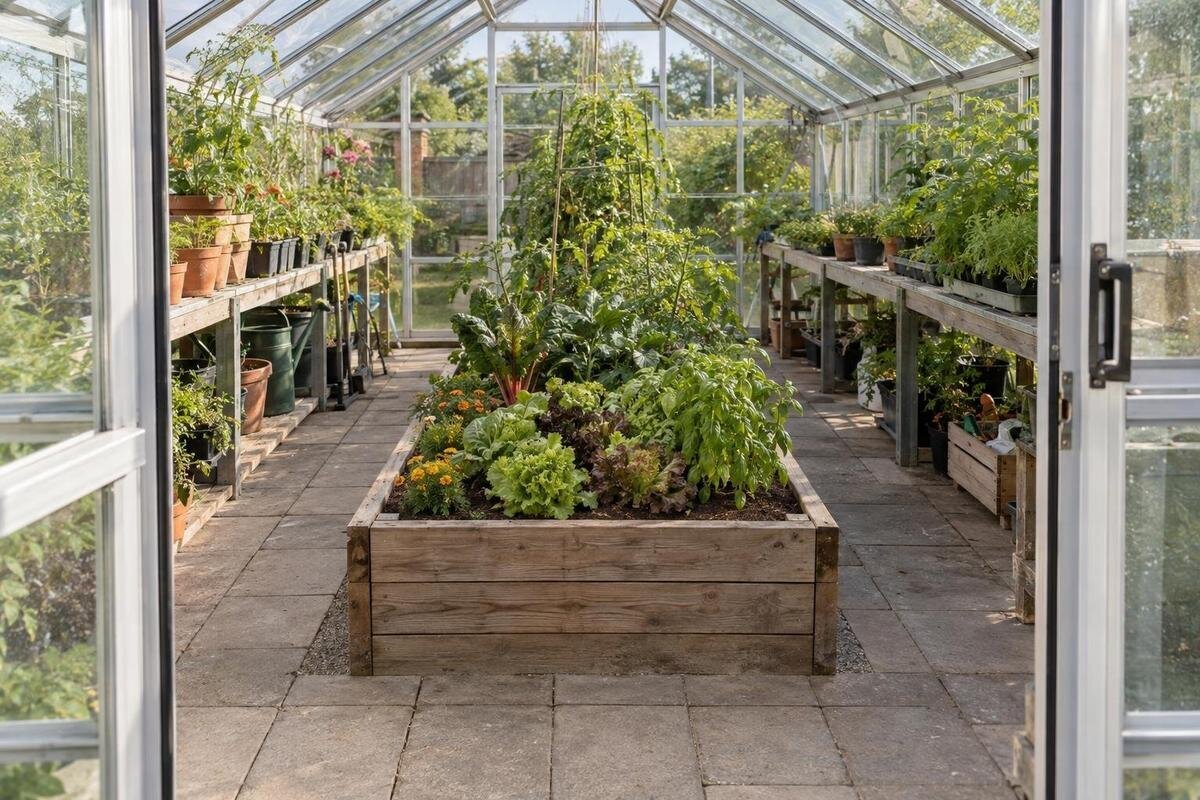
An island bed can make its planting reachable from both long sides, but it also divides the walking space. A perimeter arrangement may leave one broader central aisle instead. The choice depends on the clear internal width, the bed’s reach from either side, the mature spread of crops and the space needed to pass its ends. A greenhouse’s headline floor area alone cannot decide it. The comparisons below use illustrative measurements to show the arithmetic; they are not product dimensions or minimum aisle standards.

What changes when a bed sits in the centre?
An island bed sits away from the greenhouse sides, so you can approach the planting from both long sides and, if it stops short of the end walls, from the ends as well. That two-sided access can shorten the reach to the centre of the bed and make tying in, picking and checking plants simpler. You can choose which side to work from as the crop grows or the task changes. The trade-off is that the bed occupies a strip in the middle of the floor and requires a usable route along each long side. It does not create extra floor area; it rearranges growing and walking space. If those routes become narrow slits, the access advantage can disappear when you carry a tray or the crop spreads.
Perimeter beds keep soil along one or both greenhouse sides and usually leave a central aisle. A single side bed can be straightforward to tend if its depth suits your reach; two side beds leave one shared passage between them. That arrangement gives you one route to keep clear rather than two beside a central bed, although leaves or containers may project into it. It can also provide one uninterrupted line for carrying a long tray. Neither layout automatically provides more usable planting. Compare bed dimensions, route continuity, access to the perimeter and the tasks you repeat—sowing, watering, tying, harvesting and removing old plants—rather than choosing by appearance or gross floor area.
Measure the clear internal space first
Start with the usable inside, not the greenhouse’s outer dimensions or advertised floor area. On a plan, mark the clear floor between frames, sills, fixed shelves, pipes and other obstacles at floor level. Note the entrance position and the door’s open position; a route that looks clear on paper may be crossed by an open door. Measure the narrowest clear width and length, not just the widest point, because posts or fittings can create a pinch point. When comparing Classic greenhouse options, use the intended size’s inside measurements rather than infer a layout from the model name or headline area.
Draw bed edges to include any edging, then show the clear walking width left over. For a central bed, the cross-section is left aisle plus bed width plus right aisle; for two side beds, it is one bed depth plus the centre aisle plus the opposite bed depth. Keep this calculation separate from the space needed beyond each end of the bed. Mark where trays, a watering can or a bucket need to pass, and whether a side route reaches the entrance without a detour. If the clear width varies, test the layout at each constriction; the narrowest point often determines whether the plan is workable.
Set bed width by testing your reach
Reach is personal and task-specific, so there is no universal island-bed width that will feel comfortable for everyone. Stand where a path would run and test how far you can work without leaning over the soil, stepping on it or pulling at a plant. Reach for an imagined pot in the middle, then try a task that uses both hands, such as tying a stem. Repeat from the opposite side. A bed may be easy to reach for picking low leaves but awkward for sowing, pruning or lifting a tray. Try the test at the planned bed height too, as a raised edge can change how comfortably you reach across it.
Try the same exercise with a perimeter bed. Most of its planting will be approached from the central aisle, so test its full depth as a one-sided reach. Access from a short end may help with the corner plants, but it does not make the middle of a long bed easier to reach. Mark pots or crop rows at the farthest points and include any supports that could obstruct your hands. When comparing Classic Accoya / Limited Edition options, use this tested reach to draw the beds on the chosen size’s internal plan. Keep the bed edging within that outline rather than adding it after you have allocated the paths.
Allow for two aisles and access at the ends
A central bed divides the remaining width into two aisles; a perimeter arrangement concentrates walking space in a central aisle. That distinction matters when you enter carrying a tray, bend to weed or need to pass a watering can without brushing plants. The two island aisles need not be identical: one could serve as the main route and the other as a working side, provided both still do their jobs. An aisle may also need to accommodate standing, turning or setting something down, not just walking straight through. There is no universal width to copy: test the actual tasks and allow for fixed items that reduce clear space, such as staging or storage.
Check the bed ends as carefully as its long sides. If it runs almost to an end wall or doorway, you may not be able to move directly from one aisle to the other; instead, you will have to return around the accessible end. Allow for the open door, a person turning with a tray and access to the bed’s short ends if you intend to work there. When reviewing the Lean-To Greenhouse, establish the entrance position on the chosen plan and trace the route to each side of the proposed bed. A complete circuit can be convenient, but the essential requirement is usable access to both long sides, with turning space wherever your tasks need it.

Plan around mature plants and supports
Plants occupy more space than their stems or pots suggest. Draw the expected spread of foliage, the position of stakes or strings and any leaves likely to hang into an aisle. An island bed can be easy to reach on planting day, then narrow both routes as crops grow; side beds can narrow one shared central aisle in the same way. Allow room for regular access to the sides you will tie, pick and inspect. Include the footprint of supports and where you will stand to tend them, rather than treating a climbing crop as a vertical line. Even a support frame or tie point can change where you can work.
Use a simple seasonal overlay: one version for newly planted beds and another for the fullest expected planting. Include trays or pots that remain on the floor, not only crops in the soil. When comparing Pyramid-type greenhouse options, draw those occupied areas on the chosen size’s internal plan and mark where you would stand to reach each crop. Look for leaves or supports that would force you to turn sideways, brush against plants or move a container before watering. If the mature planting leaves too little working room, reduce the number or spread of plants, change their positions or revise the bed layout before committing.
Make routine bed care possible
Routine bed care includes more than reaching the leaves. You may need to weed along an edge, add compost, remove a spent plant, replace a label or inspect the bed edging. An island offers access from two sides, which can make these jobs easier, but it also needs both sides kept open while you work. Consider where a compost tub, seed tray or garden waste can sit without blocking the only route. If you regularly carry material through the greenhouse, trace that route from the door to the bed and back out; a bed-side space is not a useful aisle if it becomes a drop zone.
Plan storage separately from walking and planting space. A watering can, hand tools or empty pots need a place you can reach without putting them on the bed or in a turning point. When comparing a greenhouse with built-in storage, request a plan showing the storage section and its access so that you can account for it in the bed arrangement. Trace how you would retrieve a tool and return to either side of the island. Also reserve somewhere for temporary jobs, such as setting down a harvest tray or a tub of compost. That space need not be permanently empty, but using it should not cut off the route to the door.
Leave access to the greenhouse perimeter
Perimeter planting puts the outside edge of a bed close to the frame, which can make lower glazing or fittings harder to reach from inside. Consider which surfaces you actually need to clean or inspect and whether you can reach them safely across the proposed bed. Fixed supports and mature foliage may obstruct access that seems easy before planting. Where a passage is necessary, include it in the floor plan rather than assuming a narrow gap will be usable. For glazing that you intend to clean externally, check access around the greenhouse as well. An island can leave the inside perimeter more accessible, but only where its side routes and end spaces reach the surfaces concerned.
Separate routine cleaning access from occasional maintenance. Loose pots beside the frame can be moved, whereas a permanent soil bed or fixed support is a more lasting obstacle. Mark any handles or fittings you need to reach and check that bed edging will not obstruct them. When considering Bloomcabin Prestige Greenhouse options, obtain the relevant internal drawing and add these access points to your planting plan. Then decide whether each needs a standing space, a reachable gap or an area that can be cleared temporarily. This gives a more useful comparison than assuming that every perimeter must have a full walkway, or that all wall-side space can be planted.
Illustrative comparison: island and perimeter beds
Here is an illustrative cross-section, not an available product size or a recommended minimum. Suppose the clear internal width is 2.4 metres. An island bed 0.9 metres wide leaves 0.75 metres on each side: 0.75 + 0.9 + 0.75 = 2.4. A perimeter plan with two beds 0.55 metres deep leaves a 1.3-metre centre aisle: 0.55 + 1.3 + 0.55 = 2.4. These figures show how the width is allocated, not whether either aisle will feel comfortable. Door position, edging, individual reach, pots and mature foliage still need checking, as do the routes around the ends.
For a fair comparison, hold the bed length and crop plan constant. At an illustrative length of 3 metres, the island’s bare soil area would be 2.7 square metres, while two 0.55-metre-deep side beds would total 3.3 square metres. That arithmetic is not a yield prediction: crop spacing, access and the usable planting footprint matter. Repeat the drawing with the actual inside measurements for the size you are considering, including at the ends. The same exercise applies to the Spacious Greenhouse range; a larger headline area does not remove the need to check width, routes and turning space.

Match the layout to the greenhouse footprint
Overall area can be misleading if a greenhouse is long and narrow. An island needs enough cross-width for the bed plus two routes, while a narrower outline may work better with two shallow perimeter beds and one central aisle. Alternatively, a single side bed can leave more walking space alongside it. A broader outline can make two paths possible, but length matters too: a long island may mean a substantial detour to reach its opposite side. Compare width and length separately, then decide whether to shorten the bed to leave a cross-route at one or both ends. Keep that route clear of pots and allow for foliage extending beyond the bed.
Not every floor plan is a simple rectangle. On a shaped or divided footprint, mark the entrance, pinch points and main route before placing the bed; the geometric centre may not be the most convenient working position. For the T-Shaped Orangery Greenhouse, use the chosen internal plan to check how an island would affect movement between the different parts of the interior. Draw alternative positions, including a shorter island within one area rather than a bed extending across a connecting route. Compare how easily you could carry plants from the entrance to each growing area. If the island obstructs that movement, perimeter beds may make better use of the available outline.
Test the layout at full scale
Before building beds, draw the proposed outlines to scale or mark them on the floor with tape, chalk or string. Include the bed edging, the widest expected plant spread and the door’s open position. Walk the planned route with an empty tray, watering can or the bucket you usually use; turn at each end and try passing the bed without stepping on the soil. Bend where you expect to weed and check that you can reach the middle from the path. A paper plan catches arithmetic errors, while a full-size outline can reveal awkward turns that are easy to miss on paper.
Test the jobs in sequence, not as isolated reaches: enter, put down a tray, tend both sides, collect a crop or remove a plant, then leave. Notice whether an aisle stays clear when an item is set down and whether the far side remains reachable without walking around a blocked end. If an island only works while the greenhouse is empty, use a perimeter layout or reduce the bed’s length or width. If both side routes and the ends remain practical with mature planting mapped in, a central bed can be a sensible choice rather than a decorative use of the centre.
Frequently asked questions
Is a central island bed suitable for a small greenhouse?
It can be, but only if there is enough clear width for the bed and a usable route on both sides, with access at the ends where you need it. If the paths become awkwardly narrow, perimeter beds and one central aisle may be easier to work around. Check the actual inside measurements rather than relying on floor area alone.
How wide should a greenhouse island bed be?
There is no single width that suits every gardener or crop. Test how far you can comfortably work from each side, then account for edging, supports and the mature spread of the plants. A full-size outline with pots placed at the farthest points is more useful than choosing a width from an isolated rule of thumb.
Does an island bed provide more growing space?
Not necessarily. The bed’s soil area depends on its width and length, while the paths around it take up part of the greenhouse floor. Compare the actual planting footprints and remember that access, crop spacing and mature foliage affect what you can tend. A larger bed area alone does not predict a larger harvest.
Can an island bed go right up to an end wall?
It can, but you may lose the route around that end and make one side of the bed harder to reach. Leave space where you need to turn, pass from one aisle to the other or work on the short end. If those tasks are not part of your layout, check that both long sides are still accessible.
How can I test a layout before building the beds?
Draw it to scale or mark the bed and aisles with tape, chalk or string. Include the open door, edging and expected plant spread, then walk the routes with a tray or watering can. Try turning at the ends and reaching the farthest planting points without stepping on the bed.
A central island bed is practical when its two side routes and access at the ends remain usable after plants, tools and people are in the greenhouse. Measure the clear inside space, test your reach and include mature foliage before comparing it with perimeter beds. In a narrow house, one clear central aisle may be more useful than an island that divides it; in a wider plan, access from both sides may make tending simpler. Choose the arrangement that remains workable during the jobs you do regularly, not only when the beds are empty.
