
Seedlings Collapsing in the Greenhouse: Recognising Damping Off
Seedling health
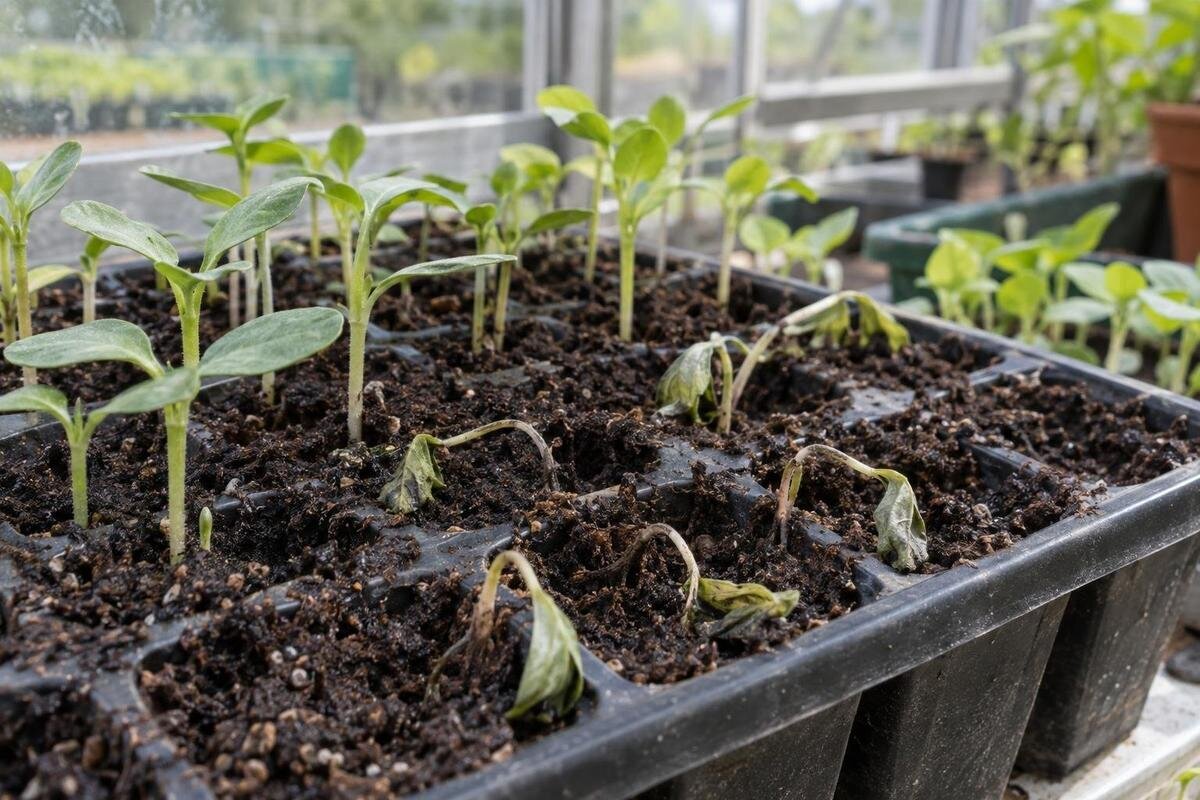
A tray of seedlings that collapses at compost level may be showing damping off, but collapse alone is not a diagnosis. Look for a narrowed, softened or discoloured stem where it meets the compost, rotting roots, or a patch of seeds that failed to emerge. Check moisture, tray hygiene, airflow and the pattern across the crop as well as the plant itself. Drying out, waterlogging, weak growth, physical damage and pests can also cause seedlings to wilt or fall, so inspect the damage before assuming infection.
Greenhouse layout check 1
What damping off means
Damping off is a disease syndrome in which several fungi and fungus-like pathogens attack seeds or very young seedlings. Before a shoot appears, a seed can rot in the compost; after emergence, infection may damage the lower stem or roots. The name describes a pattern of early decay rather than one organism with a single universal remedy. Pathogens can be carried in seed, debris or growing media, or on contaminated trays and tools. Greenhouse growing does not remove those routes: a covered space still needs clean handling and sensible moisture management. A poor emergence pattern is a reason to inspect, not proof on its own. Young stems have little reserve, so even a narrow damaged area can interrupt water movement quickly.
Before emergence, affected seeds may become soft or discoloured and fail to produce a shoot, leaving gaps in a tray. Poor seed viability, unsuitable sowing depth or growing conditions can also cause missing seedlings. After emergence, a familiar warning is a water-soaked, narrowed or brown section at the compost surface or just below it. The seedling may wilt and topple even though the compost is damp; roots can be soft or discoloured as well. A lesion at the base is more informative than a drooping top alone. Symptoms vary with the pathogen and crop, so consider the whole pattern rather than treating one visual clue as confirmation.
Signs to inspect at the compost surface
Look closely at the stem where it meets the compost, preferably in good light. In a typical post-emergence case, the collar is pinched, translucent or brown and may look water-soaked; the top can still be green at first. As damage progresses, the seedling loses support and folds at the surface rather than bending gradually along an elongated stem. Compare one affected plant with a healthy seedling of the same crop. Soft or browned roots add to the concern, although normal root colour varies between plants and growing media. A close photograph can help you record the lesion, but the appearance still needs to be read alongside the tray and its conditions.
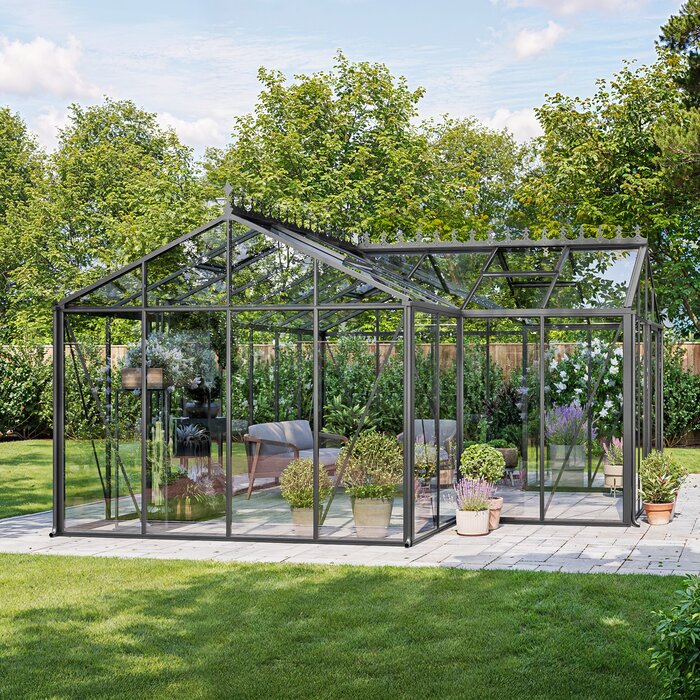
Inspect more than one cell. Check whether losses are confined to one tray, follow a wet corner or drain path, or appear across batches that shared compost, water or tools. A cluster may point to a shared source or condition, but it cannot identify the organism. Note which seedlings have fallen and photograph the base before removing plants. Avoid lifting every seedling; examine a representative plant carefully so you do not disturb the rest of the tray. Routine inspection is easier when trays can be lifted without shifting their neighbours. The Prestige greenhouse with metallic base is listed in sizes from 40.6 to 302 sq ft; compare the selected footprint with actual bench depth, tray dimensions and clear access rather than assuming the stated area is usable bench space.
Greenhouse layout check 2
How to distinguish damping off from other causes
Some lookalikes have no clear lesion at compost level. If compost is dry, a seedling may wilt because it has dried out; saturated compost can also leave roots unable to function properly and make leaves limp. Heat or poor light can produce weak, elongated stems that bend but remain intact at the base. These clues are not absolute: wet media can stress roots and favour infection at the same time, and more than one problem can affect a batch. Check the compost below the surface as well as on top, since a cell can remain wet at its base when the surface looks dry.
Physical damage may leave a clean break or crushed section, while a pest can leave a chewed or cut stem. Recent pricking out, a tray being knocked over or a watering spill can also explain a sudden local loss. Look for the damage itself rather than assuming disease from collapse. Map which cells fail, compare them with healthy seedlings from the same sowing and note any recent handling. If trays are regularly knocked while being carried, review the route between your sowing surface and bench. When considering the Lean-To Greenhouse, listed from 40 to 154 sq ft, check the selected plan for clearance to carry a full tray without catching it on shelves or the doorway.
Moisture, airflow and greenhouse conditions
Damping off risk rises when compost stays wet for long periods, drainage is poor, seedlings are crowded or a propagator remains closed after emergence. Humid, stagnant air can keep foliage and the compost surface damp. Temperature is not a simple control: cool compost may slow germination and prolong vulnerability, while different pathogens and crops respond differently to warmth. There is no single greenhouse setting that prevents every case. Moisture can also vary between the bench and the wider greenhouse, so inspect the tray itself rather than relying on a general impression of the air.
Check for pooled water under trays, persistent condensation, tightly packed leaves and poor air exchange around the growing area. Condensation on the glazing shows that there is moisture in the air; it is not a diagnosis or a reliable measure of compost moisture. Vent a propagator as seedlings emerge, following its instructions, and allow gentle air exchange without exposing tender plants to abrupt cold or drying. The Classic greenhouse range is listed from 40.6 to 302.3 sq ft; that floor-area range does not establish ventilation for a particular model, so review the exact specification and layout before assuming it provides the air exchange your routine needs.

Greenhouse layout check 3
Sowing and watering practices that reduce risk
Use fresh seed compost intended for sowing, and follow the seed packet or crop guidance for depth and spacing. Dense sowing keeps stems close together and makes it harder to inspect each base; avoid adding extra seed simply to compensate for uncertain germination. If viability is doubtful, a small test sowing can help you assess emergence before committing a whole tray. Remove excess seedlings when they can be handled without disturbing their neighbours, using clean hands or a clean tool. Garden soil can introduce organisms and may drain poorly in small cells, so use a growing medium intended for seed trays. Missing seedlings have several possible causes, so check the seed and growing conditions as well as the medium.
Water to keep the compost evenly moist, not saturated, and make sure trays can drain freely. A fine, controlled application at the compost surface can avoid washing seed out or splashing between cells. Bottom watering can be useful in some setups, but do not leave trays standing in water or pass shared water from one affected tray to another. Check moisture before watering instead of following a calendar: small cells can dry at a different rate from larger pots. When planning a watering area within the limited-edition greenhouse range, listed from 40.6 to 302 sq ft, allow space to lift trays out of their watering containers and empty collected water without spilling it across neighbouring batches.
Cleaning trays, tools and growing media
Reusable trays, pots, dibbers and watering equipment need attention between batches, especially after disease is suspected. First remove old compost and plant debris, including material caught in corners and cell holes. Scrub items with detergent and water, rinse them and inspect recesses for remaining dirt. If you use a horticultural disinfectant, apply it to cleaned surfaces and follow its label for dilution, contact time, rinsing and drying. Debris can reduce its effectiveness, and a stronger mixture is not a substitute for proper cleaning. Do not combine cleaning products. Clean the bench or shelf beneath a failed tray as well, since debris and drips can transfer contamination back onto washed equipment.
Use fresh compost for the next sowing rather than reusing media from a failed tray, and do not assume a new bag is sterile. Keep bags closed, dry and away from used trays, floor debris and dirty tools; use a clean scoop when taking compost from the bag. If comparing the greenhouse with built-in storage, its listed sizes run from 59.4 to 302 sq ft, but the storage description does not establish how areas are arranged. Check the actual layout before relying on it to keep clean media apart from used equipment.
Greenhouse layout check 4
Organising a greenhouse for seedling checks
A simple tray map makes repeat problems easier to trace. Label each batch with the crop and sowing date, and record seed or compost details when available. Keep newly sown trays, emerged seedlings and suspect trays identifiable rather than swapping them without notes. Place trays where you can see the compost surface and lift them safely; leave room to water without splashing a neighbouring batch. A clean, defined working area helps prevent used equipment from crossing into a new sowing, but it does not need to be a separate room. Choose routines you can maintain for every batch.
Arrange batches so that their labels remain visible and trays can be removed individually. Keep a clear space for examining a suspect plant, with somewhere to put used tools before cleaning them. This avoids setting a dirty dibber beside an open bag of fresh compost. If comparing the Spacious Greenhouse, whose listing covers 506–753 sq ft, sketch these working areas on the selected model’s plan rather than treating the whole floor as growing space. Include paths, the sowing surface and any pots awaiting transplanting. Review the arrangement at your busiest sowing period: an inspection space that disappears beneath spare trays will be unavailable just when several overlapping batches need attention.
What to do when a tray looks affected
When a tray shows a convincing basal lesion, move it away from healthy seedlings if you can do so without shaking compost onto other trays. Avoid splashing water from it, and photograph the affected plants before removing them. Take out collapsed seedlings and visibly rotted seeds or roots; keep the material contained and do not return its compost to other pots. Check adjacent trays for early symptoms, especially those sharing water, tools or a bench surface. If you think expert identification may be needed, contact the service before discarding every possible sample.
Clean the surface and tools after handling the suspect tray, then correct conditions you can confirm: blocked drainage, standing water, dense growth or covers left closed. Do not let unaffected seedlings dry out as a precaution; aim for appropriate, even moisture and monitor them. Keep waste contained, follow local disposal guidance and do not assume an ordinary home compost heap will destroy disease organisms. If you are considering the T-Shaped Orangery Greenhouse for a future growing area, check its actual plan for somewhere to hold suspect batches separately. That space should be reachable without carrying them over healthy seedlings, and its watering containers should not drain into those used by other batches.
Greenhouse layout check 5
Will a different greenhouse prevent damping off?
Buying a different greenhouse is not, by itself, a cure for damping off. The organisms can arrive with seed, compost, dirty containers or debris, and persistently wet or crowded conditions can develop in a new structure too. Before planning a replacement or expansion, identify a practical weakness in the current routine: pooled water, poor air exchange, difficult access for inspection or an inability to keep batches apart. If the cause is not clear, collect observations and seek advice rather than assuming the building is responsible.
Product names and floor area do not confirm disease control or growing conditions. The Pyramid-type greenhouse is listed in sizes from 60 to 203 sq ft, but its stated area and shape cannot tell you the air movement, usable bench layout or cause of a seedling loss. When comparing any structure, check the selected model’s published details against your proposed layout, ventilation routine and access needs. Consider a change only where it addresses a limitation you have identified; otherwise, improving hygiene or watering may be more relevant.
When to seek a plant-health diagnosis
Ask a qualified horticultural adviser or plant-health diagnostic service when collapse spreads through several trays, returns despite better hygiene and moisture control, affects valuable plants or does not fit the usual basal symptoms. Confirmation is particularly useful before discarding large numbers of seedlings or changing several parts of your routine at once. Different diseases and non-infectious stresses can look alike, and symptoms alone may not identify the pathogen. A clear photograph can help an adviser decide what to inspect, but it may not be enough to confirm the cause.
Record the crop and variety, sowing date, seed lot if known, compost details, watering pattern and when symptoms first appeared. Photograph the whole tray and close views of affected stems and roots, alongside a healthy plant of the same crop. If a service requests a sample, ask how it should be packed and whether it wants a whole plant, roots or compost; keep it contained until then. Avoid applying a treatment based only on an online image, since a misidentified problem can leave the real cause unresolved.
Frequently asked questions
What is the clearest sign of damping off?
A soft, narrowed or discoloured section of stem at the compost surface, followed by the seedling collapsing, is a strong clue. A fallen seedling without damage at its base may have another problem, so check the roots and growing conditions too.
Can damping off affect seeds before they emerge?
Yes. Affected seeds can rot in the compost and fail to produce a shoot. Gaps in a tray are not proof of damping off, though: seed viability, sowing depth and unsuitable growing conditions can also prevent emergence.
Can a seedling recover after it has fallen over?
If the stem has been badly constricted or the roots are rotting, recovery is unlikely. Remove severely affected seedlings. If a plant is simply wilted because its compost has dried out, it may recover after watering, so check the stem base and compost before deciding.
Should I reuse compost from an affected tray?
Do not reuse compost from a tray with suspected damping off. Use fresh growing media for a new sowing, and clean reusable trays and tools first. Fresh compost is not necessarily sterile, so good watering and hygiene still matter.
When should I seek a plant-health diagnosis?
Ask a qualified horticultural adviser or diagnostic service if losses spread, recur despite changes to your routine, affect valuable plants or do not fit the usual symptoms. Contact the service before sending a sample so you can follow its instructions.
A soft constriction at the compost surface followed by seedling collapse is a strong clue to damping off; damaged roots or missing seedlings need closer interpretation. Treat the symptoms as a working diagnosis, not a label for every failure. Isolating the suspect batch, cleaning equipment, correcting prolonged wetness and recording what happens in the next sowing can make the cause easier to trace. If losses keep returning or the symptoms remain unclear, a plant-health adviser can help distinguish infection from other problems before you change more of the setup.
