
Will a Greenhouse Fit Between Your House and Fence?
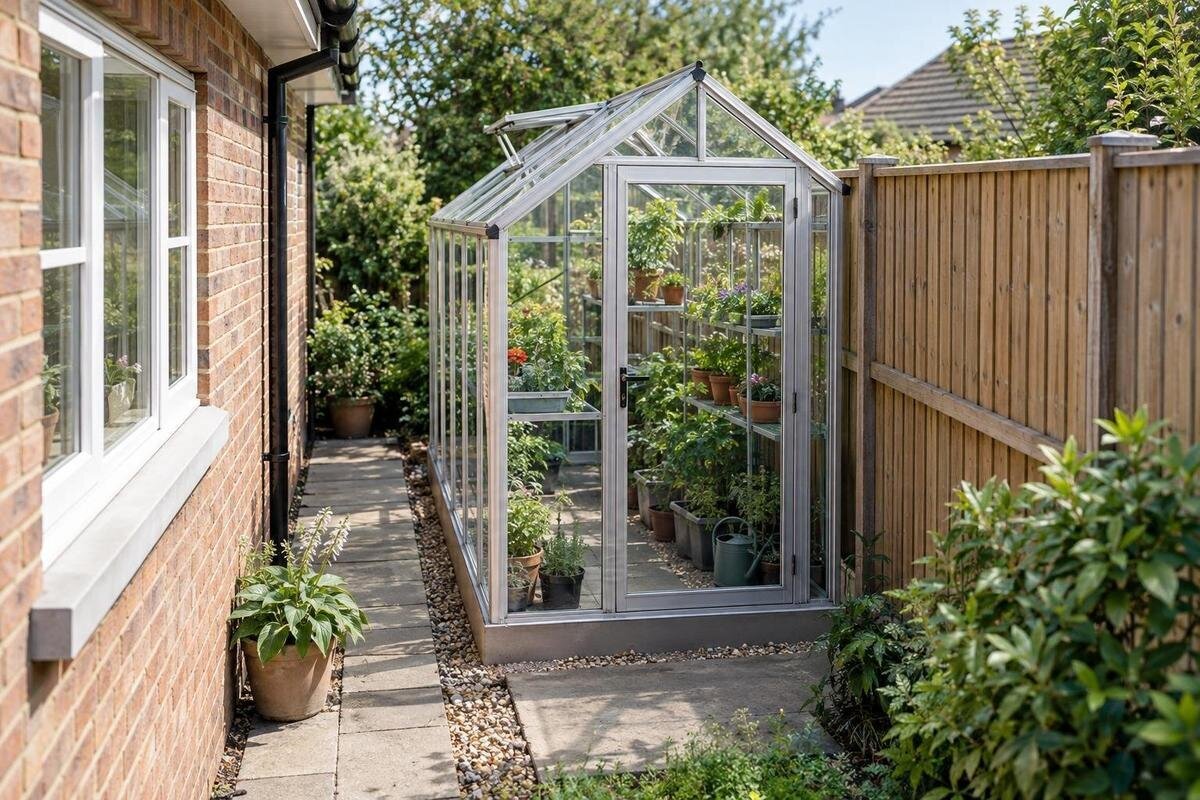
Greenhouse siting guide
That gap may look wide enough until you account for projections, opening parts and the space needed to work. To judge whether a greenhouse can go between a house and a fence, measure the full passage, calculate the usable growing width inside the frame, and plan for shade and rainwater as well as the footprint. A scale drawing is more reliable than a single measurement at the gate.

Measure the passage at its narrowest points
Measure the clear gap at several points along its entire length, not just across the entrance. A fence can bow; posts, concrete plinths and gates can protrude; the house line may change around a bay, sill, drainpipe, meter box or projecting eaves. Record the narrowest width and where it occurs, plus the length of each narrower stretch. Measure from the outermost fixed projections that would remain in place, checking near the ground and at the height of any roof or wall projections. If the house and fence are not parallel, record each change rather than averaging it: a greenhouse may clear one end and collide with the other.
Draw the passage to scale on graph paper or in a simple digital plan. Mark the house, fence, gate swing, paving edges, steps, downpipes and anything else that cannot move, then label each measurement. Take photographs from both ends and along the route, including an upward view of the eaves and guttering; date them if you will revisit the site in another season. Show moveable objects separately, and do not count them as clear space unless you intend to relocate them. A scaled sketch makes it easier to test different outlines and share the same information with a supplier or installer. Keep awkward angles and projections in the drawing instead of smoothing them into a neat rectangle.
Compare external width with the growing space inside
Separate the greenhouse’s external width from the clear growing width inside. The outer dimensions need to fit between the house-side and fence-side projections; inside, the frame and any shelves or staging may reduce the space available for plants and movement. Check the precise model and size for its overall width and depth, and ask what each published figure measures. A base, internal dimension and maximum external width are not interchangeable. Nor should you assume that a quoted base measurement includes every projection; use the manufacturer’s dimensioned drawing to see what the figures cover before comparing them with the passage. If a drawing gives a maximum dimension, use that rather than relying on a nominal frame width.
Then sketch the inside plan. Mark the clear aisle, the width needed for beds or containers, and where you expect to stand while watering, pruning or carrying a tray. The Lean-To Greenhouse is listed with an area range from 40 to 154 sq ft, but that figure cannot tell you the external width or usable aisle of the selected version. Treat a lean-to as one form to compare, not as an automatic solution for a narrow strip. Confirm the exact external and internal dimensions and how the chosen model is intended to be sited; if the outside fits but no useful growing space remains, another size may be a better choice.
Leave room to maintain the greenhouse and its surroundings
A footprint is not the same as a workable site. Think through jobs on both sides of the greenhouse: wiping down glazing, clearing leaves, reaching handles, replacing a damaged panel, checking nearby guttering and repairing a fence board. Some tasks may be possible from an end or from inside, but do not rely on that unless you can reach the relevant surfaces and manoeuvre with the tools required. If the fence needs periodic work, putting the greenhouse hard against it can turn a small repair into a job that requires shifting equipment or removing parts. Note which jobs are frequent and which are occasional; repeated tasks deserve particular attention.
Mark the places where someone needs to stand, not just the space occupied by the structure. Consider a bucket, hose, step stool or replacement component that may need to pass through, and whether access from one end remains possible once pots and tools are in use. When comparing a model from the limited-edition aluminium greenhouse range, ask how its glazing and other replaceable parts are accessed for maintenance. That information helps you assess the space needed beside the selected version. There is no universal service gap: leave room for the actual work involved. A tape or string outline can help you test movement with your usual equipment before committing to the layout.
Include doors, vents and the full footprint
Include every part that opens or projects when you draw the footprint. Check the door position and opening direction, the room a handle needs, and whether vents or other moving parts need space into the passage. If a door opens into the only route, it may block access even though the frame itself fits; if it opens towards a fence, it may be difficult to use. Model designs vary, so use the chosen product’s plan rather than assuming a door type or opening direction. Mark a clear approach from the gate or path, and include a tray, watering can or other item you expect to carry through. If you usually leave a door open while working, account for that position too.
Draw the whole plan shape, not just the narrowest side: a projecting end bay, porch or non-rectangular form may use more room at one point than along the main run. If a T-shaped design is on your shortlist, such as the T-Shaped Orangery Greenhouse, plot the exact variant’s full outline from its dimensioned plan. The model name alone is not a drawing, and a total area figure does not show where the widest part sits. Add the door and opening parts only after the outline is clear, then check whether the remaining route still works. A paper cut-out on the scaled sketch can help you test alternative positions.

Check seasonal shade in the actual passage
Sunlight can vary from one end of a side passage to the other. The house may shade the strip at some hours, while fence height and nearby structures affect how long direct light reaches the proposed position. Take photographs from the same points at different times of day and revisit in different seasons, especially if your first visit is during an unusually bright or leafless period. If a tree or neighbouring roof changes the shadow later in the year, include that in the assessment too. Use fixed viewpoints so you are comparing changes in light rather than changes in camera position. A lunchtime check or one summer photograph cannot describe the pattern through the growing year.
On a seasonal shadow diagram, draw the proposed greenhouse outline and note when the house or fence casts shade across it. Do not just mark that the garden is sunny or shaded overall; the strip may be bright at one end and dark at the other. Compare the observed pattern with the crops you want to grow and the periods when you expect to use the greenhouse. There is no universal sunlight figure that can be promised for every crop or site. If only part of the footprint gets useful light, consider how the growing layout would work there rather than treating the whole passage as one uniform space.
Trace roof water from the house and greenhouse
Treat rainwater as a separate fit test, not a detail to leave until the structure is in place. Mark the house’s eaves, gutters, downpipe outlets and any known overflow point, then note where water currently lands after rain. Add the greenhouse roof outline and the drainage arrangement confirmed for its exact model. The narrow strip may leave little room for water to pass without pooling or crossing a path, so identify whether discharge would fall beside the house, fence, greenhouse base, doorway or neighbouring property. Note any low spots or existing puddles on the site photographs, and observe where water moves after ordinary rainfall rather than relying only on a dry-weather estimate.
Do not assume that water from the house can simply be directed along the greenhouse, or that greenhouse runoff will drain harmlessly away. For a design such as the Pyramid-type greenhouse, obtain the selected version’s roof plan and drainage details so you can identify each discharge point. Show any proposed water butt on the sketch, including access to its tap and the route for overflow when it is full. If a downpipe, overflow or drainage arrangement needs changing, ask a suitably qualified trade professional to assess the site. Keep the focus on where water goes, rather than assuming that gravel or paving will absorb it.
Plan beds and access inside the greenhouse
Work out what must fit inside before settling for the narrowest model that clears the outside gap. A bench on each side, a central path, containers, trays and watering equipment all use the same width; the frame also takes space. Draw the bed or container widths and an aisle that suits the tasks you will do, then check that you can reach plants without stepping into a bed or dragging items past the door. Try a typical growing setup, not an empty-floor sketch, and allow for access during planting and harvesting. If the internal layout becomes one cramped row with no practical route, the greenhouse may fit physically but fail the purpose for which you want it.
Storage changes the calculation too. If you are considering the greenhouse with built-in storage, find out where the storage sits in the specific layout and how much space remains for beds, benches and an aisle. Draw any partition and storage entrance shown on the model plan, then check whether stored items can be reached without moving plants. Make a realistic inventory: bags of compost, empty pots and long-handled tools need different shapes of space, not just a total floor area. Compare that arrangement with storing some equipment elsewhere. This helps you decide whether integrated storage suits the narrow site without counting the same space twice as both storage and growing area.
Keep access to walls, fences and services
Check what would become difficult to reach once the greenhouse is in place. House-side openings, air bricks, meter boxes, taps, exterior lights, drainpipes, inspection covers and the gate may all need access for use or maintenance. On the fence side, consider whether panels, posts or a shared boundary need occasional attention; if another owner is involved, agree practical access arrangements rather than assuming you can reach across the strip. Also check whether the passage is still needed for bins, bikes or access to the rear garden. Site photographs can help a supplier or installer understand each obstruction.
Check whether the greenhouse would need to touch, attach to or sit close to the house, and what the manufacturer’s instructions say for that exact model. A wall that looks straight does not establish that it is suitable for a fixing. If you are comparing the Bloomcabin Prestige Greenhouse, mark the selected version’s position against every wall fitting on your sketch. Check that an opening window would remain usable and that air bricks would not be obstructed. Keep inspection covers accessible rather than merely visible beneath an empty aisle. Ask an appropriately qualified professional about any proposed structural or service-related change; these issues need resolving before the layout is settled.

Compare the selected model’s dimensions with the site plan
Bring the shortlisted models together on one comparison sheet, using the same site measurements and drawing scale for each. Record the chosen size, overall width and length, maximum height, internal clear width and proposed position. Distinguish a genuine passage candidate from an alternative for another garden location. For example, the Spacious Greenhouse has a listed area range of 506–753 sq ft; that is not evidence that it suits a narrow strip. Only retain a selected version for this site if its dimensioned plan supports the layout. If you are considering a different location as a fallback, draw it separately so that you can compare the two sites without confusing their constraints.
Alongside each model, record the remaining space at the tightest points and any unanswered questions. State whether the drawing includes the base, eaves, handles and opening parts, and identify anything still awaiting confirmation. This makes the comparison more useful than a list of nominal sizes: you can see which option leaves access where it is needed and which depends on an uncertain measurement. Send the annotated sketch to the supplier with specific questions, such as which dimension includes a roof projection or where a door sits in the chosen version. Keep the answers with the plan. Do not treat a layout as settled while a missing detail could change the fit.
Test the delivery route and everyday access
Check how the greenhouse and its components would reach the passage as well as whether the finished structure fits. Measure the gate, turns, steps and low obstacles on the route from the delivery point. For the Classic aluminium greenhouse, or any other shortlisted model, ask the supplier or installer for the selected version’s package dimensions, handling requirements and assembly-space requirements. Mark where components could be set down without blocking the route or damaging existing fittings. A long package may be difficult to turn even when it passes through the gate. Do not assume that assembly can take place entirely within the final footprint; confirm the working space needed before choosing the position.
Finally, walk the route in the way you will use it: open the gate, reach the greenhouse door, carry a tray or watering can, and make a repair without moving something that is always in the way. If the plan works only when the access strip is empty, or if roof water, wall access or fence maintenance has no practical solution, revise the position or choose another size or growing arrangement. Think about a typical busy day, with tools, pots and the gate in their usual places. A tight site can be practical when its clearances are deliberate; it is not workable merely because the frame can be squeezed between two boundaries.
Frequently asked questions
Can a greenhouse fit in any gap between a house and a fence?
Sometimes, but only after checking the whole length of the passage, the exact external outline and the space needed to open and maintain the greenhouse. A gap that is wide enough at the gate may narrow around a post or downpipe. No single clearance number answers the question for every site.
How much clearance should I leave around it?
There is no universal figure. Work out which sides need access for cleaning, repairs and fence or gutter work, and account for doors, vents, tools and the route through the garden. Use the actual model instructions and site measurements; ask the supplier or an appropriate professional if a required clearance is unclear.
Will a lean-to greenhouse solve the width problem?
Not automatically. A lean-to is one layout to compare, but the exact model’s external width, internal space, opening parts and siting requirements still matter. Check whether it is designed to be fixed to a wall or can be placed as planned, and keep access to the house wall and its fittings.
What should I do with rainwater from the house roof?
Mark the house gutter, downpipe outlet and any overflow, then include the greenhouse roof and the route its water will take. Avoid assuming runoff can be left against the house, fence or base. If a discharge or drainage arrangement needs changing, ask a suitably qualified professional to assess it.
How can I judge whether the passage gets enough sun?
Observe the proposed footprint at different times of day and in more than one season. Use dated photos from fixed viewpoints and add the moving shadows of the house and fence to a seasonal diagram. Compare the resulting pattern with the crops you plan to grow; a single sunny-day visit is not enough.
Treat the gap as a working route, not just a line on a plan. If the exact outside outline fits, the interior supports the way you want to grow, and maintenance, shade, runoff and access all have practical answers, a greenhouse may suit the site. If the layout depends on blocking a service, improvising drainage or squeezing through with no room to work, change the size or position before buying.
