
Should a Greenhouse Have Removable Benches or Permanent Beds?
Greenhouse layout guide
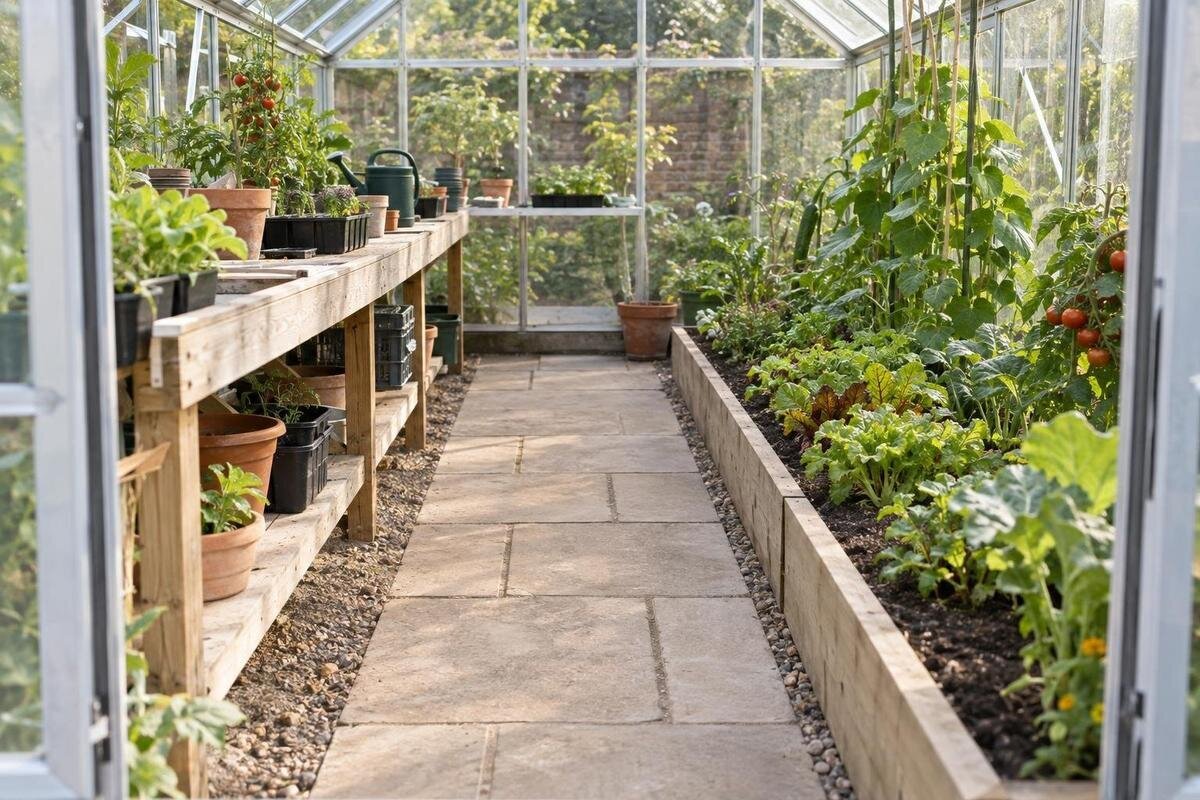
Whether removable benches or permanent beds work better depends on how often the greenhouse changes job. Staging offers a raised surface for trays and pots; taking it out can expose floor-level space for summer crops, while a fixed bed keeps a planting strip ready throughout the year. The two measured plans below use an illustrative clear internal rectangle of 2.40 m by 3.60 m. Those dimensions are planning examples only, not available Bloomcabin product sizes; the comparison separates growing area from worktop and access space.
How benches and permanent beds use greenhouse space
A bench, often called greenhouse staging, is a raised surface for seed trays, pots and small tools. A permanent bed is a planting area that stays in place, either in the ground or within fixed raised-bed edging. These terms can hide important differences: a bench top may lift out while its legs, wall rails or cross-bracing remain, and those parts still affect access to the floor. A bed’s outside width includes any edging or structure, so it is not all plantable soil. Compare the complete installed arrangement, rather than matching a removable shelf with a diagram of an otherwise empty floor.
The practical trade-off is between a work surface that can be moved and a planting footprint that stays ready. Staging suits routines with lots of seed trays, small pots or potting tasks on a raised surface; beds suit repeated ground-level cultivation in the same place. Removing a bench can open its footprint to floor-level crops or a different arrangement of containers, but it does not add floor area to the greenhouse. A permanent bed gives up some flexibility in return for a fixed growing zone. The choice is about how you use that space, not which option is universally better.
Map the seasonal changeover
Map the jobs over a full year rather than choosing from a spring photograph. Record when trays need a surface, when potted plants move out, when summer crops need floor-level room and whether autumn or winter brings more potting, storage or clearing. Mark each area as raised work surface, planted floor, clear route or temporary holding space. This separation prevents a square metre of bench top being counted as a square metre of bed, and reveals whether staging earns its footprint for most of the year or only during propagation. If two uses overlap, note the busiest month, not just the ideal changeover.
Measure the longest bench component and the route it must take through the doorway; decide where it will be stored between seasons. A unit that is awkward to carry, cannot pass the entrance or has nowhere to go may stay in place, so its theoretical flexibility is not practical flexibility. Also ask whether you want to remove both sides or only one, and whether the staging can be reconfigured without dismantling other fittings. When applying the sketch to a real structure, use the chosen model’s interior drawing; the Classic aluminium greenhouse range is a starting point for comparing formats, not a substitute for checking the selected size’s clear width, length and obstructions.
Illustrative plan A: removable benches in an 8.64 m² footprint
Plan A uses an illustrative clear internal rectangle 2.40 m wide by 3.60 m long, or 8.64 m²; these are planning dimensions, not a product size. Put one removable bench measuring 0.60 m by 3.00 m along each long side. Each provides 1.80 m² of surface, giving 3.60 m² in total. Between them, a 1.20 m central aisle runs for 3.00 m. Leave a full-width strip 0.30 m deep at each short end. The widths add to 2.40 m and the lengths to 3.60 m. Door swing, frame intrusions and the structure itself are not included in this arithmetic.
In the staging season, treat the central aisle and end strips as access, not spare growing area. If both benches come out for summer, their two 0.60 m by 3.00 m footprints become accessible at floor level: 3.60 m² in total. That area could take growbags, pots or a floor-grown crop only if the rooting, floor and watering arrangements allow; lifting staging does not turn paving into a soil bed. The 1.20 m aisle is still only the plan’s nominal clear width: containers, stems and foliage can narrow it. A Lean-To Greenhouse model needs its own measured outline; do not assume it matches this rectangular example.
Illustrative plan B: permanent beds in the same footprint
Plan B keeps the same illustrative 2.40 m by 3.60 m rectangle so the comparison is like-for-like. Replace each removable bench with a permanent 0.60 m by 3.00 m planting strip. The two bed footprints are 1.80 m² each, or 3.60 m² combined. Retain the 1.20 m central path over 3.00 m and the two 0.30 m end strips. The footprint arithmetic is unchanged, but those side strips are now committed to growing in beds; there is no raised bench surface in this version. If you use raised beds, count their outside edge-to-edge width rather than just the planting area.
During summer, the beds already provide the planned floor-level growing area, so there is no staging to dismantle before planting. In quieter months they still occupy the same strips, whether planted, resting or awaiting the next crop. This can suit a routine that rarely changes: no unit needs moving or storing. The trade-off is that the floor footprint cannot be reclaimed as open space for other activities. Soil depth, growing medium, edging and the bed’s relationship to the base are separate decisions, not details represented by the plan. Apply the same arithmetic to the chosen size in the Limited Edition aluminium greenhouse range rather than assuming the example’s internal measurements.
What changes when summer crops need floor space?
In these matched plans, both systems use 3.60 m² along the sides; they do not offer different gross floor areas. The bench plan changes a raised surface into accessible floor space when the units are removed. The bed plan keeps that floor space ready for planting from the outset. If you need to clear the interior for a seasonal task, benches may be more adaptable, provided the parts blocking the floor also move and you have somewhere to store them. If the same ground rows grow crops each summer, permanent beds avoid a changeover that brings no extra planting area. The difference is flexibility and work, not a guaranteed increase in yield.
Judge summer clearance at the crop’s mature size, not from the empty plan. Mark the plant base, support, expected foliage spread and the part of the path you need to keep open; a stem or tie may fit within a bed while leaves reach into the aisle. The plan gives no crop height or headroom, and an open floor patch is not the same as unobstructed growing volume. If you are comparing a Pyramid greenhouse model, use its own internal outline and dimensions before drawing parallel side strips; the product name alone cannot show how those runs fit.
Combining a permanent bed with removable staging
The choice does not have to be all or nothing. On the same example footprint, keep one 0.60 m by 3.00 m removable bench on one side and put a permanent bed of the same size on the other. The central aisle remains 1.20 m by 3.00 m, with the same 0.30 m end strips. The layout now has 1.80 m² of raised surface and 1.80 m² of fixed planting area. Remove the bench in summer and its strip becomes accessible at floor level while the opposite bed remains planted. This provides a work surface while the bench is installed, but the fixed bed prevents a complete seasonal reset of the floor.
A mixed arrangement can help when propagation continues after crops move into the beds, or when only one side needs changing. It can also reduce the amount of equipment to lift and store. The remaining bench still has to leave a useful route to the door, and the bed still limits how that side can be used. Do not assume that built-in storage will take a bench: the aluminium greenhouse with built-in storage is a separate product listing, so check the actual location and clear dimensions of any named storage before counting it for your own equipment.
Check the bed footprint and access
Beds commit the greenhouse floor to a growing method, not just a different piece of furniture. Before choosing them, establish whether the intended area will be planted in the ground, in a raised container or on a prepared surface, and how the bed edge meets the floor. The 0.60 m in the illustration is the outside footprint; an edging board or wall reduces the width available to plants. If making the bed requires changing or cutting into the greenhouse base, check compatibility with the supplier or a qualified installer rather than assuming the layout can be built as drawn.
Reach matters as much as area. In this example, each 0.60 m-wide side strip is approached from the central aisle; test a full-size mock-up to see whether you can tend the planting without stepping into it. Think through where harvest containers will sit, how you reach the far ends, and whether supports or leaves will interfere with the route. A shaped footprint needs its own drawing: for a T-Shaped Orangery Greenhouse, map each bed run and path to the actual internal plan rather than extending a rectangular strip across every part of the layout.
Keep the route usable as crops grow
An aisle is useful only if it remains open in the season when the greenhouse is fullest. The 1.20 m path in the illustration is a chosen number, not a recommended minimum. Mark the door opening, bench legs, plant supports and mature foliage, then compare the remaining passage with the way you carry pots, trays or a watering can. Check the route both while staging is in place and after it is removed. Allow for door movement and access outside the greenhouse as well as internal width; neither is included in the plan’s arithmetic.
Routine access and cleaning can favour different arrangements. A removable unit lets you reach the floor underneath once it is lifted, but only if the part blocking that space really comes away. A permanent bed leaves its edges and growing surface in place, so consider how you will water, weed, clear spent plants and move materials without repeatedly stepping across the path. When assessing the Prestige Greenhouse model page, mark these working positions on the internal drawing; a model name or external footprint does not establish the aisle left after adding a bed.
Measure the chosen greenhouse from its internal drawing
For a real purchase, begin with the selected model and size, then use its verified internal dimensions rather than the outside footprint or an area figure alone. Mark the usable width at each point, the clear length, the doorway and any intrusions shown on the drawing; a tapered, stepped or otherwise shaped interior may not take two identical runs. The Spacious Greenhouse range is listed from 506 to 753 ft², but a total area figure cannot tell you whether side beds and your preferred route fit. Choose the exact size before transferring this sketch.
On paper, calculate bench-top area, planted bed footprint and circulation separately; do not add them together as though every square metre has the same function. Outline the benches and beds on the actual plan, include bed edging, and test the path with staging in both seasonal positions. If possible, mark the widths at full scale on the greenhouse base or with removable tape before fitting anything. Check the entrance, access at the far end, the stored bench location and crop supports. Adjust the example to the real interior rather than squeezing a greenhouse around its dimensions.
Choose for the routine you will repeat
Removable benches make most sense when the greenhouse genuinely changes job through the year: trays or pots need a raised surface in one season, while floor-level crops need that same zone clear in another. Choose them only if removal is practical and the freed floor has a planned use; otherwise the promised flexibility stays on paper. Permanent beds are the more direct fit when the same growing strips are used year after year and reclaiming the floor is not a priority. Their advantage is readiness, not a larger footprint.
If both tasks matter, a mixed arrangement can preserve a smaller work surface and a fixed bed while keeping one side adaptable. Compare the greenhouse at its busiest stage, not just at installation: trays, mature crops, supports, tools and a clear route all need space. Ask which feature you would miss more often—the bench top or the ability to reclaim its floor—and make the layout answer that question.
Frequently asked questions
Does removing greenhouse staging automatically create a planting bed?
No. It makes the floor beneath the staging accessible, but paving does not become soil when a bench is lifted. Decide whether that area will hold growbags, pots or a crop in the ground, and check whether legs, rails or braces remain.
Do benches and permanent beds offer the same growing capacity?
Not necessarily. In the illustrative plans, each option uses 3.60 m² of side space, but a bench provides a raised surface while a bed provides a fixed planting footprint. Crop type, root space and the actual internal dimensions determine what that area can support.
How wide should the greenhouse aisle be?
There is no single width that suits every greenhouse and gardener. The 1.20 m aisle in the example is for comparing layouts, not a recommended minimum. Check the door, equipment you carry, supports and mature foliage, then judge the remaining route in the selected greenhouse.
Can I have one permanent bed and one removable bench?
Yes. A mixed arrangement can keep one work surface while reserving the opposite side for regular planting. Draw both pieces to their full outside dimensions, preserve a working route and decide where the removable unit will go when it is not in use.
Are the 2.40 m by 3.60 m plans available greenhouse sizes?
No. They are illustrative measurements used to compare the layouts, not catalogue dimensions. Check the verified internal dimensions for the exact greenhouse size you are considering, including the doorway and any intrusions shown on its drawing.
The useful comparison is not just bench against bed; it is a seasonal arrangement against a fixed one. Removable staging earns its place when the released strip has a planned use, the units can realistically be moved, and the route still works. A permanent bed is a simpler fit when that same planting area will be used every year. Draw the greenhouse in both seasonal states and count the work surface, planting area and clear path separately; the better choice is the one that still works when the space is busiest.
