
Blossom End Rot on Greenhouse Tomatoes: Why Fertiliser May Not Help
Greenhouse tomato problems
That dark, sunken mark at the base of a greenhouse tomato can send growers straight to a calcium feed. Yet blossom-end rot often reflects disrupted calcium delivery to growing fruit, even when the growing medium contains calcium. Water consistency and root health matter, and several fruit problems can look similar. Identify the lesion and review conditions before changing the feed.

Before adding fertiliser 1
What blossom-end rot looks like
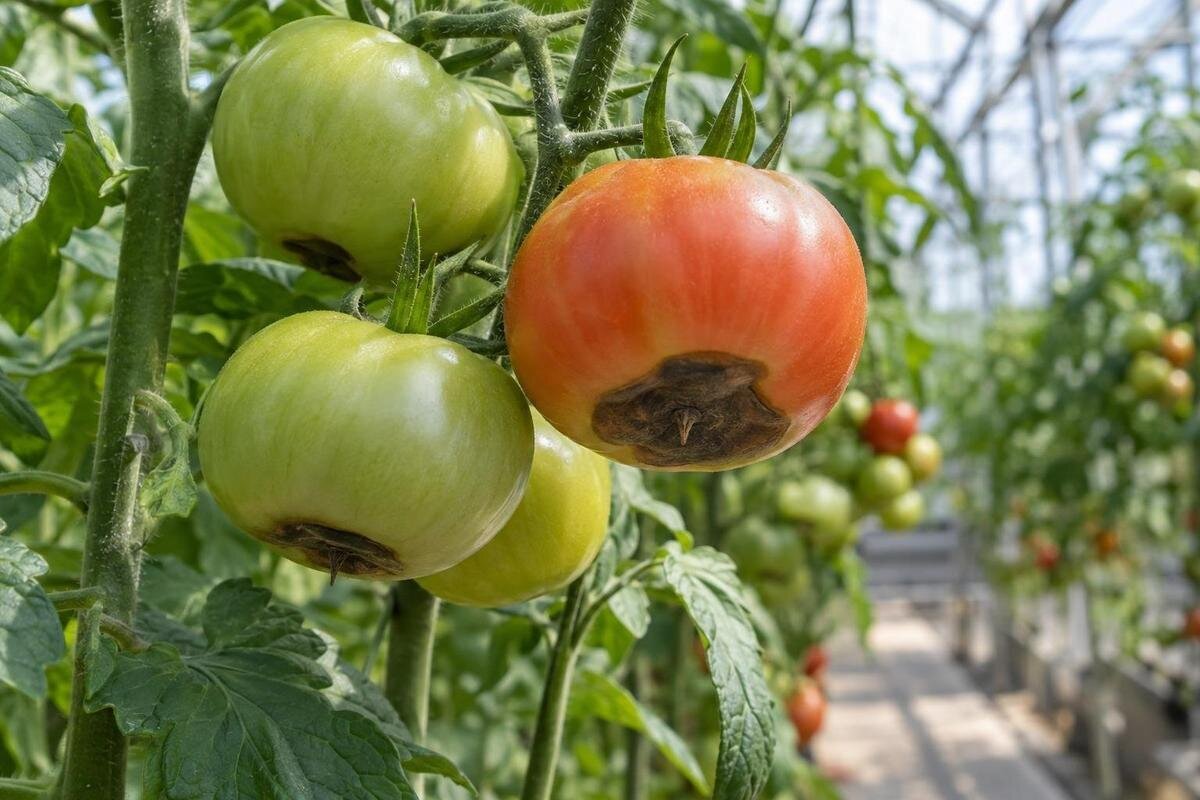
Blossom-end rot (BER) is a physiological disorder of developing tomato fruit. The first mark is usually at the blossom end—the end opposite the stalk—rather than beside the calyx. It may begin as a small, dull or water-soaked patch. As it enlarges, the tissue turns brown to black, becomes sunken and often dries into a firm, leathery area. The affected part can be irregular in shape, so a neat circular outline is not required for BER to be possible. On a long or pointed tomato, identify the blossom end from the fruit’s shape rather than its position on the plant. A fruit hanging at an angle can make a photograph misleading unless the stalk is also visible.
The mark can appear while a tomato is still green, and it may affect one fruit or several on the same plant. Look at the whole fruit as well as the discoloured area: note its position, whether the patch is dry or wet, and whether it is changing. The first fruit to show symptoms may not tell you whether later fruit will be affected. Nor does the number of marked tomatoes, on its own, identify the cause.
Check the fruit’s position and texture
The location of a mark is an important clue. BER is typically at the blossom end. Sunscald is more often a pale, bleached or papery patch on the side exposed to strong sunlight. A split is a visible break in the skin rather than a sunken patch of dead tissue. Other fruit rots can start around wounds or in different parts of the tomato; some become soft, spread, or develop visible mould. These signs can overlap, especially if decay has begun in tissue already damaged by BER. Check the leaves and stems as well: widespread spotting, wilting or stem damage gives an adviser information that a close-up of the fruit alone cannot provide. Record separate symptoms rather than assuming that every mark has the same cause.
Photographs are most useful when one shows the whole fruit and another shows the affected area clearly, with the blossom end identifiable. The Royal Horticultural Society’s blossom-end rot guidance describes a dark patch that becomes sunken at the end where the flower was attached. Compare that description with your fruit, but treat a visual match as a clue rather than a certain diagnosis. If the patch is wet and spreading, mouldy, or accompanied by a plant that is rapidly deteriorating, ask an experienced horticultural adviser or plant diagnostic service rather than assuming that a calcium treatment is needed.
Before adding fertiliser 2
Why extra calcium fertiliser may not help
BER is associated with too little calcium in the affected fruit tissue while that fruit is developing. That does not automatically mean the whole plant, or the soil, is short of calcium. Roots take up calcium dissolved in water, and it moves through the plant mainly in the water-conducting tissues. A fruit may receive too little at a critical stage even when a test finds calcium in the growing medium. The problem can therefore be one of uptake and distribution, rather than simply the amount present.
Adding a calcium fertiliser without checking the root zone may leave the cause untouched. Repeated or excessive feeding can also raise the concentration of dissolved salts or upset the nutrient balance, making it harder for roots to take up water. Before changing anything, write down the feed name, dilution, frequency and any other amendments already used. Follow the product’s instructions rather than combining full-strength feeds or guessing at a corrective dose. Nor should a single marked tomato automatically prompt you to stop all normal feeding: the question is whether the existing programme suits the crop and medium. Keep nutrient decisions separate from purchases of growing equipment. If you are also planning a new planting area, the Pyramid-type greenhouse range can be compared for its listed footprint; choosing a structure is a separate decision from establishing whether the roots need additional calcium.
How water movement affects calcium uptake
Water is part of the route by which calcium reaches a tomato plant. When the root zone becomes too dry, roots may take up less water and less calcium. A plant can then face a shortfall in fruit even if the medium was moist earlier in the week. Fruit also loses less water through transpiration than leaves, so calcium delivery to it is not a simple reflection of the total amount absorbed by the plant.
Keeping the root zone moist is not the same as keeping it saturated. Very wet, poorly drained conditions can deprive roots of oxygen or damage them, which also interferes with uptake. Check what happens after watering: does the water soak into the medium, run down a gap beside it, or remain in a tray? A wet surface does not show whether the centre of a root ball has been moistened. With irrigation, observe each outlet while it is running and check the medium afterwards; a working timer does not prove that every plant receives water. For manual watering, keep the route to the crop clear so that the furthest pots are not routinely missed. When organising a future greenhouse, the greenhouse range with built-in storage is one option to examine for keeping supplies separate from crop access. Confirm the actual arrangement before deciding where watering equipment will go.

Before adding fertiliser 3
Root stress and greenhouse conditions
A mismatch between fruit growth and calcium delivery can be more likely when roots are stressed or fruit is expanding quickly. Possible contributors include repeated drying and rewetting, waterlogged compost, root damage and a high concentration of salts in the growing medium. Temperature and humidity also affect plant water use and transpiration. Their effects depend on the conditions in that greenhouse; a dark patch alone cannot reveal whether heat, humidity or another root-zone problem was involved.
Record actual conditions where the affected plants are growing rather than inferring them from the type of structure. Compare affected and unaffected rows, note whether containers dry at different rates, and use a thermometer if temperature is a concern. Take readings near the crop rather than relying on a single measurement beside an open door. A brief morning inspection may miss a much warmer afternoon, so note the time as well as the reading. Review how you manage existing vents and shading during changing weather; the aim is to understand fluctuations, not to treat one temperature reading as proof of BER. If you are comparing Prestige greenhouse options, ask which vents are included in the configuration you are considering and how they are operated. Those details matter when planning day-to-day management, but the model name alone cannot tell you what conditions your tomatoes will experience.
What to check before changing the feed
Map where the affected fruit is growing. Note the plant, row or container, the fruit’s stage, and whether other fruit on that plant is affected. Then compare the root-zone conditions in those places: the surface can look dry while deeper compost is still wet, and pots or beds may not behave alike. Record recent watering and feeding, plus any hot or unusually humid periods. A pattern across one row may point to a different issue from marks scattered across the whole crop.
Check for obvious problems such as poor drainage, standing water or an irrigation outlet that is not reaching a particular container. If several beds or growing media are involved, keep records for each rather than treating the entire greenhouse as one uniform space. A simple sketch can identify the affected plant, its water supply and neighbouring plants without requiring elaborate monitoring equipment. Include changes such as repotting, moving a container or disturbing roots while installing a support. Compare plants of the same variety and similar fruit stage where possible, because unlike plants are less useful comparisons. In a larger growing area, make each watering zone identifiable and accessible. If you are considering the spacious orangery greenhouse range, use a proposed planting plan to assess those routes before choosing a size. The important layout question is whether you can inspect and water every root zone, including plants beyond the main path.
Before adding fertiliser 4
Keeping moisture steady in beds and containers
Use the moisture at root depth, rather than a fixed calendar, to guide watering. Check at a consistent depth and in more than one place, especially if plants are in separate containers or beds. Water enough to moisten the main root zone, but do not leave it persistently saturated. The amount and interval will vary with the growing medium, container size, plant growth and current conditions, so a routine that suited a cool week may not suit a warm one.
Tomatoes in pots or grow bags have less medium around their roots than plants in a bed, so their moisture can change more quickly. Make sure water reaches each container; do not assume that one plant’s condition represents the whole row. Check drainage openings and avoid leaving containers in accumulated water. If the compost has become very dry, check that watering actually wets it rather than escaping around the edges. Recheck the root zone afterwards instead of judging success by the amount poured in. Leave enough access to reach the back of each container and inspect it without repeatedly moving or damaging the plant. For a future container layout, Classic aluminium greenhouse models provide a range of listed footprints to compare. Draw the pots, supports and working path within the proposed space; the area available for plants is less than the total footprint once access is included.
When a soil or substrate test is worthwhile
A test can help when symptoms recur, when you have been adding fertiliser without a clear result, or when the crop shows other signs of a nutrient problem. Use a method suited to the growing medium: garden soil, bagged compost and other substrates may need different sampling or interpretation. A pH result describes acidity or alkalinity; it does not measure calcium on its own. Electrical conductivity (EC) indicates soluble salts, but it does not identify which nutrients are present. Ask the testing service what its analysis covers before sending a sample. Follow its sampling instructions and label different beds or containers separately when you are comparing a problem area with an unaffected one. Mixing them together can conceal the difference you are trying to investigate.
Water hardness is not a complete measure of calcium available to roots; water can contain other minerals, and its alkalinity can affect the growing medium’s pH. A water or substrate analysis may be useful if the problem persists, but interpret it for the material you are using. Give the adviser your feed details and say whether the sample comes from a bed, pot or grow bag. Ask whether any result supports a particular correction rather than treating every value outside a reference range as a reason to add another product. Leaf-applied calcium is not a guaranteed shortcut, because calcium moves poorly from leaves to fruit. When planning beds in a lean-to greenhouse, retain access to the growing medium for future sampling as well as routine care. Test the soil or compost actually used for the crop; nearby garden soil is not a substitute for a sample from a container.

Before adding fertiliser 5
What to do with affected fruit
The damaged tissue will not become sound again when watering or feeding changes. You can remove a badly affected tomato if you prefer, but removing it does not treat the underlying cause. BER itself is not contagious, although damaged tissue may later be colonised by mould or other decay. Inspect the rest of the fruit before deciding whether it is in good condition; wet, spreading decay or visible mould is a different concern from a small, dry BER mark.
Check later fruit as it develops and note whether new marks appear, rather than judging the result by old lesions. Photograph an affected fruit with a date and identify its plant so that you do not count the same lesion as new damage at every inspection. Fruit already developing when you changed the watering may still show symptoms; an immediate clean crop is not a realistic test of the adjustment. Compare newly affected fruit with the total number inspected, since a larger crop can produce more damaged tomatoes without a higher proportion being affected. When drawing a planting plan for limited-edition aluminium greenhouse models, include the space occupied by mature plants, not just their pots. Check whether lower trusses would remain visible from the path. This helps you judge a proposed layout without assuming that the published footprint is all available for planting.
Reducing the chance of repeat symptoms
Make the watering routine workable when you are away as well as when you are present. If someone else looks after the crop, show them how you check moisture in each type of container or bed, and explain which areas behave differently. Leave clear feed instructions so that a second person does not accidentally repeat an application. For an automatic system, check its operation before relying on it during an absence and arrange for someone to notice blocked outlets or empty supplies. Consistency depends on the routine continuing through changes in weather and carers, not simply on choosing a watering interval once.
If new fruit continues to develop similar marks despite steady moisture, or the symptoms do not match the usual BER pattern, ask a horticultural adviser to review close-up and whole-fruit photographs alongside your watering and feeding notes. Include the variety, growing medium and dates when symptoms first appeared. This lets the adviser distinguish a persistent problem from damage that developed before your changes. For the next crop, retain a short account of what happened and which adjustments appeared useful; avoid adding several amendments at once, as that makes the results difficult to interpret. If you are separately planning the T-shaped orangery greenhouse, mark the water source, hose route and any proposed irrigation zones on its plan. Use your records to identify practical requirements for that project rather than treating a replacement structure as a cure for BER.
Frequently asked questions
Can a tomato affected by blossom-end rot recover?
The damaged patch will not heal or return to normal. Later fruit may develop without symptoms if conditions improve, but that is not guaranteed. Judge progress by the fruit that forms afterwards, not by whether an existing mark fades.
Does blossom-end rot prove that my compost lacks calcium?
No. It points to too little calcium reaching the affected fruit while it was developing, which can happen even when the growing medium contains calcium. Check root conditions and watering, and test the medium before adding more.
Will a calcium spray cure blossom-end rot?
A spray is not a dependable first response. Calcium moves poorly from leaves to fruit, so spraying may not correct the supply to developing tissue. First investigate moisture, roots and the growing medium; use a treatment only when it is appropriate to the evidence.
Is blossom-end rot contagious?
No. It is a physiological disorder, not an infection that passes from fruit to fruit. Several affected plants can still point to a shared issue, such as watering or root-zone conditions.
Should I water greenhouse tomatoes every day to prevent it?
There is no reliable daily rule for every plant and growing medium. Check moisture where the roots are, then water according to the plant, container or bed, and current conditions. Aim for a steady supply without leaving roots waterlogged.
If the mark is blossom-end rot, developing fruit received too little calcium; that is not proof that the soil lacks it. The location and texture of the lesion help distinguish it from other damage, while root-zone moisture and drainage help explain why calcium delivery may have faltered. A test-based correction may help if a shortage is actually present. Otherwise, more fertiliser can add stress while leaving the cause untouched. Judge improvements by later fruit, not by an old patch that cannot heal.
