
Greenhouse Glazing Seals: When Cleaning Is Not Enough
Greenhouse repair
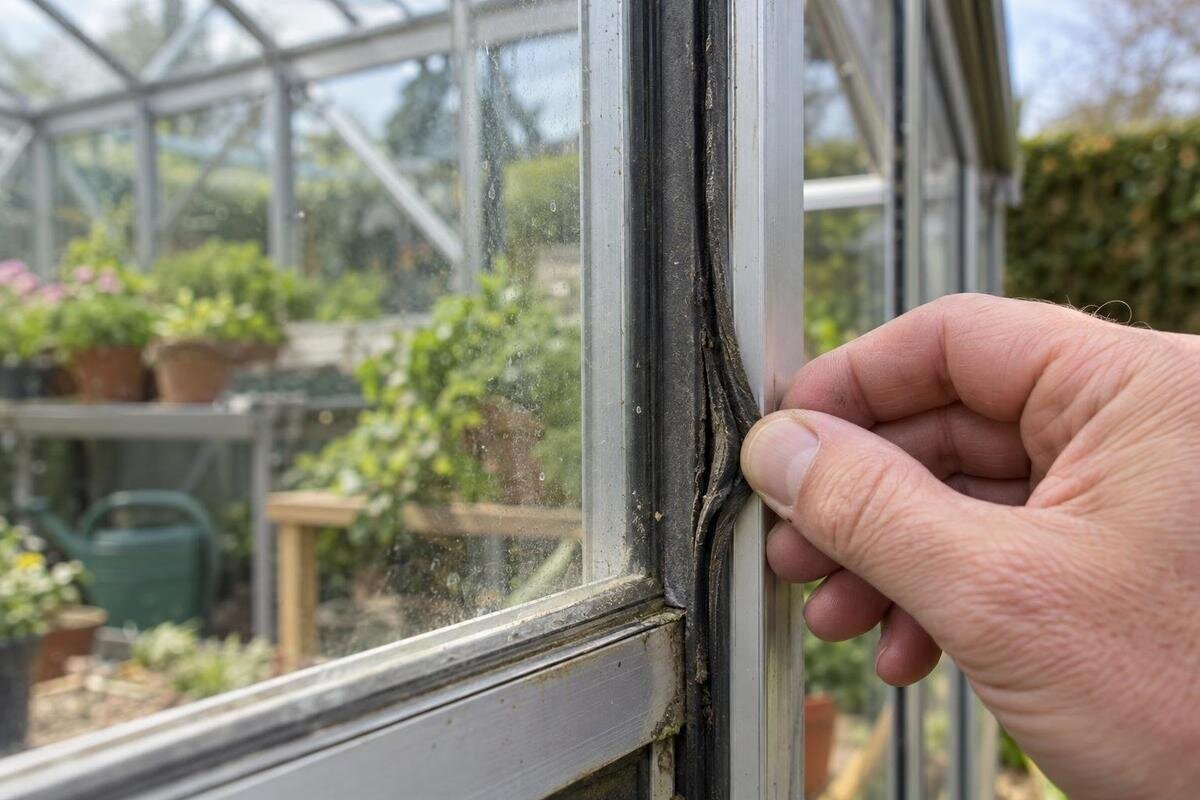
Greenhouse glazing seals can look dirty long before they fail, while an old seal can remain in place after it has stopped sitting properly. Washing away soil or algae improves appearance, but it cannot mend a split, reverse permanent flattening or make the wrong profile fit. This guide explains what to inspect, how to distinguish seal wear from other signs of moisture, and what to have ready before asking for a matched replacement.

01
What greenhouse glazing seals do
Greenhouse glazing seals, often called glazing rubbers or gaskets, sit at the junction between a pane and its supporting frame in systems that use them. Depending on the design, they may cushion the glazing and help close a route for wind-driven rain. Clips, pressure bars or capping may carry some or all of the retaining role. The seal is therefore one part of an assembly, not a stand-alone fix for a loose pane, damaged bar or distorted frame. If its seating has shifted, washing cannot put it back correctly or correct a fault in the frame channel. Identify the component before assuming every gap needs another strip.
Greenhouses do not all use the same arrangement. Profiles can differ between roof and side glazing, between models, and around doors or vents. Some are flexible strips; other edge details may be formed or retained differently. A door brush, joint sealant at a frame connection and a glazing gasket may all be called ‘rubber’ informally, but they do different jobs. Identify which component is affected and where it sits before cleaning or ordering. A generic weather strip may not be designed for a glazing channel, even if the colour and material look similar. Use the manual’s diagram if its terminology is unclear, and do not assume the same profile runs around every edge.
When cleaning will not restore a seal
Cleaning may be enough when the seal is intact and the visible problem is dust, soil, algae or another surface deposit. Follow the greenhouse maker’s care instructions; if they allow it, use clean water and a soft cloth or sponge, working without pulling the strip away. Wipe or rinse residues as directed, then inspect again in good light. A dark line that disappears may have been dirt, while a split or gap remains after the surface is clean. Look along an accessible run, including visible corners and joins, rather than judging only the dirtiest patch. Do not reach across or climb on glazing to clean an inaccessible area.
Cleaning cannot restore material that has become brittle, cracked, torn, permanently compressed, shrunken or detached. It cannot correct a profile that was the wrong size or fitted incorrectly. Avoid abrasive pads, solvents, strong cleaning agents, oils, silicone sprays, heat or high-pressure washing unless the manufacturer explicitly approves them; a treatment that seems to soften or lubricate the surface can affect how it behaves or sits. If an approved clean leaves a physical gap or visible damage, do not keep scrubbing in the hope that the shape will recover. Treat the problem as a parts-identification question instead, and avoid applying extra sealant as a cosmetic cover that could make later assessment harder.
02
Visible signs of seal deterioration
Look for a split running across or along the strip, a torn edge, a missing section, ends pulling back from a corner, or a visible gap between glazing and seal. Hardening and loss of resilience matter too, although you should not test them by bending or pulling material beside glass. A flattened section that no longer fills its intended channel, or a strip that has shrunk away from the pane, may indicate permanent deformation. Note where the change occurs and whether it is limited to one short run or repeated elsewhere. A single loose end may also signal a retention issue, so record it rather than forcing it back.
Compare the affected run with similar visible sections, but treat that as a clue rather than proof: profiles and exposure can vary around one greenhouse. Dirt or fading alone does not establish failure, and one worn strip does not mean the whole structure needs replacing. Photograph the location so a supplier can distinguish a roof run from a side edge or opening. When labelling the photographs, use the full model name from your paperwork. Names such as the Limited Edition greenhouse with built-in storage help distinguish catalogue entries, but the original manual is needed to identify the fitted component. Record the condition of each affected run separately rather than describing all the seals as worn.
Check that the seal is actually the source
Moisture is a reason to inspect, not proof by itself that a glazing seal has failed. Condensation can form on an inside pane without a damaged seal, while water can travel along a bar and appear some distance from its entry point. Note whether the mark is on the pane, at an edge, on the frame or beneath the greenhouse; whether it follows rainfall; and whether a seal visibly lifts or leaves a gap. Record the weather and location before wiping the area, then compare observations rather than relying on one wet patch. The pattern helps describe the issue, but it is not a diagnosis; do not order a seal solely because water has appeared nearby.
Inspect from a stable, accessible position and use photographs rather than reaching across or climbing onto the frame. Look at the seal’s seating, nearby glazing bars, clips or capping and any visible pane movement, but do not press or lever the pane. If a panel is loose, cracked or the frame appears distorted, stop at observation and ask a greenhouse installer to assess the assembly. Include any history of repairs in your enquiry: the current seal may not be the original component. For a greenhouse believed to be a Bloomcabin Prestige model, send the order reference and relevant manual page alongside the photographs. Identifying the structure helps the supplier investigate; it does not establish why water is appearing.

03
Why the replacement profile must match
A replacement must match the part’s function and profile, not merely its advertised length. Details to confirm may include cross-section, width, thickness, how it engages with the frame, the glazing type or thickness it serves, and whether it belongs on a roof, side, door or vent. A small mismatch may prevent it from seating, leave a gap, or interfere with the intended retaining arrangement. These details depend on the greenhouse system; do not infer measurements from a photograph or assume the same material description means the same profile. The maker’s part number or drawing is more reliable than a generic description such as ‘greenhouse rubber’. Check the diagram for how the part meets the pane and bar.
Start with the maker’s parts list, assembly manual or technical drawing, looking for a part number and any note about a revised or superseded component. Ask the manufacturer or seller to confirm compatibility with your exact model and version. If two profiles are suggested, ask which drawing reference applies to the affected location and why; a similar outline is not enough. When discussing a model such as the Bloomcabin Orangery, distinguish the complete greenhouse name from the seal’s own identifier. Do not substitute household weather stripping, stretch a shorter strip or trim a seemingly close profile unless the manufacturer approves that method. Keep the confirmed part reference and any accompanying drawing together, so the order can be checked against the written specification.
Identify the greenhouse model and version
Find model information in the original order confirmation, invoice, manual, warranty paperwork or an accessible label supplied with the structure. Record the manufacturer, model name, approximate purchase year, size or configuration if known, and any serial or batch reference. Preserve the exact wording, including a model suffix or edition name. Different versions or glazing layouts can share closely related names, so a brand and photograph alone may not identify the right spare. If paperwork is missing, give the supplier the information you do have and ask where to find the identifier; do not dismantle the frame or glazing in search of it. Mention any panels or bars replaced since purchase.
Photos can support an enquiry if they show context as well as detail: one view of the affected roof or wall from a safe position, then a closer image of the seal, corner or visible gap. Include a ruler only if it can be placed without touching or shifting the glazing; otherwise say that the measurement is unknown. Avoid zooming so far that the location is unclear, and do not climb to photograph a roof edge. If you find a likely catalogue match, such as the Classic aluminium greenhouse, send it as a reference rather than treating visual similarity as confirmation. A supplier can compare it with your purchase records. Mention differences between the listing and your greenhouse, especially altered doors, vents or glazing.
04
Prepare a useful spare-parts enquiry
Make the spare-parts request specific enough for the supplier to check the right assembly. State the model and version, purchase year or order reference, the location of the seal, the number of affected runs and whether the glazing is glass or another panel type if known. Add the manufacturer’s part number when available, plus clear photographs and measurements only where safely obtainable. If you cannot identify a code or measure a cross-section, say so rather than guessing: an approximate dimension can point to a different profile. Mention whether the seal is split, missing, detached, flattened or simply suspected of letting in water, and whether the problem affects one place or several.
Ask the supplier to confirm the part number, compatible model and version, profile and quantity before you order. Check whether it is supplied in a particular length, whether corners or retaining pieces are separate, and whether the manual calls for specialist fitting. Distinguish the number of damaged runs from the quantity you need to buy; the supplier should explain the ordering unit and any model-specific allowance. For an enquiry about an aluminium lean-to greenhouse, describe which wall, roof edge or opening contains the affected seal rather than simply saying ‘along the side’. Ask whether the quotation includes all associated parts needed for the approved repair. If an equivalent is proposed, request written confirmation of its compatibility and the relevant fitting instructions.
When an installer should assess the glazing
Replacing a glazing seal can be straightforward on some systems and involve releasing or lifting glazing on others. Without the model’s procedure, it is not possible to tell from a photograph whether a run is a surface gasket or part of the pane-retaining arrangement. Glass can be heavy and breakable, and roof glazing may be difficult to reach safely; avoid prising out a seal, shifting a pane or working from an improvised support. Use the manufacturer’s instructions and part confirmation before deciding who should do the work, particularly if neighbouring panels might be affected. Do not assume the seal can be pulled free while the glazing stays safely in place.
Use a qualified greenhouse installer or the original supplier’s service route when glazing is cracked, loose, overhead, difficult to access, or likely to need adjacent panes or retaining parts disturbed. The same applies if frame bars are bent, fixings are loose, or a previous repair used an unknown sealant. Ask the installer to identify the component, explain what must be removed and confirm the method against the model’s instructions. If repair is no longer practical and you are considering the Limited Edition aluminium greenhouse, request a separate installation scope for the new structure. Keep removal of the old greenhouse, preparation of the site and fitting of the new one clearly itemised, rather than combining them with the abandoned seal repair.

05
Repair a seal or replace the greenhouse?
Replacing only the seal may be proportionate when the damaged part is clearly identified, the manufacturer can supply or approve a match, and surrounding glazing and frame remain in serviceable condition. If several runs have failed, adjacent panels are unstable, the frame is distorted or required parts cannot be identified, a wider assessment may be needed. Age alone does not establish that a greenhouse or seal has failed, and there is no universal number of worn sections that makes replacement the right choice. Ask the supplier or installer to explain what has failed, what work is included, and whether a local repair can follow the maker’s procedure.
Compare written scopes rather than just a replacement-part total: work may involve access, removing and refitting glazing, additional retaining parts or checking nearby sections. A new structure also raises separate questions about site fit, base, dismantling and disposal. If your shortlist includes the T-shaped orangery greenhouse, establish its documented layout and installation requirements before comparing the complete replacement cost with a repair quotation. Do not assume an existing base can be reused simply because the new greenhouse looks similar in a photograph. Ask for like-for-like descriptions of the work, including what is excluded. The useful comparison is between a defined repair to the existing assembly and a fully specified replacement, not between a seal price and a headline product price.
Care for the replacement and keep its details
After a confirmed replacement is fitted, keep its part number, profile description, model and version, supplier and the location where it was used with the manual. That record turns a future enquiry from ‘I need greenhouse rubber’ into a request that can be checked against a known component. During ordinary cleaning, look at accessible runs for fresh splits, pulled-back ends, gaps or movement; avoid tugging on them as a test. Cleaning removes dirt, but it is not a treatment for restoring flexibility, so there is no benefit in applying an unapproved conditioner. A dated photograph can help show whether an issue is new or changing.
Follow the maker’s care instructions for the seal and adjacent glazing. If a new part does not sit evenly or a pane seems to move after work, have the fit checked rather than concealing it with another layer. When choosing a future greenhouse, use what you have learnt from the repair to ask about documentation and spare-parts identification. For example, an enquiry about the Bloomcabin Oasis pyramid greenhouse can include a request for the applicable manual, a parts diagram and an explanation of how replacement seals are identified. Ask what information the supplier would need for a later order, without assuming future availability. Store those answers with the purchase documents so the next repair enquiry begins with a clear record.
Frequently asked questions
Can I clean greenhouse glazing rubber with washing-up liquid?
Only use a cleaner if the greenhouse manufacturer’s care instructions allow it. If they recommend a gentle clean, use the approved method and a soft cloth; do not assume that a household cleaner, solvent or abrasive is suitable. Avoid applying oils or silicone sprays unless the manufacturer specifically approves them.
Does a faded or discoloured seal always need replacing?
No. A change in colour on its own does not confirm that the seal has failed. Look for physical damage such as splits, torn edges, shrinkage, hardening, flattening or gaps. If its condition is unclear, photograph the area and ask the supplier or manufacturer to identify the part.
Can I use a generic strip of greenhouse rubber?
Do not assume it will fit. Seals can differ in profile, dimensions, location and the way they meet the glazing or frame. Ask the manufacturer or supplier to confirm a part number or approved equivalent for the exact greenhouse model and version before ordering.
Can I replace a short section without removing the pane?
That depends on the greenhouse’s glazing arrangement. Some work may involve releasing or lifting glazing or disturbing retaining parts, which cannot be judged reliably from a photograph. Check the model-specific instructions, and ask an installer to assess the job if the pane is overhead, loose, damaged or difficult to reach.
Will a new seal stop a greenhouse leak?
Only if the seal is the cause and the replacement matches the system. Condensation, water travelling along a frame, a damaged retaining part or a loose pane may produce similar signs. Record where and when moisture appears, then have the source assessed before ordering a seal.
Cleaning is useful when the seal is dirty and still intact; it is not a repair for material that has split, hardened, shrunk or lost its shape. Treat suspected failure as a matching-parts question: record the model, location and visible condition, then confirm the seal reference before anything is removed. Where glass is loose, damaged or overhead, leave the work to a competent installer. That keeps attention on the failed component rather than obscuring it with an unsuitable strip or sealant.
