
Why Greenhouse Seedlings Become Long and Leggy
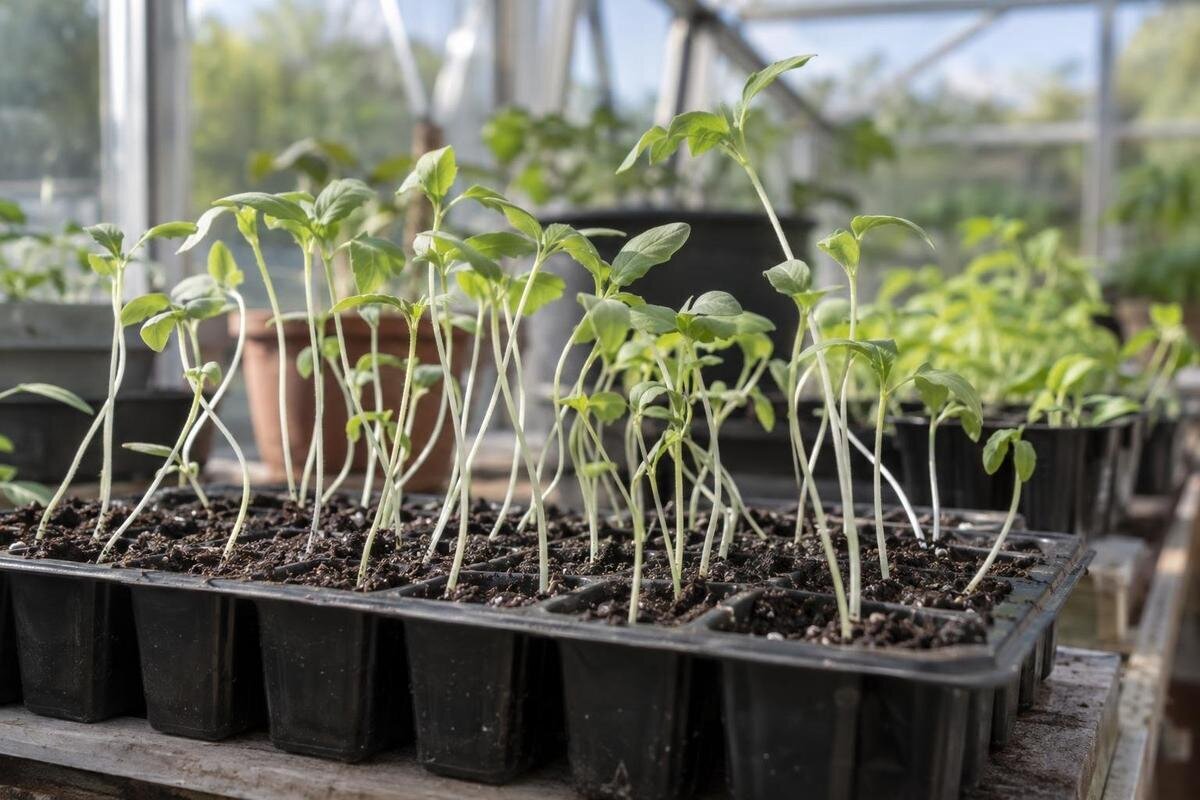
Seedling care in the greenhouse
Thin, elongated seedlings often indicate that light, warmth and spacing are out of balance. In a greenhouse, it is not enough to note that the space is warm or the day seems bright: light at tray level, heat after germination and the distance between neighbouring plants all interact. Compare seedlings across the tray and note when stretching began. That pattern helps distinguish a light-and-temperature mismatch from natural growth habit, root stress or disease, so you can change the relevant condition rather than treating every tall seedling in the same way.

How to recognise leggy seedlings
Leggy seedlings usually have stems that lengthen faster than they thicken. Look for an unusually long stem below the seed leaves (cotyledons), long gaps between successive true leaves, a narrow stem that bends under its own top growth, or a lean towards the brighter side of the greenhouse. The two cotyledons commonly sit opposite each other at the same point on the stem; the length below them is more useful than the distance between them. Height alone is not proof: crops and varieties differ, and a naturally upright seedling can look tall while remaining sturdy. Compare like with like—same crop, variety, sowing date and stage—before deciding that growth is abnormal.
Look at the pattern across the whole tray. A uniform batch that stretches after emergence points towards conditions shared by all the seedlings; plants in the centre that are taller than those at the edge may be shading one another. A row leaning in the same direction suggests uneven light. Note whether leaves are opening normally and whether stems are straight, pale, soft or already bent. Also record whether the change began after a tray was moved, a propagator cover was removed or a warm spell. A side-on photograph or dated note makes comparison easier; colour is a clue, not a diagnosis on its own.
Check the light at tray level
Light reaching a seed tray is reduced by more than cloud. A wall, fence, evergreen, roof overhang or greenhouse frame can shade one part of a bench, while a shelf above the seedlings may create another band of shade. Dust or condensation on the glazing can also reduce the light reaching plants. A bright patch of sun for a short part of the day does not tell you what the tray receives overall. Watch its position from morning to afternoon over several days: weather and season change the pattern, and a compass direction alone cannot account for nearby buildings or trees.
Put seedlings in the brightest position that suits the crop, leaving enough headroom to prevent an upper shelf or neighbouring foliage from shading them. If only a small area receives good daylight, give newly emerged batches priority rather than filling it with equipment. When considering the Limited Edition aluminium greenhouse with built-in storage, listed from 59.4 to 302 ft², examine where the storage area would sit in relation to your proposed propagation bench. Ask for a layout showing the growing and storage areas, then compare it with the shadows you observed on site. Keeping pots, compost and tools organised may free up working space, but seed trays still need an unobstructed position. Do not count a shelf as propagation space merely because a tray fits on it.
Why warmth can make low light worse
Warmth is useful for germination when a crop needs it, but the best conditions for starting a seed are not automatically right once it has emerged. In low light, warm seedlings can extend their stems quickly without developing compact growth. A covered propagator or a greenhouse that heats up in sunshine can create that mismatch: the plant has ample warmth but limited light. The effect depends on species and stage, so do not make every seedling cold in response. Follow crop-specific guidance after germination and remember that daytime warmth and the cooler night that follows can differ considerably.
Use a minimum–maximum thermometer near the trays; roof-level air or your own impression of the greenhouse can be misleading. Read it regularly and reset it after recording the highest and lowest temperatures. Once seedlings emerge, ventilate or remove a propagator cover as appropriate to the crop and outside conditions, while avoiding cold draughts for sensitive plants. Do not leave seedlings on a germination setting simply because it helped the seeds sprout. If comparing the Bloomcabin Prestige Greenhouse for a propagation area, establish which ventilation openings the chosen configuration includes and whether they can be reached when benches are occupied. Leave access to their controls in your layout. The useful buying question is how you will manage the conditions around the seedlings, not whether a model name suggests warmth or protection.
How overcrowding affects seedlings
Seedlings sown close together compete for light and space. Leaves overlap early, so plants may grow upwards while their stems remain slender and lower leaves become shaded. A tray that looks evenly filled at germination can be crowded once the first true leaves open. Thin or prick out before plants are tangled, following the crop’s recommended spacing rather than aiming for one universal gap. If removing an extra seedling would tug at the roots of the one you are keeping, snip the unwanted stem at compost level instead.
Pricking out gives individual seedlings room to develop, but it is not a shortcut for rescuing every weak plant. Many crops are moved when true leaves appear, although the right stage varies; seedlings that are already entwined may need careful separation. Keep labels with each variety and space pots so leaves can expand without immediately overlapping again. When assessing the Spacious Greenhouse, measure the trays and pots you actually use rather than estimating capacity from its listed 506 to 753 ft² range. Sketch both the initial trays and the larger area needed after pricking out. Allow somewhere to set down a tray while separating seedlings, with access that does not require reaching over other batches. This reveals whether your planned sowing volume can remain well spaced as the plants grow.

Distinguish stretching from other problems
Compare a problem tray with one of the same crop in another position. You can also move a small group to better light while keeping temperatures suitable for that crop. Mark the group and judge the growth formed after the move, not the length of stem already present. A different response suggests that location contributes to the problem, although changing several conditions together will not identify which one mattered most. If every tray is stretched, check shared conditions, including sowing time and whether seedlings stayed covered after emergence. Bench edges, doorways and shelves can differ in light and temperature even within one greenhouse. A simple map of tray positions helps connect symptoms to growing conditions instead of relying on an impression of the space as a whole.
Do not confuse a long stem with a seedling collapsing at the base. A constricted, darkened or water-soaked stem at compost level, followed by toppling, may indicate damping-off rather than ordinary stretching. Wilting, poor roots or unusual leaf colour can also point to watering, root or nutrient problems, although signs overlap. Check the compost and stem base before feeding: extra fertiliser will not correct low light, and excess nitrogen can encourage soft growth. If you are planning a new growing area around the Classic aluminium greenhouse, include space to inspect trays at close range. Check the proposed bench depth against your comfortable reach, and allow a clear surface for examining an affected plant without setting it among healthy batches. Easy inspection helps you notice a damaged stem before treating the whole tray for the wrong problem.
Improve light gradually
Once low light is likely, move the tray towards a brighter, more even position and clear nearby obstructions where practical. Take the crop’s recent conditions into account: a seedling raised in dim indoor light can scorch if placed in intense direct sun all at once, and a sunny spell adds heat as well as light. Increase exposure gradually and watch the leaves for bleaching or crisp edges. Turning a tray may reduce one-sided leaning, but it will not make an overall dim location bright. Aim for stronger, more balanced new growth rather than trying to straighten the existing stem by force.
Where natural daylight remains inadequate, a dedicated plant light may help. Follow its instructions for distance and daily operating period alongside the crop’s guidance; there is no single distance or duration that suits every lamp and seedling. Watch for leaves heating, paling or bleaching, and remember that extra light does not solve excessive warmth or crowding. If considering the Lean-To Greenhouse, map the proposed bench position against the adjoining wall and nearby obstructions. Check whether seedlings would receive useful daylight throughout the day or only during a brief sunny interval. Where supplementary lighting is part of the plan, establish whether the chosen equipment is suitable for greenhouse humidity and ask a qualified electrician about the electrical provision. Do not assume that a domestic indoor lamp is suitable for the same conditions.
What to do with already-stretched seedlings
Recovery depends on the seedling’s stage. Newly emerged plants or those with a few true leaves may produce sturdier new growth when light improves and post-germination warmth is suitable. The stretched section will not shrink or turn into a normal-length internode, so watch the growing point and the next leaves rather than expecting an overnight change in appearance. If the stem is intact and the leaves remain healthy, the seedling may still be usable. If it has kinked, collapsed or been badly damaged, weigh the time left in the sowing schedule against raising a replacement.
When potting on, handle seedlings by a leaf rather than squeezing the stem, and check crop-specific planting depth. Tomatoes commonly form roots along a buried section of stem, but deeper planting is not a remedy for every crop. Keep the growing point clear and avoid burying a stem if the crop is sensitive to it. Prepare the new pot before lifting the seedling so its roots are not left exposed while you search for compost or labels. Firm the compost gently and water to settle the roots. When comparing the Classic Limited Edition greenhouse, check whether your proposed layout leaves room for this work as well as for standing pots. A useful potting area needs a clear surface for the original tray, prepared containers and finished plants, without forcing you to balance seedlings on an occupied bench.
Plan a greenhouse bench for successive batches
A practical propagation bench needs room for more than newly sown trays. Allow space for seedlings that have just emerged, a place to prick out and pot on, and an area where plants can be observed without stacking trays in front of them. Keeping batches at different stages visibly separate makes it easier to give each the right conditions, remove covers at the appropriate time and prevent mature leaves shading younger plants. Label each group and leave access for watering and checking underneath trays; repeatedly lifting or moving them can disturb seedlings.
Plan the working layout as well as the overall footprint: where trays will sit, how you will reach them and how much clear bench surface remains after other greenhouse uses are accounted for. When considering the T-shaped orangery greenhouse, obtain the dimensions of the chosen configuration and sketch your containers to scale. Its name alone does not establish the length of a usable bench or the clearance beside it. Check how benches would meet at corners, whether a tray could be lifted out without moving another batch, and whether open doors would obstruct the working area. Mark likely shaded positions separately rather than counting every surface as equally useful. A layout that lets you keep emerging seedlings visible and accessible is more valuable for propagation than a high tray count achieved by stacking.

Match sowing volume to available space
Match the number of seeds you sow to the room you can keep bright after germination. Sowing everything at once can leave you with more seedlings than pots or bench space, especially if the crop is started long before it can be moved on. Follow species-specific sowing and planting guidance, and use successive sowings where they suit the crop and your growing plans. A smaller batch that can be spaced properly is often easier to manage than a densely packed tray whose best-positioned plants shade the rest. Include potting-on space in your plan, not just room for germination.
Before each batch, count the cells and pots you can manage and reserve a clear area for seedlings once they emerge. The Pyramid-type greenhouse is listed from 60 to 203 sq ft; use that range to shortlist sizes, then check the usable bench arrangement for the configuration you are considering. Measure tray widths, include the spaces between pots and allow for watering access. Record how many seeds you sowed, how many germinated and how much space the seedlings occupied at the true-leaf stage. Germination trays can conceal the space demand because many small seedlings initially share one container. For the next sowing, base your quantity on the room available after separation, allowing for older batches that may still be waiting to move on. This makes the plan reflect your growing results rather than an optimistic maximum capacity.
Monitor growth from emergence to potting on
Make the first check as seedlings emerge. Note their position, whether a cover or propagator is still in use, and whether the greenhouse warms sharply in sunshine. Check again as true leaves develop, before crowding makes a correction harder. A dated label and a photograph from the side can show whether stems are lengthening between leaf pairs. Keep the crop’s instructions beside the tray, since a condition that suits one species may be too warm or too bright for another. These small observations help you trace a change to its cause.
When stretching appears, respond to the clearest pattern—light, temperature or spacing—and watch the new growth. If a tray is both crowded and dim, separate it while improving its light rather than applying a general fertiliser or moving it straight into harsh sun. Note what you changed and where the next leaves formed. If more than one cause is obvious, address both and record that too. A brief growing record is more useful than relying on fixed light or temperature rules that do not suit every crop.
Frequently asked questions
Can leggy seedlings become sturdy again?
They cannot shorten the stretched sections of stem already formed. If the stem is intact and the leaves and roots are healthy, better light, suitable post-germination temperatures and more space can encourage sturdier new growth. A collapsed or badly damaged seedling may be better replaced if the crop’s timing allows.
Should I bury a stretched seedling’s stem?
Only if that crop tolerates deeper planting. Tomatoes commonly form roots along a buried section of stem, but this is not suitable for every seedling. Check crop-specific guidance, keep the growing point clear and do not bury a sensitive stem just to hide its length.
Should I move leggy seedlings straight into full sun?
Not if they have been growing in dim conditions. A sudden change to intense direct sun can scorch young leaves, and a sunny greenhouse may also become hotter. Move them towards brighter conditions gradually, while keeping the crop’s temperature needs in mind.
Can a warm propagator cause seedlings to stretch?
Warmth is useful for germination when a crop needs it, but seedlings can stretch if warmth speeds growth while light remains limited. Once shoots appear, follow the crop’s guidance for growing-on conditions and avoid keeping seedlings on a germination setting by default.
How close should a grow light be to seedlings?
There is no universal distance: it depends on the light and the crop. Follow the manufacturer’s instructions and crop guidance, then watch for signs of excess heat or bleaching. A light that is too far away may not help, while one too close can damage leaves.
A leggy batch is useful feedback about the balance between light, warmth and space. The shape of the seedlings, their position in the greenhouse and the point at which stretching began can help you identify what to adjust. Changing those conditions will not erase long internodes that have already formed, but it can give the next growth a better chance of staying sturdy. Keep the strongest seedlings, assess damaged ones by crop and stage, and use what the batch showed to plan the next sowing.
