
Winterising Greenhouse Water Pipes, Pumps and Tanks
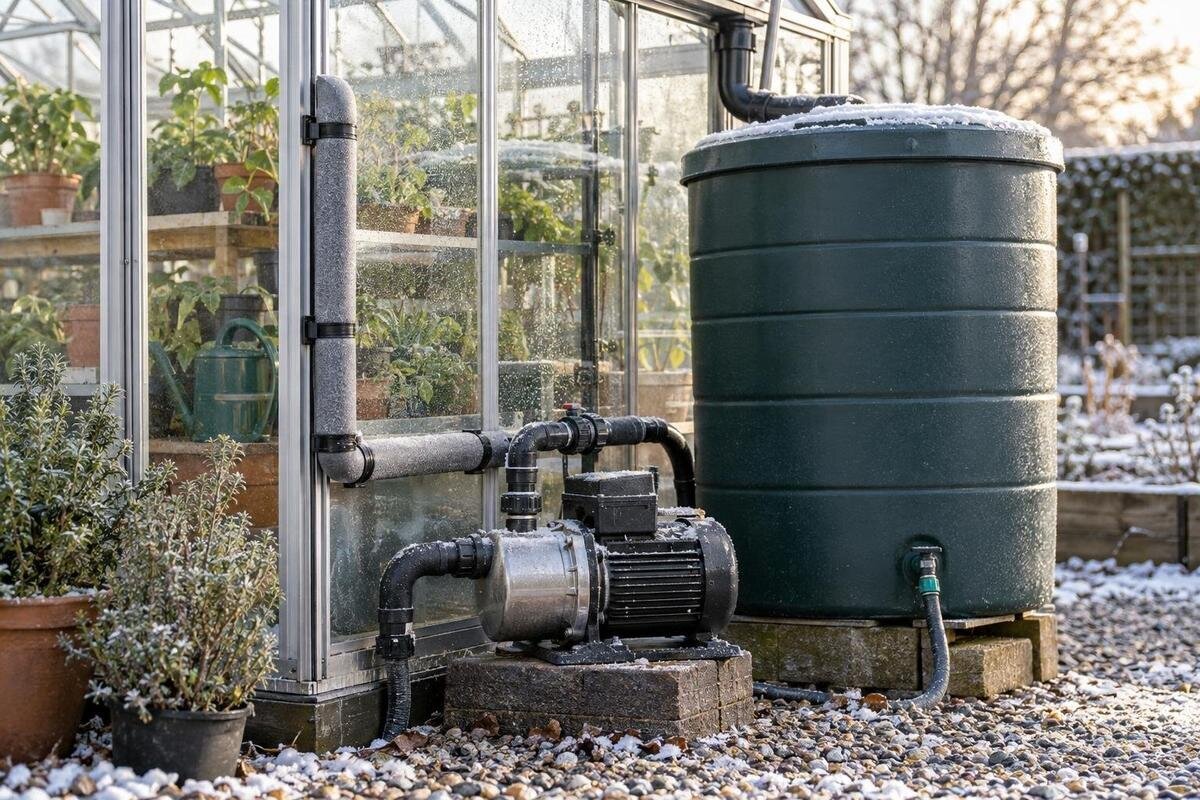
Greenhouse watering systems
Winterising a greenhouse watering system is a component-by-component job, not simply a matter of turning off a tap. Water may remain in a pump chamber, filter bowl, valve, timer body, sagging pipe, emitter line or tank outlet after the main run appears empty. If it freezes, trapped water can damage equipment or leave leaks to find in spring. This guide concentrates on pipes, pumps and tanks rather than glazing, plants or general greenhouse winter care. The aim is to map what holds water, drain or store each item as its maker directs, and choose a different plan if irrigation needs to stay in service.

Map the water system before you shut it down
Walk the whole route from the water source to the furthest outlet before touching anything. Record whether the supply comes from a mains tap, a water butt or another tank; where the pump, filter, timer or controller, pressure regulator, manifold and valves sit; and which sections are outdoors or in an unheated area. Mark the main shut-off, designed drain points, low spots, sagging hose, loops and capped branches. Note equipment shared by more than one circuit, because closing one valve may not isolate everything. A sketch, photographs of connections and a list of model numbers give you a reference for each component’s own winter instructions. Label controls that could restart automatically and note which area each valve serves.
When comparing a new structure such as the Lean-To Greenhouse, include access to the water supply in your layout checks. Use the proposed installation plan to measure the route from the source to each outlet, including crossings at entrances or work areas. Identify where pipes would need supports and where a change in level could leave a pocket of water. Allow access to shut-offs and drain points without moving benches or reaching behind fixed equipment. Keep this water-system drawing separate from your notes on glazing, plants and the frame: its purpose is to show every water-holding component and how you will reach it during shutdown.
Winter shutdown or continued watering
Choose first whether the system will be dormant, used for hand-watering or required to irrigate automatically. A full drainage procedure is not compatible with leaving the same circuit live, so identify any separate zone that can be shut down while another remains in use. Use an approaching frost forecast as a prompt, not a fixed calendar date, and consider the actual position of each component rather than a sunny midday reading in the growing area. Equipment outdoors, near an entrance or in an unheated part may experience different conditions from the centre of the greenhouse. A glazed enclosure should not be treated as a guarantee that water in pipes, fittings or pump chambers will remain above freezing.
For a planned installation in the limited-edition aluminium greenhouse, decide whether winter crops will need automatic irrigation, occasional hand-watering or no connected supply. That choice affects which circuits you need and whether they can be isolated separately; it does not establish the structure’s frost protection. Include the pump and tank locations in your assessment, especially if either will stand outside. For an existing system, stop the controller’s watering programme and close only the known water shut-off for that circuit. Follow instructions for pressure release and electrical isolation. If the supply is shared, a valve is unfamiliar or a pump is fixed in place, ask a qualified installer to identify the shutdown sequence.
Drain pipes, hoses and drip lines branch by branch
Once the supply is isolated, follow the maker’s sequence for draining the lines; do not loosen a joint while it may still be under pressure. Use the system’s intended drain points and outlets, then work through every run from its source to its end. Water can remain in a sag, upward bend, low section between supports, coiled hose or branch beyond a closed valve. Opening the main tap is not proof that these pockets have emptied. If a run is meant to be disconnected, drain it over a suitable place and let it empty in the orientation recommended by its maker. Leave valves as instructed rather than assuming open or closed is always best.
If you are planning watering for the T-Shaped Orangery Greenhouse, draw each proposed branch on the layout before choosing the irrigation equipment. Separate groups of beds or pots may need separate runs, and every run needs an accessible means of draining it. On an installed system, trace short microtubes, end caps and seldom-used taps as well as the main lines. If the manufacturer recommends flushing before storage, use its stated process and then drain the line. Do not use compressed air unless the maker specifically approves it and confirms the components are suitable; pressure can damage small fittings. Coil removed hoses loosely, label their connections and keep soil and grit out of the ends.
Follow the pump’s model-specific winter instructions
Pump construction determines whether the unit can be drained where it sits, needs a particular drain plug opened or should be removed. Read the exact model’s instructions before opening a housing: water may remain in the casing, outlet or strainer even after connected pipework is empty. Do not assume the pump is self-draining, and do not dismantle sealed parts simply to reach a suspected pocket. If the manual says to remove it, follow the specified orientation and storage conditions, protect ports from dirt and keep small plugs with the unit. Do not run a drained pump dry as a test; priming requirements are model-specific.
When considering a pyramid-type greenhouse, use its installation drawings to check where a proposed pump could be reached for servicing. Allow space for the unit, its connections and any removal procedure described in the pump manual; a position that fits during normal use may be awkward when hoses need disconnecting. A removable surface pump, a submerged pump and a fixed connected system can have different shutdown needs. Never lift a submerged pump by its electrical cable or handle wet connections. If electrical isolation or disconnection is unclear, ask a suitably qualified electrician or pump installer. Keep the pump’s instructions with the equipment so its spring priming procedure is readily available.

Empty filters, valves and control units individually
Filters, pressure regulators, meters and valves can hold water in small chambers that are easy to overlook. With the supply isolated, drain or remove only the parts the manufacturer identifies as user-serviceable. Empty filter bowls and clean cartridges or screens by the stated method; avoid scraping seals or using an unapproved cleaning agent. Check solenoid valves, non-return valves, connectors and pressure-control bodies individually. A downstream pipe draining freely does not show that a closed valve body is empty. Keep seals with their correct housings, and note any cracked part, leak or other visible damage so it can be dealt with before the system is used again.
Timers and controllers need separate attention: some stay fitted, while others can be removed or protected only as their instructions allow. Record settings and take a clear photo before removing a device; remove batteries only if its manual says to do so. If you are considering the greenhouse with built-in storage, check the proposed storage conditions against the requirements for your pump, filter and controller. Built-in storage does not by itself establish that the space will remain frost-free or dry enough for a particular device. Make a list of parts that need a different storage location, and keep electrical equipment out of service if it is wet or damaged.
Winter preparation for water tanks
Treat the tank as its own vessel, not as an extension of the pipework. Identify its material and construction, whether it is portable or fixed, and the designed drain outlet and overflow. Check the maker’s instructions for whether it should be empty or left in a particular state during cold weather. If draining is permitted, isolate the inlet and outlet and empty it through the intended drain rather than loosening an unfamiliar fitting. An outlet above the base can leave water behind, so do not assume that a short drain has emptied the tank. Clean sediment only by the approved method, and never climb into a tank or reach into an inaccessible vessel.
If the tank cannot be fully drained, is part of a fixed system or must retain water, get model-specific advice rather than improvising. Do not add antifreeze, salt or household chemicals unless the system instructions expressly approve them. Keep lids and screened openings fitted as directed, and leave any designed overflow able to function. When planning a tank alongside a Prestige Greenhouse, check access to the tank lid, outlet and drain before settling its position. Confirm the tank supplier’s support requirements separately, and identify a suitable route for drained water that will not create a puddle across an entrance or path. Ask the supplier or installer about any unfamiliar fixed connections.
Check rainwater inlets, outlets and overflows
For a rainwater-fed system, follow the route from the collection point to the tank and then to the pump or tap. If a gutter, downpipe, diverter or overflow is part of your installation, remove reachable leaves and debris and check that water can follow its intended route. Do not assume every greenhouse has collection equipment or that a visible downpipe drains the pump feed. Exposed connecting pipes, valves and filters need the same component-by-component treatment as irrigation lines. Use safe access for inspection; do not climb onto a roof or use an unstable ladder to reach a connection.
Mark the collection side and stored-water side separately on your sketch. A diverter or first-flush device, if fitted, may also retain water, so check its own instructions before deciding whether it stays connected. For a proposed rainwater system serving the Spacious Greenhouse, ask which collection components are actually included and obtain confirmation of compatibility for any separately chosen fittings. Record the connection sizes and accessible drain points rather than selecting parts from an image. On an existing installation, drain vulnerable feed pipes by their designed method. Identify the full route before altering a line that forms part of wider property drainage, particularly where the tank overflow and collection inlet follow different paths.
Use a separate frost plan if winter watering must continue
If irrigation must continue, do not follow a full-drain routine and then leave the system expected to run. Ask the equipment maker or a qualified irrigation installer for a frost strategy covering the source, pump, controls, exposed lines and automatic valves. Include unused branches: a working main circuit does not protect a dead-end line that still contains water. Insulation may slow heat loss, but it is not proof that still water or enclosed components cannot freeze. Any powered frost protection should be specified for the actual system by a competent person; this is not a guide to electrical installation.
Monitor conditions at vulnerable components, not only in the main growing area, and decide how you will notice a failure or loss of supply. When planning winter watering for the aluminium Classic greenhouse, assess the proposed pipe route and equipment positions rather than assuming an enclosed location will prevent freezing. Ask the irrigation supplier what operating conditions the selected components require and how those conditions will be maintained. Keep a clearly identified shut-off accessible if a pipe, fitting or controller fails. If you will be away, decide who can check the system and respond to a problem. Where monitoring or reliable protection is not possible, arrange a shutdown before freezing weather.

Store removable parts so spring set-up is clear
Once removed parts are clean and dry as directed, group them by circuit instead of putting every fitting in one box. Keep the matching filter bowl, cartridge, valve or adapter together, and label each group with its location. Note the direction of flow where the maker marks one, and keep small seals in a labelled bag with the part they belong to. Store tubing in broad loops, without crushing it under heavy items or leaving it where it can be stepped on. Protect openings from dirt, but do not wrap damp components in a sealed cover or apply lubricant unless the instructions call for it.
Record what was drained, what was removed and what could not be drained completely. Include the pump model, controller settings, tank state, the location of stored parts and any repairs still needed. Keep photographs with the system plan or manual, and make unresolved issues easy to spot before spring. A cracked fitting, damaged cable, leaking seal or unknown connection should be marked for inspection before use, not reconnected because it looks familiar. A clear record also helps distinguish a component that needs servicing from one that was deliberately left in place.
Inspect and recommission the system in spring
Before restoring water, inspect every section that was drained or stored. Look for splits, bulges, loose fittings, cracked filter bowls, damaged cables and worn seals; use replacement parts specified for the equipment. Refit removable items in their recorded positions and check the manual’s priming procedure. Do not start a pump simply to see whether it works if it may be dry or is not fully reassembled. If damage is visible, or you are unfamiliar with the system’s electrical or operating checks, arrange a qualified repair or recommissioning rather than testing a questionable connection.
Bring the system back into service in stages, following the maker’s procedure for restoring the water source and priming the pump. Where the design allows, run one circuit at a time and inspect joints, outlets and emitters as each section is used. Confirm that timers and valves operate as intended before restoring the automatic watering programme. Stop if you find a leak, unexplained loss of flow or other abnormal behaviour, and repair it before normal use. Update the system plan with any changed parts or routes, then check again after the first full watering cycle.
Frequently asked questions
Can irrigation pipes stay in place all winter?
They can stay installed if the system’s instructions allow it and vulnerable sections are properly drained or protected. Check branches, low points and fittings individually; an empty-looking main pipe does not prove the whole circuit is empty.
Does pipe insulation prevent water from freezing?
Insulation can slow heat loss, but it is not a guarantee against freezing, especially during prolonged cold. Follow the equipment instructions for the actual location, and drain exposed or unused sections where the system allows.
Should I remove the pump for winter?
That depends on its design, installation and manufacturer’s instructions. Some pumps can be drained in place; others may need particular treatment or storage. Do not dismantle a sealed unit or run a drained pump to test it.
Does a rainwater tank need to be completely empty?
Follow the tank maker’s instructions: designs differ, and some tanks cannot be drained fully through their outlet. Drain vulnerable connected pipes separately, and do not add antifreeze or household chemicals unless the system instructions expressly approve them.
Can I use compressed air to empty drip lines?
Only if the equipment maker specifically approves that method and confirms the whole circuit is suitable for it. Pressure can damage small lines or fittings. Use the system’s designed drain points and instructions instead.
Good winterisation leaves no ambiguous section that is only ‘probably empty’. You should be able to identify every part that holds water, say how it was drained or why it remains in use, and know where removable components are stored. If a pump, tank or fixed connection cannot be dealt with using its instructions, get advice specific to that equipment before frost arrives. Keep the record for spring: inspection and a controlled restart are easier when the winter shutdown was mapped clearly.
